Custom Clinical Registry Automation - Extract Any Data Element from Any Patient Cohort
Beyond standard NAACCR cancer registries, Patient Journey Intelligence supports fully custom registry configurations for any clinical use case - disease-specific cohorts, outcomes studies, quality improvement initiatives, or research programs that require data elements not covered by a standard registry template. You describe what you want to extract. The system does the work.
Prompt-Based Field Definitions - No Code, No Pipeline
Define extraction fields in plain language using prompt-based field definitions and expected result examples. No coding, no pipeline configuration.
OMOP-Based Cohort Scoping for Any Patient Population
Scope extraction to any patient population using the same OMOP-based cohort builder, conversational AI, or pre-built templates available for standard registries.
Source-Linked Provenance and Governance on Every Extracted Field
Every extracted field carries the same provenance and governance guarantees as standard registries - source document, extraction timestamp, and confidence score.
Step 1 - Scope the Patient Population Using OMOP Cohort Tools
The first step is scoping which patients to include. Custom registries use the same cohort definition tools as the Cancer Registry module - OMOP filter builder, conversational AI, or a pre-built template - so the process is identical regardless of the registry type.
Refer to the Cancer Registry - Step 1: Define the Patient Cohort for a full description of all three methods. The defined cohort is then selected when configuring the curation job in Step 3.
Step 2 - Define a Custom Extraction Ontology with Prompt-Based Field Descriptions
An ontology is the extraction schema for your custom registry - the set of fields you want to populate for each patient, described in plain language. You do not need to write code or configure extraction pipelines. You describe what each field means and provide examples of the values you expect, and the system handles the rest.
Reuse or Adapt an Existing Ontology from a Previous Project
If a relevant ontology already exists from a previous project, select it as the starting point. All field definitions and examples are editable before saving, so you can reuse, extend, or narrow an existing schema without starting from scratch.
This is the recommended path when:
- Running a new cohort against an extraction schema you have already validated
- Deriving a focused sub-registry from a broader existing ontology
- Standardizing extraction across multiple projects using a shared base schema
Build a New Ontology from Scratch Using Plain-Language Field Definitions
To build a new ontology from scratch, navigate to Patient Registry → Custom Registry and clink on Add Registry button. Specify a name for your registry and a description and then add fields one by one. For each field, you provide:
- Name - the internal identifier for the field, used in exports and API responses (e.g.,
primary_diagnosis,date_first_recurrence) - Display Name - the human-readable label shown in the UI and result views (e.g.,
Primary Diagnosis,Date of First Recurrence,ECOG Performance Status) - Category - groups the field within the ontology for navigation and reporting. Standard categories include Demographics, Clinical, Lab, Medication, and Procedure; custom categories can be defined as needed
- Data Type - the expected shape of the extracted value: free text, date, numeric, boolean, or coded value. This controls validation and export formatting
- Extraction Instruction - the plain-language prompt the AI models use at extraction time. Describe what to extract, which document types to look in, and the terminology to expect (e.g., "The patient's primary cancer diagnosis as documented in the pathology report or discharge summary. Extract the full histological description including morphology and behavior.")
- Example Values - one example per line, showing representative correct extractions. Include edge cases and, where relevant, negative examples (what the field should not capture). The more specific the examples, the more accurate the extraction
How to Write Effective Field Descriptions
The field description is the instruction the AI models use at extraction time. The more specific and example-rich it is, the more accurate the extraction. Include the terminology to expect, and at least two or three examples of valid values.
Fields can be added, reordered, and removed at any time before the ontology is published. Once published and used in a curation job, the ontology is versioned - changes create a new version rather than overwriting the existing one, preserving the extraction lineage for past jobs.
Step 3 - Create a Curation Job: Select Cohort, Ontology, and Start Automated Extraction
A curation job ties together the cohort and the ontology and runs the automated extraction. Navigate to Data Curation Studio → New Curation Job and click on the Add Automation button. This activates the curation wizzard
- Select the registry - choose the ontology created or selected in Step 2. An overview of all fields defined in the ontology is shown so you can confirm the extraction schema before proceeding.
- Select the cohort - choose the patient cohort defined in Step 1. The estimated patient count is displayed before you confirm.
- Configure the automation - set two key extraction parameters:
- Extraction level: Patient level consolidates findings across all documents for each patient into a single abstraction record; Document level produces a separate result per document, useful when you need to track how values evolve across visits or compare findings across document types
- Document ranking: enable to prioritize higher-quality or more recent documents when evidence conflicts, or disable to treat all documents with equal weight
- Name and describe the automation - provide a name and a short description that will help you identify and retrieve the results once the job completes (e.g., name:
NSCLC Outcomes 2022–2024, description:Patient-level extraction of treatment response and recurrence for EGFR-mutated NSCLC cases). This metadata is searchable in the results library. - Review and create - a summary screen shows the full configuration: registry, cohort patient count, extraction level, document ranking setting, and automation name. Confirm everything is correct, then click Create Automation. The system begins processing patient files immediately.
Verify Cohort Scope and Field List Before Starting Extraction
Review the field list and patient count on the summary screen before confirming. Extraction runs against the full cohort - changing the scope or ontology after launch requires creating a new automation job.
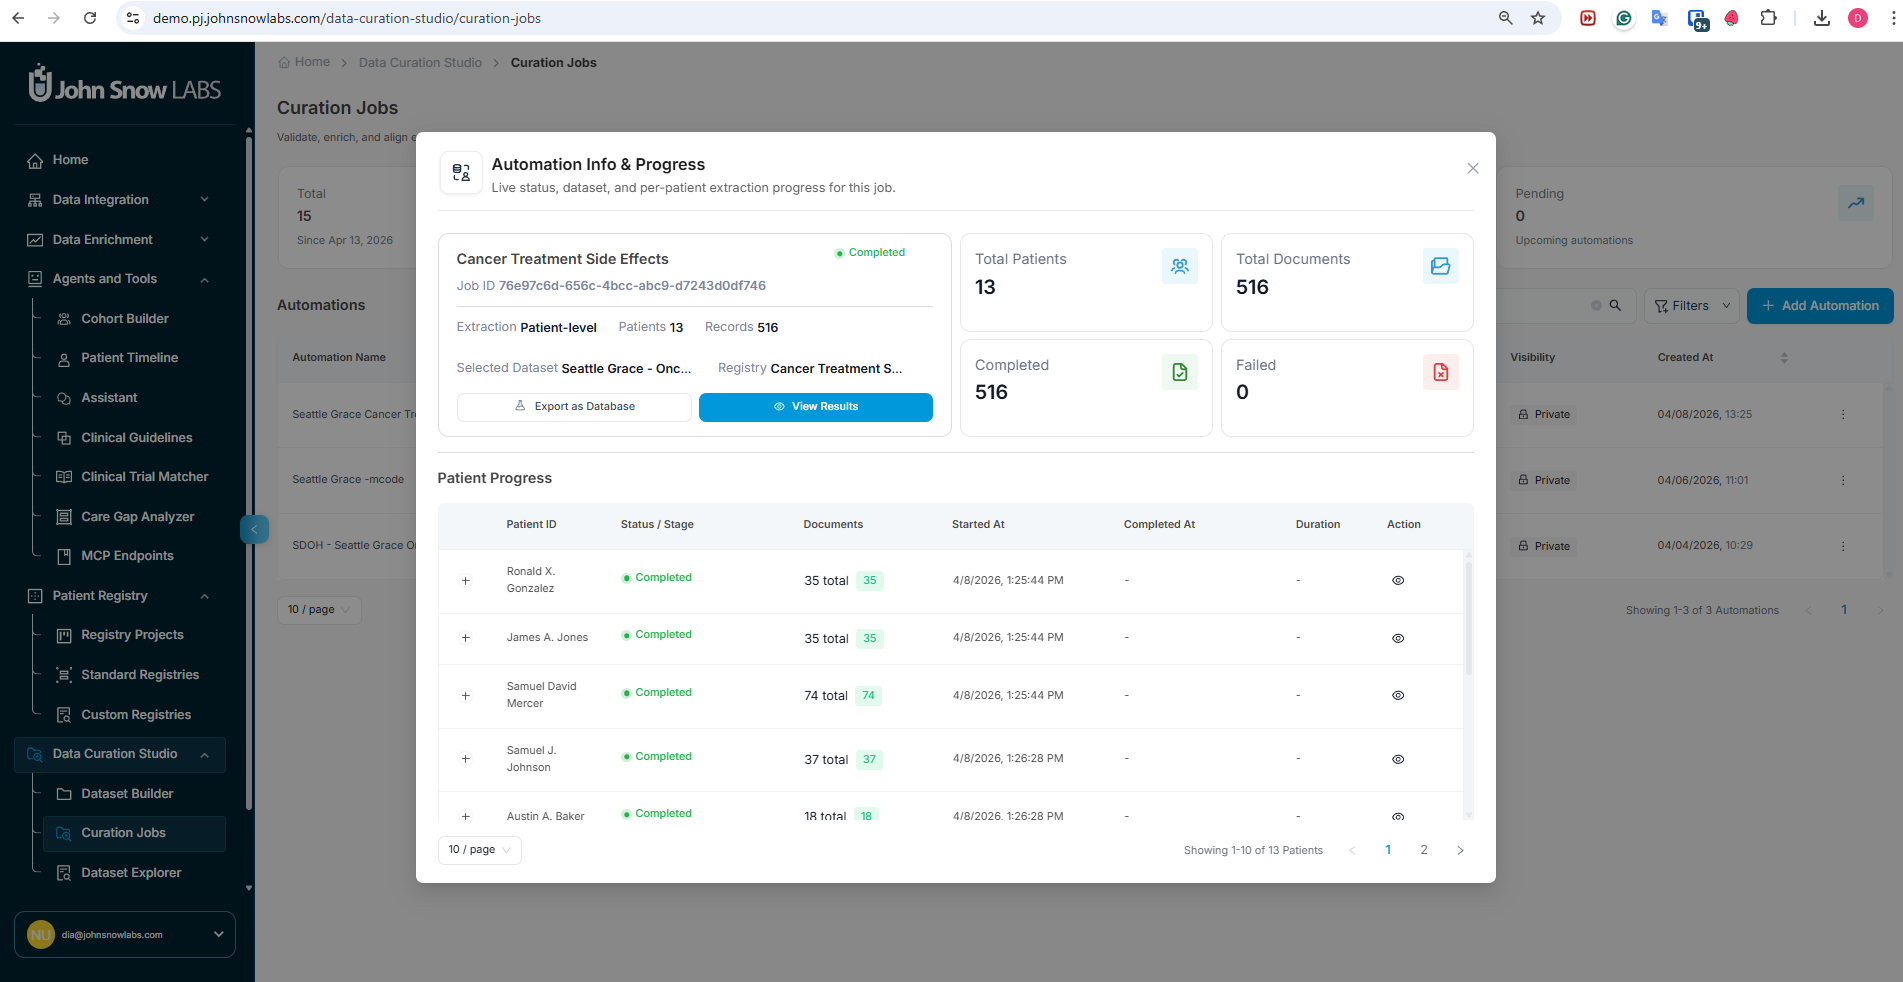
Step 4 - Monitor Extraction Progress and Review Intermediary Results in Real Time
Once a curation job is running, the job dashboard provides real-time visibility into the extraction process.
Cohort-Level and Per-Patient Extraction Progress
The dashboard shows extraction progress at two levels:
- Cohort level - overall completion percentage, number of patients processed, number pending, and any processing errors
- Patient level - per-patient status, with the ability to open any individual patient record to see which fields have been extracted and which are still pending
You can review intermediary results for patients whose extraction is already complete while the rest of the cohort is still being processed - there is no need to wait for the full job to finish before beginning a review.
Per-Patient Structured Results with Evidence and Confidence Scores
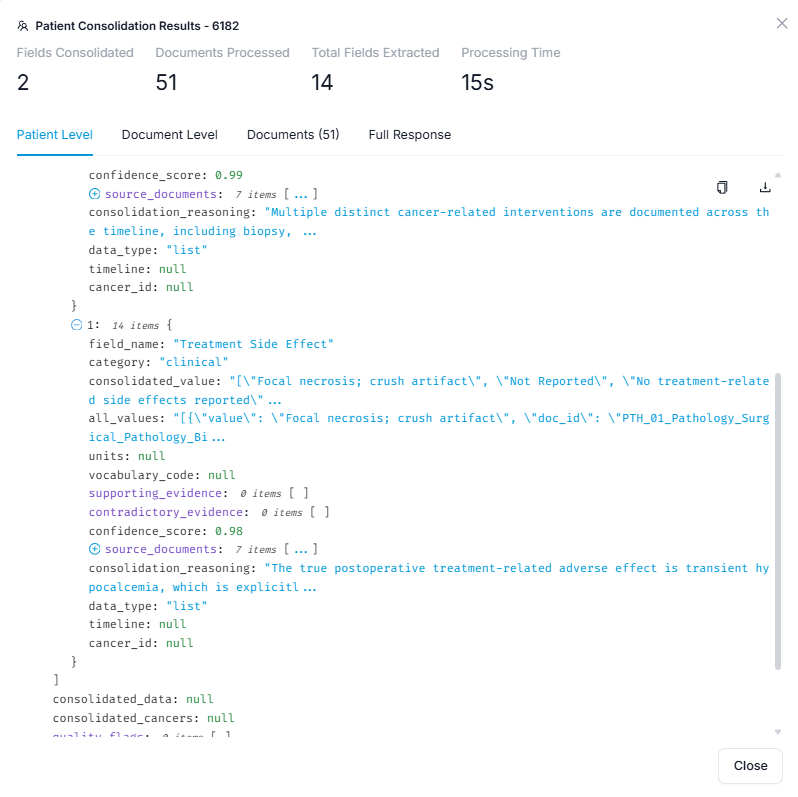
For each patient, results are presented as a structured record with one row per ontology field:
- Extracted value - the result of the extraction for that field
- Source evidence - the document and passage the value was drawn from, with the relevant text highlighted
- Confidence score - the model's certainty, giving you a quick signal of which fields to prioritize for review
At the cohort level, aggregate statistics show value distributions across fields - useful for spotting extraction anomalies, unexpected null rates, or value patterns that suggest a field definition needs refinement.
Step 5 - Export Extracted Data for Analysis, Reporting, or Integration
When extraction is complete, results can be exported for analysis, reporting, or integration with other systems.
Exporting the full cohort: Go to Curation Job → Export Curation to generate a structured file containing all extracted fields for all patients in the job.
Exporting individual patients: Individual patient records can be exported directly from the patient view.
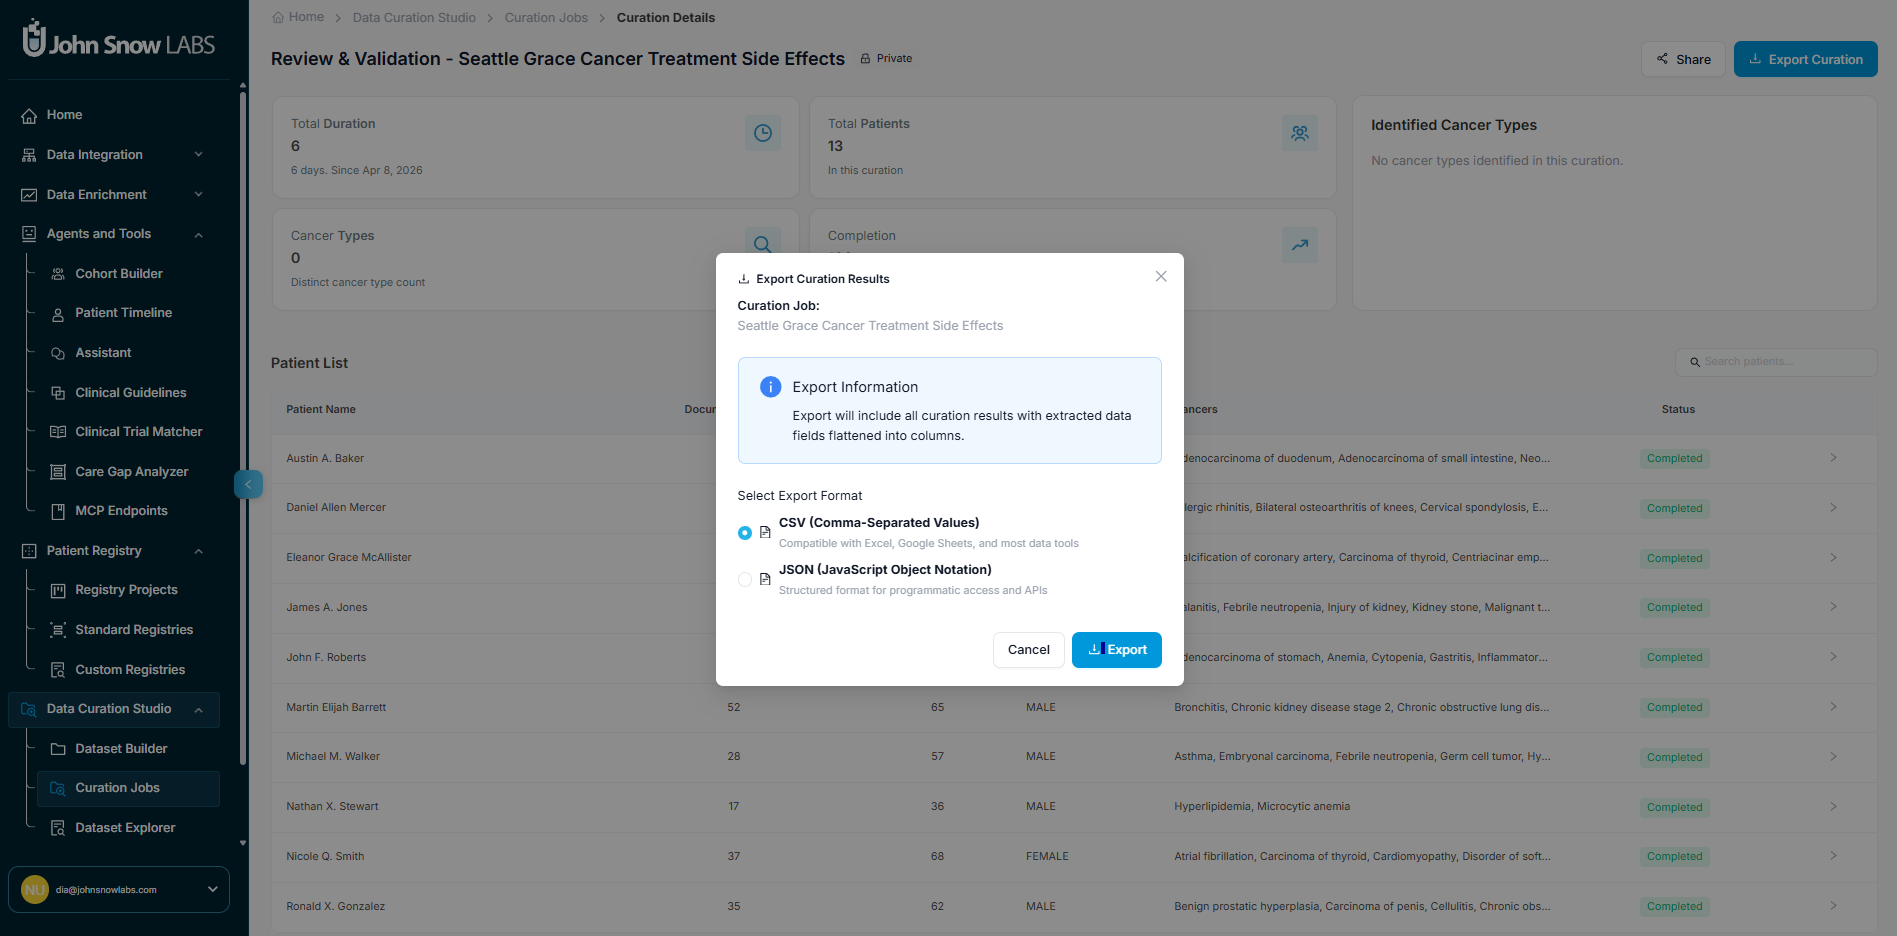
Exports are available in JSON and CSV format. Every exported record carries full provenance metadata - source document reference, extraction timestamp, and confidence score - matching the governance guarantees of standard registry exports.
Certified Expert Validation for Custom Registries - Coming Soon
Human-in-the-loop validation for Custom Registries is currently in development and will be available soon. When released, it will follow the same field-level review workflow as the Cancer Registry module - with accept/edit/flag actions, supporting and contradictory evidence display, and a complete audit trail - applied to your custom ontology fields.