Workspaces: organize and share clinical data projects
A workspace is a named group of related work in Patient Journey Intelligence. It collects the cohorts, datasets, jobs, chats, and registry projects that belong to one project into one page, and shares that page with the people who need it. Adding an item to a workspace references it where it already is, so nothing is moved or copied and the same cohort can serve three projects at once.
A typical clinical data project touches five or six modules. A care gap review starts with a cohort in Cohort Builder, runs in the Care Gap Analyzer, and draws on a dataset, an information extraction job, and a few Assistant chats along the way. Each of those is on its own module page with its own owner. Without a workspace, a colleague joining the project asks for a list of names and searches for each one. With a workspace, they open one link.
What a workspace holds
A workspace holds 11 kinds of item, grouped into five tabs on the workspace page.
| Tab | Items | Where they come from |
|---|---|---|
| Cohorts | Patient cohorts | Cohort Builder |
| Datasets | Datasets built from ingestions and cohorts | Data ingestion |
| Jobs | Data curation, information extraction, ingestion, care gap, and de-identification jobs, plus agentic search runs | Curation jobs, Information Extraction, Care Gap Analyzer, De-Identification, Agentic Search |
| Chats | Assistant chats and guideline chats | Assistant and the Clinical Guidelines page |
| Registry projects | Registry projects and their cases | Patient Registries |
Three rules apply to every item:
- Adding an item creates a reference. The item stays on its module page with its original owner, and removing it from the workspace leaves it untouched.
- One item can be in many workspaces. A cohort can be in a cardiology workspace and a quality reporting workspace at the same time.
- Each workspace belongs to one stage. It belongs to the stage you were working in when you created it, and accepts only items from that stage. A Production workspace never shows Playground work.
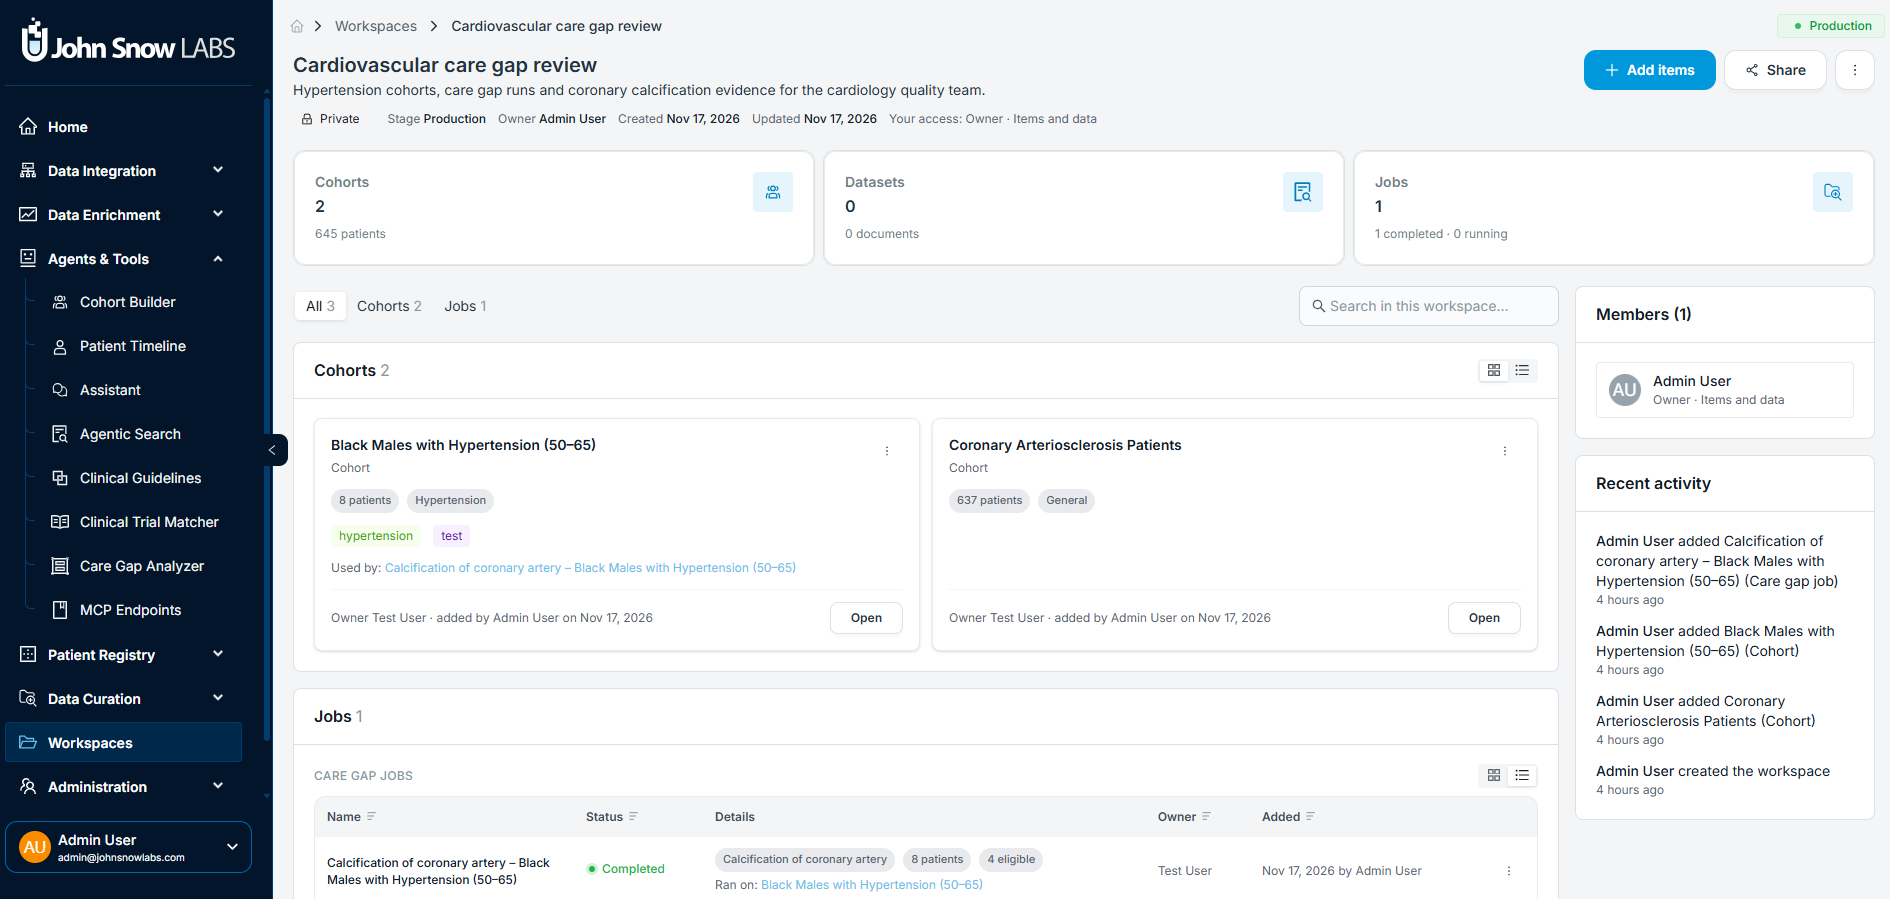
A workspace page: summary counts at the top, items grouped by type below, then members and recent activity. Screenshots on this page come from a development environment with test data.
Four ways teams use workspaces
The four scenarios below cover the common patterns. Each one turns on two choices: which role a member gets, and whether they see the data behind the items.
A care gap review for a quality committee
A cardiology quality lead builds two cohorts in Cohort Builder: Black Males with Hypertension (50–65) with 8 patients and Coronary Arteriosclerosis Patients with 637. She runs a care gap job for coronary artery calcification against the first cohort, and it finds 4 eligible patients.
She creates a workspace called Cardiovascular care gap review, adds both cohorts and the care gap job, and shares it with two physicians on the quality committee as Viewers with Items and data. The physicians open the care gap job, see the four eligible patients, and follow the link from the cohort card to the job that used it. They cannot edit the cohort or rerun the job, so the numbers they review are the numbers she produced. The cohort to care gap tutorial builds the cohort and care gap job that this workspace collects.
A registry abstraction team
A cancer registry manager runs a registry project with a team of abstractors, plus the ingestion jobs that loaded pathology and oncology notes and the information extraction jobs that pre-populated the case fields. He groups all of it in one workspace and adds two senior abstractors as Editors, so they can add the next ingestion batch or a new curation job themselves as the project grows. New abstractors join as Viewers and get one page that lists every job feeding the registry. Case assignment and abstraction still run through the registry project's own team membership; the workspace gives the team a shared map of the work around it. The registry project tutorial covers the registry side end to end.
An analytics handoff without patient-level access
A data engineering team runs ingestion and information extraction jobs for a research group. The research program manager needs to know which jobs ran, on which sources, with what status and document counts, but has no need to see patient documents.
The engineering lead adds the jobs to a workspace and shares it with the program manager as a Viewer with Items only. The program manager sees each job's name, status, pipeline, and document count. The patients and documents behind the jobs stay hidden. The lead keeps cohorts, datasets, and de-identification jobs out of this workspace, because those item types always show their patients and documents to every member (see what members see).
A stage-wide library of reference questions
A clinical informatics team collects the Assistant chats and guideline chats that answer recurring questions: patients prescribed antibiotics in the most recent six months of data, or What is the first-line treatment for advanced NSCLC. They put these chats in one workspace and make it public on the stage. Every user on that stage can open the workspace and read the chats, so a new analyst starts from a query the team has already checked. Chats open read-only for anyone who is not their owner.
Create a workspace
You need the Workspaces switch on your role, which an administrator turns on under Roles in Administration. System administrators can always create workspaces.
- Open Workspaces in the main menu.
- Select New workspace.
- Enter a name and an optional description of up to 5,000 characters.
- Select Create workspace, or press Enter in the name box.
You become the owner, and the new workspace opens ready for items. The dialog shows which stage the workspace will belong to before you create it.
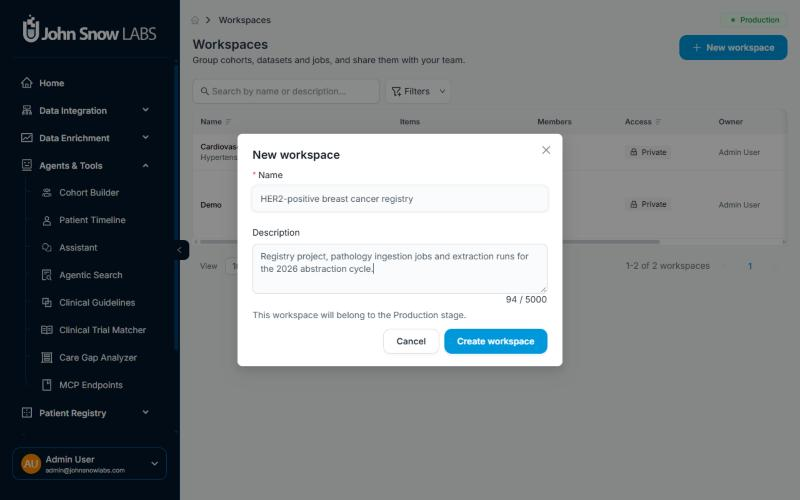
The New workspace dialog names the stage the workspace will belong to before you create it.
You can also create a workspace while adding an item: in the Add to workspace dialog, select New workspace, and the new workspace is selected for you.
Add items
Owners, editors, and system administrators can add items in two ways.
From the workspace page
Select Add items, choose a tab (Cohorts, Datasets, Jobs, Chats, or Registry projects), and tick the items you want. The Jobs tab splits into data curation, information extraction, ingestion, care gap, De-ID, and agentic search, and the Chats tab into Assistant and Guideline. The button counts your selection, for example Add 3 items, and you can pick across tabs before you confirm.
Each row shows the item's main details and status. Search, Filters, and Favorites help you find items; Load more reaches older ones. Items already in the workspace are marked Already in workspace. If the workspace is public, the dialog warns you first.
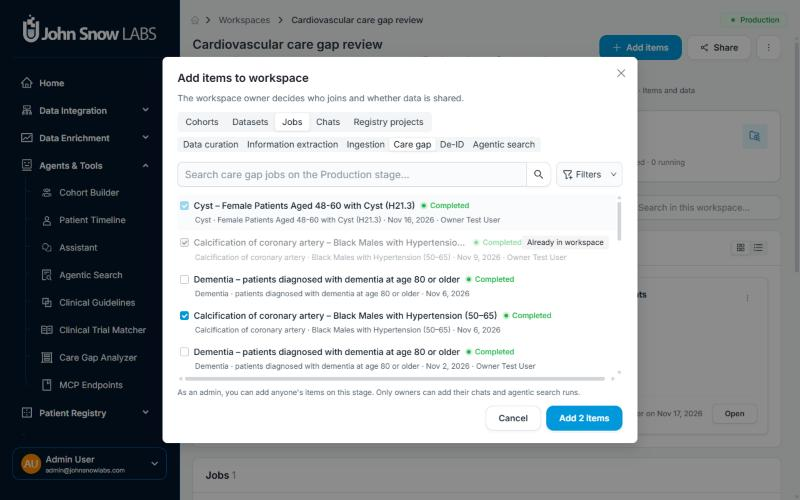
Add items lists the items you can add on the workspace's stage, grouped by type, marks items already in the workspace, and counts your selection.
From an item
Open the item's page, or find it in its list of cohorts, datasets, or jobs. Select the ⋯ menu, then Add to workspace, and choose one or more workspaces. The dialog also lists the workspaces the item is already in, under Already in.
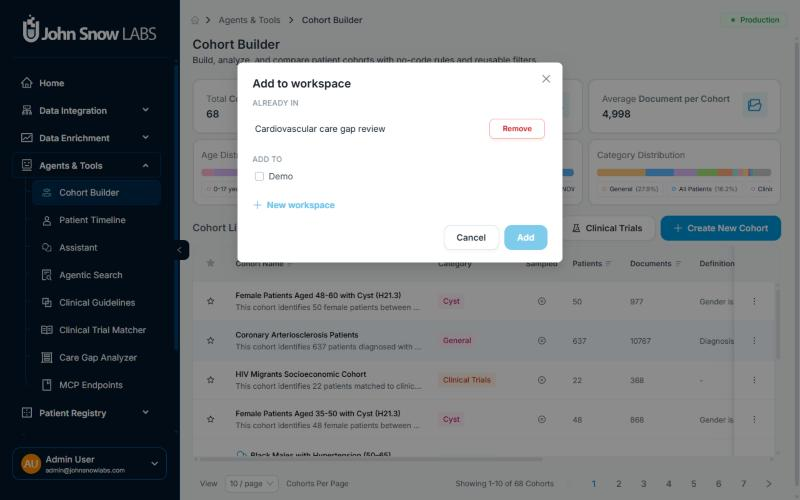
Add to workspace, opened from an item's menu, shows where the item already is and lets you add it to more workspaces or start a new one.
Who can add what
| You are | You can add |
|---|---|
| Workspace owner or editor | Items you own on the workspace's stage |
| System administrator | Anyone's items on the stage, with each item's owner shown in Add items |
| Any of the above | Chats and agentic search runs only when you own them; system administrators follow the same rule |
Share a workspace
Every member sees Share in the workspace header. Owners and system administrators can change anything in it; other members see who has access.
- Open the workspace and select Share.
- Click the search box to list people you can add, type a name or email to narrow the list, and pick one or more people.
- Choose Editor or Viewer.
- Choose Items only or Items and data.
- Select Share.
The dialog lists everyone under People with access, owner first. Changes to a person's role or data access save immediately. People must have access to the workspace's stage to be added; anyone without it shows No stage access and cannot be picked.
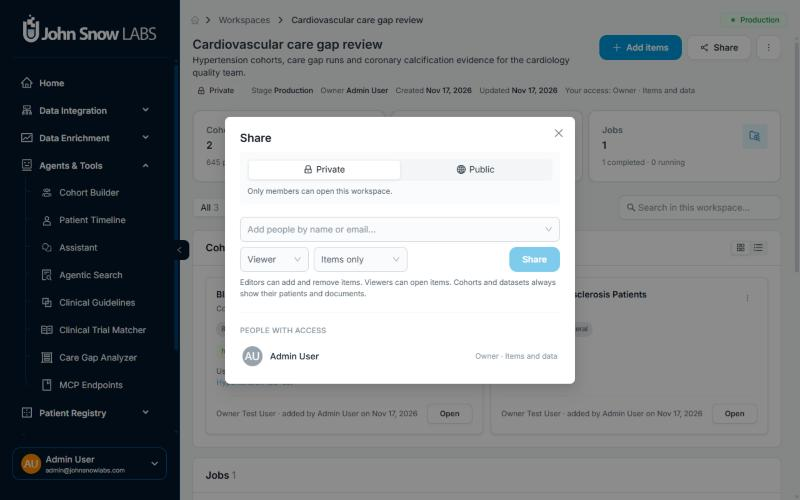
The Share dialog sets visibility, role, and data access in one place.
What each role can do
| Role | What the person can do |
|---|---|
| Owner | Everything, including managing members, sharing, and deleting the workspace |
| Editor | Add and remove items |
| Viewer | Open the items |
System administrators can do everything an owner can, even when they are not members.
Workspace access never lets anyone edit or rerun an item. Only people with edit access to the item itself, such as its owner, or a system administrator can do that. A Viewer on a care gap workspace opens the results; changing the cohort definition stays with the cohort's owner.
Choose what members see
| Choice | What the person sees |
|---|---|
| Items only | The items in the workspace |
| Items and data | The items, and the patients and documents behind jobs |
The choice applies to data curation, information extraction, ingestion, and care gap jobs, and to registry projects. Cohorts, datasets, de-identification jobs, chats, and agentic search runs always show their patients and documents to workspace members, whichever option you pick.
Plan the item mix before you choose Items only
Items only hides patient-level data for jobs and registry projects. It does not hide the patients in a cohort or the documents in a dataset. To share job metadata with someone who should not see patient data, keep cohorts, datasets, de-identification jobs, chats, and agentic search runs out of that workspace.
Make a workspace public
A public workspace can be opened by everyone on its stage.
- Open the workspace as an owner and select Share.
- At the top of the dialog, select Public.
- Read what becomes public, then select Make public.
The confirmation lists the items that become public, for example 2 cohorts and 1 job, and states that items added later become public too.
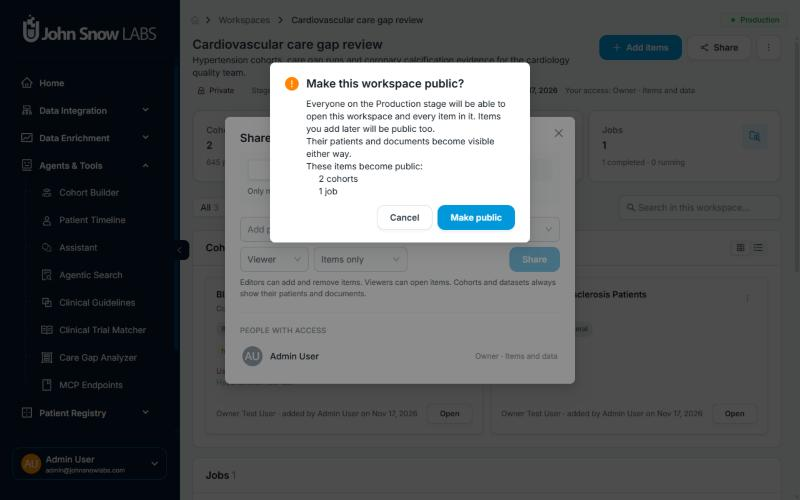
Before a workspace goes public, the confirmation lists exactly which items everyone on the stage will be able to open.
Everyone on the stage then sees Items only. To let them see the patients and documents too, choose Items and data next to the public setting and confirm. To return to private, select Private and confirm. Changing a workspace's visibility never changes how any item is shared on its own.
Remove items and members or delete a workspace
- Remove an item: select the ⋯ menu on the item card, then Remove from workspace…, and confirm with Remove. The item stays where it is.
- Remove your own item from any workspace: open Add to workspace from the item's ⋯ menu and select Remove next to the workspace under Already in. Item owners can do this at any time, including from workspaces they do not own.
- Remove a member: as an owner, open Share, find the person under People with access, select the remove icon, and confirm with Remove.
- Delete a workspace: as an owner, select ⋯ in the workspace header or on the workspace's row in the Workspaces list, then Delete, and confirm with Delete workspace. Its items are not deleted.
Item additions and visibility changes appear under Recent activity on the workspace page, with who made each change and when.
How workspaces fit with stage and role access
Workspaces add a project layer on top of the two access controls the platform already enforces. Roles decide which modules a user can open, and stages decide which environment's data they can reach. A workspace then decides which items from that stage a group of people sees together, and how much of the data behind them.
The layers stack. A member who loses access to the stage loses access to the workspace on it. A Viewer with Items and data still cannot open a stage they are not a member of. The data itself stays inside your own environment throughout, because a workspace references items in place and never copies patient data. For how Patient Journey Intelligence keeps clinical data inside your infrastructure, see the platform architecture and the Patient Journey Intelligence product page. The webinar From Raw Data to Agentic Workflows with John Snow Labs CTO Veysel Kocaman walks through the platform from ingestion to the agents whose output workspaces collect, and you can schedule a demo to see workspaces on your own data.
Frequently asked questions
No. A workspace stores a reference to the cohort, dataset, job, chat, or registry project. The item stays on its module page with its original owner, and removing it from the workspace or deleting the workspace leaves it untouched.
Yes, for data curation, information extraction, ingestion, and care gap jobs, and for registry projects. Share the workspace with Items only, and the person sees each item's name, status, and details without the patients and documents behind it. Cohorts, datasets, de-identification jobs, chats, and agentic search runs always show their data, so leave them out of that workspace.
No. Editors add and remove items in the workspace. Editing or rerunning an item needs edit access to the item itself, which its owner and system administrators have.
No. Each workspace belongs to the stage it was created in and accepts only items from that stage. Create a separate workspace on each stage if a project spans both.
The colleague needs access to the workspace's stage. People without it show No stage access in the Share dialog and cannot be picked. An administrator grants stage access on the stage detail page or in the user's Stage Access section.
You can add only items you own. Ask the cohort's owner to add it, or ask a system administrator, who can add anyone's items on the stage. Chats and agentic search runs are the exception: only their owners can add them, administrators included.
An owner removes them in the Share dialog, and the change takes effect immediately. If a member loses access to the workspace's stage, they lose access to the workspace automatically. Items they added stay in the workspace.
Users whose role has the Workspaces switch turned on, which an administrator sets in Roles, and system administrators.