Ingestion jobs: from clinical source to OMOP CDM in one automated pipeline
Getting data into the platform should not be an engineering project. In most healthcare organizations, connecting a new data source means weeks of custom ETL work, one-off parsers for each document type, and manual reconciliation when sources disagree. The result is a pipeline that works until something changes - and something always changes.
The Data Ingestion module takes a different approach. You configure where your data lives, define what you want to import, and the platform runs the full pipeline automatically: document retrieval, de-identification, NLP extraction, terminology normalization, OMOP CDM conversion, and deduplication. Every step is monitored in real time. Every decision is recorded with full provenance. The output is a continuously updated, audit-ready OMOP dataset - not a snapshot, not a one-time export.
Data Ingestion Walkthrough
This video demonstrates the interface visually without audio narration.
Two ways to bring data in
Every ingestion job starts with a choice: pull from a registered external source, or upload files directly. Both paths run through the same automated pipeline and produce the same OMOP output - the difference is just how the data arrives.
Pull from a registered source
Connect to an external system already configured in the Data Sources module - an EHR, SFTP endpoint, S3 bucket, AWS HealthLake, or HTTP plugin. Run imports on a schedule (daily, weekly, monthly) or trigger them on demand. For sources that support file browsing, you can navigate the directory structure and select exactly which files to import.
Upload files directly
Upload clinical documents from your local machine without a registered connector. Supports TXT, XML, HL7, PDF, and DICOM files. The right choice for pilot ingestions, one-off imports, or testing new document types before connecting a full source system.
Both methods use the same four-step configuration wizard. It takes minutes.
Setting up a new ingestion job
Choose your import method
Select 'Data Source' to pull from a registered external system, or 'Local Upload' to import files from your machine.
Select your source
For external sources, browse your configured connections - HTTP plugins, SFTP endpoints, AWS HealthLake, or S3 buckets - in card or table view and select the one you want to use.
Pick your files
Navigate the source's folder structure, filter by file type, search by name, and preview documents before selecting. Toggle de-identification on or off for this job.
Review and start
Confirm your import method, source, file list, and de-identification settings, then click Start Ingestion. The pipeline begins immediately.
The de-identification toggle at step 3 is worth pausing on. When enabled, PHI removal runs as the very first processing step - before NLP extraction, before any clinical facts are written anywhere. If you are creating a dataset for research, quality improvement, or any secondary use, enable it here. The de-identification pipeline supports HIPAA Safe Harbor and Expert Determination methods across text, PDF, DICOM, and images.
What happens after you click Start
Once a job launches, the platform runs seven sequential steps automatically. You can watch each one progress in real time by clicking the job to open the Job Status panel.
1. Document retrieval
Files are securely downloaded from the source system or read from the uploaded batch. Connection credentials are verified and file integrity is checked before processing begins.
2. De-identification
If enabled, PHI - names, dates, identifiers, geographic details - is removed using HIPAA-compliant methods before any other processing touches the content. The de-identified text is what flows into all downstream steps.
3. Information extraction
Healthcare NLP reads every clinical document and extracts diagnoses, medications, procedures, lab results, imaging findings, and relationships - including assertion status (present, absent, historical, hypothetical) for each entity.
4. Terminology normalization
Every extracted and structured concept is resolved to a standard vocabulary code: SNOMED CT, RxNorm, LOINC, ICD-10-CM, CPT, or one of 40+ additional vocabularies. Local institutional codes are mapped automatically.
5. OMOP conversion
Normalized clinical facts are transformed into OMOP CDM v5.4 - condition occurrences, drug exposures, procedure occurrences, measurements, observations, and note_nlp records - with standard concept IDs and full source provenance.
6. Merge and deduplication
New records are merged into the existing OMOP dataset. Duplicate entities across sources are detected and consolidated. Conflicts are resolved using the medical reasoning hierarchy: source priority, recency, confidence score, clinical logic.
7. Clinical measure recalculation
Any clinical quality metrics or registry measures that depend on the updated data are recalculated automatically, so dashboards and reports reflect the latest ingested content without a manual refresh.
For each step, the status panel shows a completion indicator, elapsed time, and processing statistics - for example, "312 documents processed, 2,140 clinical facts extracted, 847 concepts resolved". A job is only marked Completed when all seven steps finish successfully.
The diagram below shows the full pipeline architecture end to end. Input files arrive from source systems or local storage, are routed through the content extraction stages, and flow through information extraction, concept resolution, OMOP modeling, and merge/deduplication before the curated output is made available to downstream platform modules - Cohort Building, Clinical Measures, and Data Curation. Each processing stage writes intermediate results to Elastic Search, which serves as the backbone for pipeline state, provenance, and monitoring.
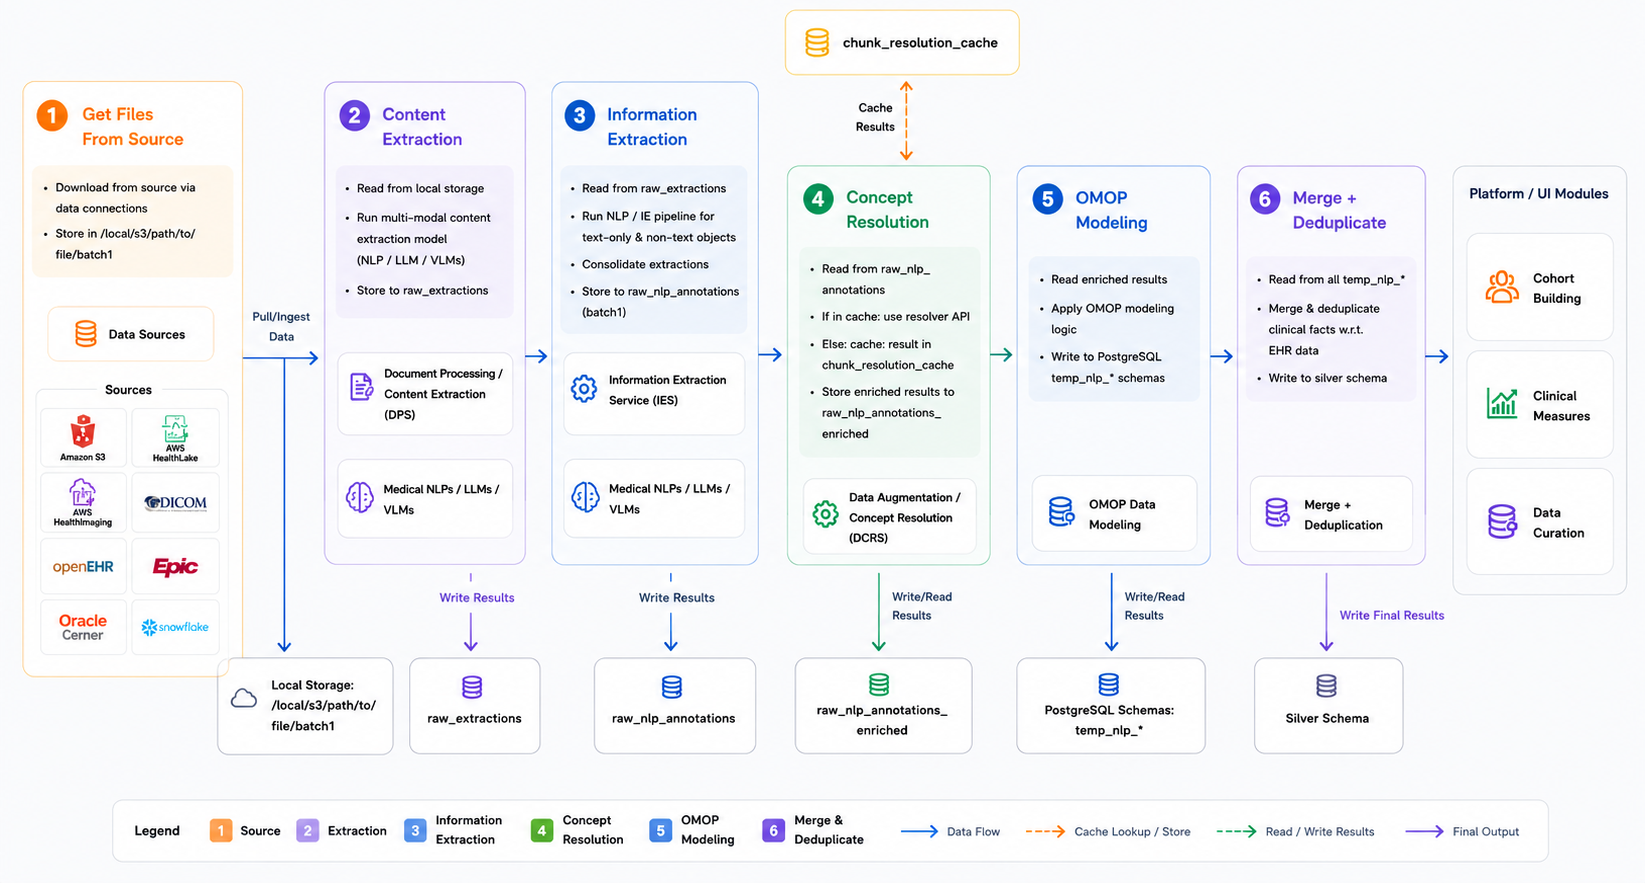
End-to-end ingestion pipeline architecture. Source systems feed into local processing storage, where content extraction, information extraction, concept resolution, OMOP modeling, and merge/deduplication are applied in sequence. Curated outputs reach downstream platform modules including Cohort Building, Clinical Measures, and Data Curation.
Step 5 — OMOP conversion — is where extracted clinical facts become a structured, queryable dataset. The pipeline reads the enriched NLP annotations produced in step 3, applies confidence and terminology filters, and maps each clinical entity to its corresponding OMOP CDM v5.4 domain: diagnoses become condition occurrences, prescriptions become drug exposures, procedures become procedure occurrences, lab results become measurements, and free-text notes are preserved as note and note_nlp records. Each record carries its standard concept ID, source value, and provenance back to the originating document. The output is written to a temporary per-source schema before step 6 merges it into the Gold OMOP dataset — ensuring that partial runs never corrupt the canonical patient data.
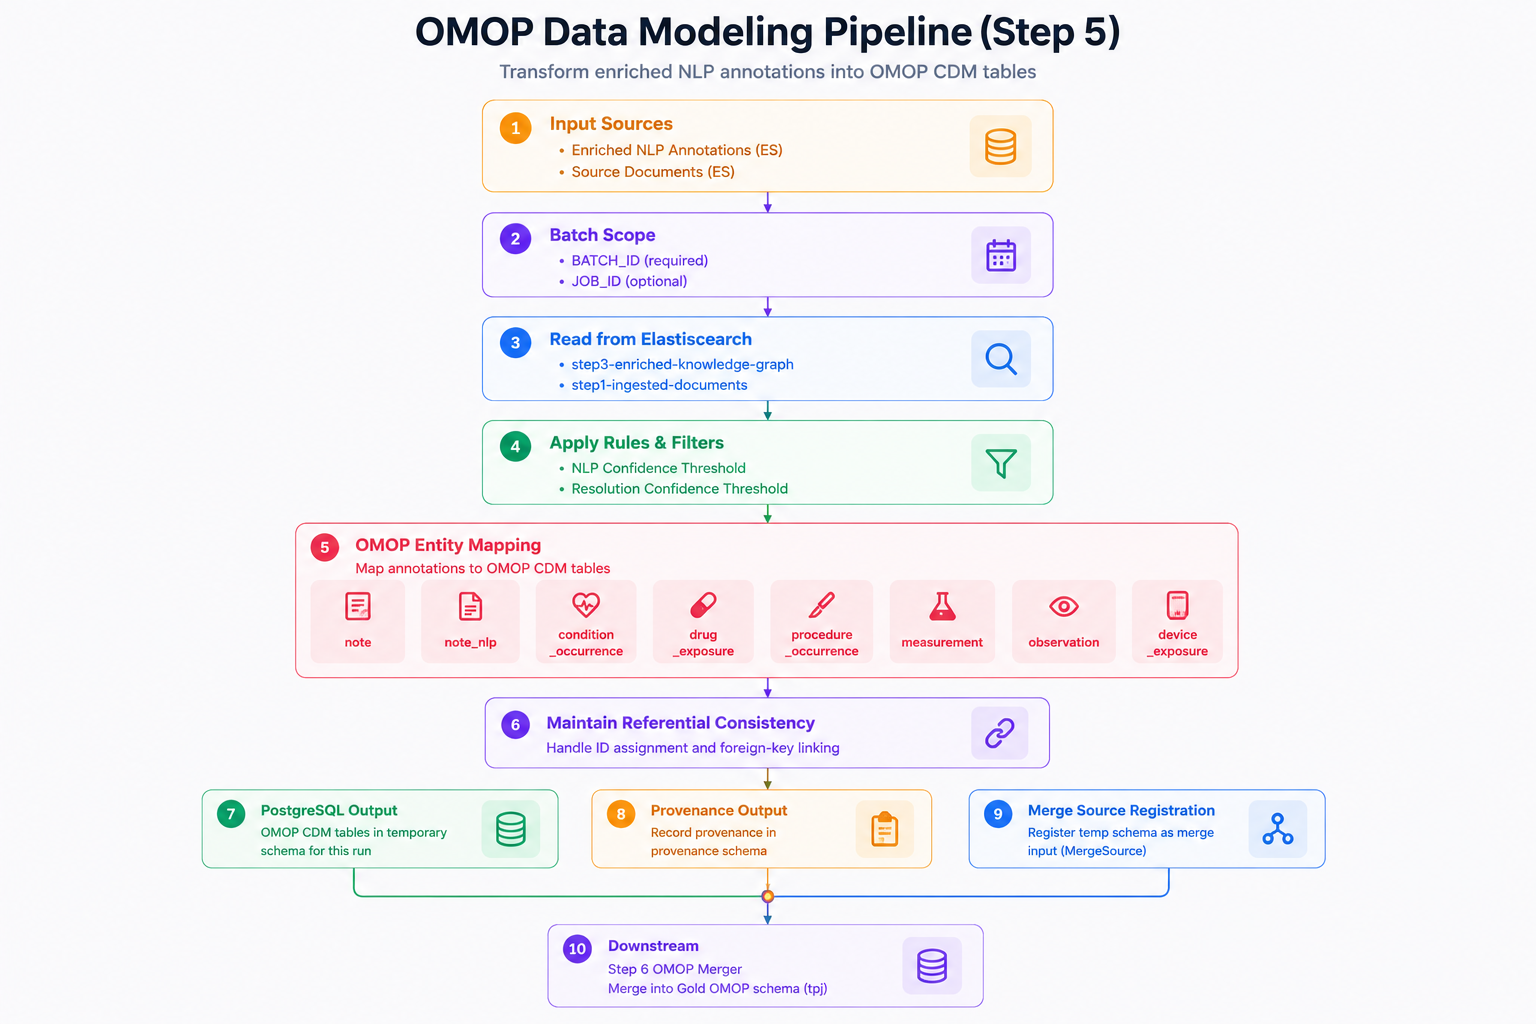
Transforming enriched annotations into OMOP CDM. This pipeline reads enriched NLP annotations and source documents, applies confidence and terminology filters, maps clinical facts into OMOP CDM domains — condition occurrence, drug exposure, procedure occurrence, measurement, observation, note, and note_nlp — and prepares temporary schemas for merge into the governed OMOP dataset.
Monitoring the dashboard
The ingestion dashboard gives you a single view of every job - scheduled and manual, running and historical. Each row shows:
| Field | What it tells you |
|---|---|
| Job ID | Unique tracking number for this import |
| Source Name | Where the data came from ("Main EHR", "Manual Upload") |
| Source Type | Connection method: S3, SFTP, HealthLake, HTTP Plugin, Local Upload |
| Created At / By | When the job started and who initiated it |
| Documents Processed | How many files were imported |
| Schedule Type | None (manual), Daily, Weekly, or Monthly |
| Pipeline Duration | Total elapsed time from start to finish |
| Status | In Progress, Completed, or Failed |
| Progress Bar | Visual indicator showing how far along the job is in its current step |
At a glance you can see what is running, what succeeded, and what needs attention - without drilling into individual jobs.
Scheduled ingestion: keeping your dataset current
A one-time import gives you a snapshot. A scheduled import gives you a living dataset. For any registered data source, you can configure an automatic schedule - daily, weekly, or monthly - and the platform will run the full ingestion pipeline at the specified interval without any manual action.
Scheduled jobs appear on the dashboard with three additional fields:
- Frequency: How often they run (Daily, Weekly, Monthly)
- Next Execution: When the next automatic import will start
- Last Execution: When the most recent import completed
Combined with step 7 (clinical measure recalculation), this means your OMOP dataset, quality metrics, and registry measures are all kept current automatically as new clinical data arrives at the source.
When a job fails: logs and recovery
Not every job completes on the first attempt. Connection timeouts, unsupported file formats, and NLP edge cases can all cause individual steps to fail. The Logs tab on any job surfaces exactly what went wrong:
What the logs capture:
- Connection problems: authentication failures, network timeouts, credential expiry
- File format issues: unsupported types, corrupted files, encoding problems
- NLP extraction errors: documents that could not be parsed or exceeded processing limits
- Pipeline failures: which stage failed, the error message, and the affected record count
- Document-level warnings: individual files with issues that did not stop the overall job
Once you have identified and resolved the underlying issue - correcting a credential, removing a corrupted file, adjusting a configuration - you have two controls available on any active or failed job:
- Re-run Job: Restarts the same import with identical settings. Use this after fixing the underlying issue - the job runs from scratch with the same source, file selection, and de-identification configuration.
- Stop Job: Immediately cancels a running job. Use this if you notice a configuration mistake mid-run. No partial output is written to the OMOP dataset.
These controls give you full operational flexibility to recover from errors or iterate on your import configuration without creating a new job from scratch.
What the module enables
Manual and scheduled imports
Import data on demand or configure automatic schedules - daily, weekly, or monthly - for any registered source. Both run through the same full pipeline.
End-to-end processing
Every document passes through de-identification, NLP extraction, terminology normalization, OMOP conversion, and deduplication automatically, without custom engineering per source.
File preview before import
Browse the source directory, filter by file type, and preview individual documents before committing to an import - so you import exactly what you intend.
Real-time pipeline monitoring
Watch every step of every job as it runs, with per-step status, elapsed time, and processing statistics. No black-box processing.
Detailed logs for troubleshooting
Every connection failure, format error, and extraction issue is logged at the document level, giving you the information you need to diagnose and fix problems quickly.
Full operational control
Re-run failed jobs with one click, stop running jobs immediately, and maintain complete visibility into how and when data entered your system.
Best practices for production ingestion
Start with a pilot before scaling. Import 100–1,000 documents from a single source, review the extraction results in the Database Explorer, check that terminology mappings look correct for your institution's coding patterns, and validate that the OMOP output structure matches your expectations. Fixing mapping issues at this stage costs minutes; fixing them after millions of documents have been processed costs significantly more.
Enable de-identification by default for any job feeding a research or secondary-use dataset. It is easier to enable it consistently than to audit later which jobs ran with it on and which did not. The de-identified and identified OMOP datasets are kept synchronized automatically - turning de-identification on does not create a separate pipeline or additional overhead.
For production sources, use scheduled ingestion rather than manual jobs. Manual jobs depend on someone remembering to run them. Scheduled jobs run whether or not anyone is watching, and the dashboard makes it obvious when a scheduled job has not run on time.
Review logs on first-time imports actively. The most common issues - local code mappings that the terminology server does not recognize, document formats that need a parser configuration, PHI patterns specific to your institution - surface in the first few hundred documents. Catching them early keeps the dataset clean from the start.
For local uploads: TXT, XML, HL7, PDF, and DICOM. For registered sources: SFTP endpoints, Amazon S3 buckets, AWS HealthLake, HTTP plugins, and FHIR endpoints. Structured EHR data arrives via HL7 v2 feeds and FHIR R4/STU3. Additional formats can be configured based on your Patient Journey Intelligence instance.
Before. De-identification is step 2 in the pipeline, immediately after document retrieval. NLP extraction is step 3. This means PHI is removed from the content before any clinical facts are extracted or written to storage. All downstream steps - terminology mapping, OMOP conversion, deduplication - operate on de-identified text when de-identification is enabled.
Yes. The de-identification toggle is configured per job, not per source. You can run a de-identified job for your research export pipeline and an identified job for your operational OMOP dataset from the same source. Both outputs are maintained as synchronized datasets.
The job is marked Failed and the Logs tab shows which step failed and why. No partial output is written to the OMOP dataset - the pipeline is atomic at the job level. Once you resolve the underlying issue, use Re-run Job to restart with the same settings. Completed steps are not re-executed; the job resumes from the failed step.
Scheduled jobs can run daily, weekly, or monthly. For higher-frequency requirements - near-real-time ingestion from active EHR feeds - contact your John Snow Labs implementation team about event-driven ingestion configurations.
Use the Database Explorer to query the OMOP concept tables after a pilot ingestion. Check that local codes map to the expected standard concept IDs, and review any records where concept_id is 0 (unmapped). The Medical Terminology Server logs resolution statistics per job, which you can also review in the Logs tab.