Data Sources: connecting clinical systems to Patient Journey Intelligence
Every clinical insight in Patient Journey Intelligence starts with a registered data source. Before the platform can extract entities from a clinical note, normalize a diagnosis to SNOMED CT, or build a longitudinal patient timeline, it needs a secure, validated connection to the system that holds the raw data. The Data Sources module is where those connections are created, configured, monitored, and governed.
Think of it as the front door to your ingestion pipeline. Any external system - an EHR, an Amazon S3 or Google Cloud Storage bucket, an AWS HealthLake instance, a DICOMweb imaging server, a Snowflake warehouse, an existing OMOP CDM database, an SFTP endpoint - enters the platform through a registered source. Everything downstream: NLP extraction, OMOP conversion, medical terminology normalization, deduplication, and enrichment, depends on the connections defined here.
Data Sources: registering and managing clinical data connections
This video demonstrates the interface visually without audio narration.
This video demonstrates the interface visually without audio narration.
What the Data Sources module manages
The module gives you a single, governed place to handle every aspect of an external data connection, from initial setup to ongoing monitoring:
Secure connections
Connect to EHR platforms, cloud storage (Amazon S3, Google Cloud Storage), FHIR services, DICOMweb and DICOM imaging systems, Snowflake warehouses, OMOP CDM databases, RESTful APIs, and SFTP endpoints. All credential inputs are encrypted, masked, and stored in compliance with enterprise security and healthcare regulatory requirements.
Credential lifecycle
Manage access credentials end to end - from initial configuration through secure key rotation. Existing credentials stay hidden by default during edits; new keys can be entered to replace them without disrupting active ingestion jobs.
Configurable scheduling
Assign automated ingestion schedules during source setup: none (manual trigger), daily, weekly, or monthly. Scheduled jobs are automatically queued in the ingestion pipeline for consistent, unattended data refresh cycles.
Connection health monitoring
Track the last successful connection timestamp, view active or failed status indicators, and access diagnostic error logs. Real-time visibility lets administrators detect and resolve pipeline disruptions before they affect downstream processing.
Non-disruptive edits
Update source names, connection parameters, credentials, or schedules at any time. Source type is locked after creation to preserve schema compatibility, but all other fields remain editable without affecting previously ingested data.
Unified connector registry
A searchable, sortable inventory of every active and retired connector. Audit metadata - created by, created timestamp, last modified, last successful connection - is surfaced for every entry, supporting governance and compliance reviews.
How data flows from source to pipeline
Once a source is registered, data moves through a defined sequence before it reaches the extraction and modeling stages. The diagram below shows the full flow - from the moment an external system is registered, through scanning and download, to local processing storage where the ingestion pipeline picks it up.
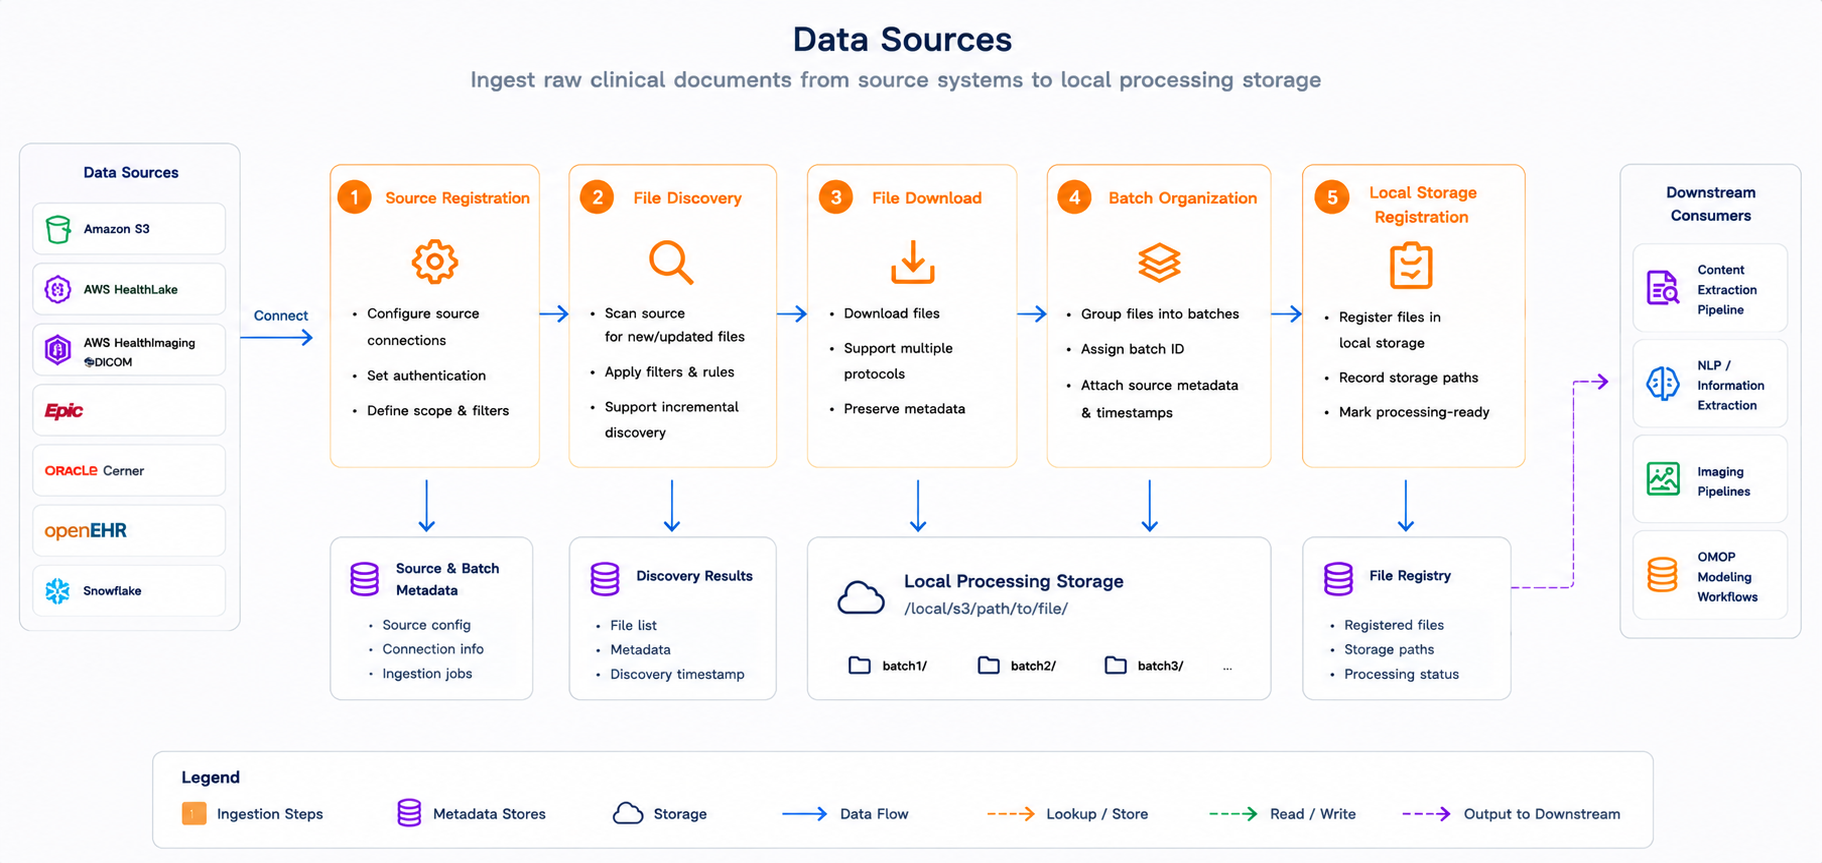
From source registration to processing-ready files. External clinical systems - object storage, EHR and FHIR services, imaging servers, and data warehouses - are registered, scanned, downloaded, organized into batches, and staged in local processing storage for downstream extraction and modeling.
The connector registry
The main interface presents a searchable, sortable table of all data connectors - both active and historical. Each row surfaces the metadata you need to assess integration health at a glance:
| Field | Description |
|---|---|
| Source identifier | Descriptive label for the connection |
| Connector type | Amazon S3, Google Cloud Storage, SFTP, EHR, AWS HealthLake, AWS HealthImaging, DICOMweb, Snowflake, OMOP CDM, HTTP Plugin |
| Created by / timestamp | Audit trail for the origin of the configuration |
| Last modified | Most recent update to parameters or schedule |
| Last successful connection | Confirms ingestion recency |
| Status | Active, Completed, or Failed |
| Ingestion schedule | None, Daily, Weekly, or Monthly |
| Actions | Edit, Delete |
Supported connectors
A connector is the typed integration between Patient Journey Intelligence and one external system. Each type renders its own configuration fields in the source creation wizard and applies its own validation rules. The connectors below are available today, grouped by the kind of clinical data they bring in.
File and object storage
- Amazon S3 - file-based ingestion of clinical documents from an S3 bucket.
- Google Cloud Storage - file-based ingestion from a Google Cloud Storage bucket. Configuration requires a GCP cloud credential, bucket name, and project ID. An optional prefix restricts ingestion to a single path inside the bucket, so one connector can target a department folder rather than the whole bucket.
- SFTP - secure file transfer from an SFTP endpoint, configured with host details and secure paths.
Electronic health records and clinical APIs
- EHR - connection to an electronic health record data source. Endpoint and authentication settings are connector-specific and configured during source creation.
- AWS HealthLake - FHIR-native structured data from an AWS HealthLake datastore.
- HTTP Plugin - integration with RESTful endpoints, configured with HTTP methods, headers, and payload schemas.
Medical imaging
- AWS HealthImaging - DICOM image object retrieval from an AWS HealthImaging datastore.
- DICOMweb - connection to any DICOMweb-compatible medical imaging server. Configuration requires the server base URL and an authentication method. Four authentication options are supported: no authentication, basic authentication, bearer token, and OAuth 2.0.
Data warehouses and standardized clinical data
- Snowflake - connection to a Snowflake data warehouse. Configuration requires the Snowflake account, warehouse, database, schema, username, and password. Role, stage name, and filename are optional.
- OMOP CDM - direct connection to an existing OMOP Common Data Model database, with no file export step in between. Configuration requires the database host, port, database name, schema, username, and password. You can select specific OMOP tables such as
person,visit_occurrence, andcondition_occurrence; leaving the table list empty imports every available table.
Connectors in development
Three connector types appear in the source type list but are not yet available for operational use. They are visible so you can plan integration work against them. Until backend support ships, they will not complete a connection test.
| Connector | Planned capability |
|---|---|
| Epic | Native integration with Epic EHR systems |
| Databricks Unity Catalog | Access to files stored in Unity Catalog volumes, configured with a Databricks credential and a Unity Catalog volume path |
| Databricks Delta CDM | Access to OMOP CDM tables held in Databricks Delta Lake through a Databricks SQL warehouse, configured with a Databricks credential, SQL warehouse HTTP path, catalog, schema, and optional table selection |
Creating a new data source
Selecting Add Source launches a guided three-step wizard that walks through everything needed to bring a new clinical system into the platform.
Step 1: Source metadata and type selection
Define a unique name and choose the appropriate integration type. Patient Journey Intelligence supports a broad range of connectors, each with a contextual description to guide selection:
- Amazon S3 and Google Cloud Storage - file-based document ingestion
- SFTP - secure file transfer protocol
- EHR - electronic health record data sources
- AWS HealthLake - FHIR-native structured data
- AWS HealthImaging and DICOMweb - DICOM image object retrieval
- Snowflake - data warehouse tables
- OMOP CDM - direct connection to an existing OMOP Common Data Model database
- HTTP Plugin - integration with RESTful endpoints
- Epic, Databricks Unity Catalog, and Databricks Delta CDM - visible in the list, still in development
See Supported connectors for the configuration each type requires.
Step 2: Parameter configuration
Connector-specific fields are dynamically rendered based on the selected source type. Typical configuration parameters include:
- Bucket or datastore identifiers
- Endpoint URLs
- Geographic region (for cloud-based systems)
- Access credentials and authentication tokens
- HTTP methods, headers, and payload schemas
- SFTP host details and secure paths
Advanced network options - private VPC routing, static IP allowlisting - are also supported. All credential inputs are fully encrypted, masked, and stored in compliance with enterprise security and healthcare regulatory frameworks.
Step 3: Review and confirmation
The final screen displays a comprehensive summary of the proposed configuration, including:
- Source metadata
- Connection parameters
- Selected ingestion schedule
Selecting Create Source finalizes the integration, making the connector immediately available to the Data Ingestion module.
Modifying an existing source
Clicking the Edit icon on any connector reopens the full configuration interface. Source name, connection parameters, credentials, and schedule are all editable. Source type is locked after creation to preserve schema compatibility with previously ingested data.
Credential rotation
When editing a source, existing credentials are hidden by default. Leave the credential fields blank to keep the current keys, or enter new credentials to perform a secure key rotation. This approach keeps keys out of the UI after initial setup while still allowing rotation without deleting and recreating the source.
Administrative controls
Each connector entry supports two administrative actions, both role-restricted by the platform's access control layer:
- Edit - modify integration parameters, schedules, or credentials at any time
- Delete - remove the connector from active use; all previously ingested data is retained
Scheduling options
Ingestion schedules are set during source creation and can be updated at any time:
| Schedule | Behavior |
|---|---|
| None | Ingestion is triggered manually from the UI or via API |
| Daily | Executes once per 24-hour cycle |
| Weekly | Executes on specific days of the week |
| Monthly | Executes on designated calendar dates |
Scheduled jobs are automatically queued in the ingestion pipeline - no additional configuration is needed in the Data Ingestion module after a schedule is set.
Connection monitoring
Built-in observability surfaces three signals for every registered source:
- Last visit timestamp - confirms the most recent successful connection
- Status indicators - visual feedback for Active, Completed, or Failed states
- Historical execution status and latency diagnostics - review past run outcomes and connection latency to identify degraded or intermittent sources
- Error logs - diagnostic output to identify and resolve connection failures
These signals give administrators the visibility needed to catch ingestion disruptions early, before gaps in source data affect the downstream OMOP datasets or NLP enrichment pipeline.
What registered sources power downstream
Once a source is registered and active, it feeds directly into Patient Journey Intelligence's downstream processing framework. Every ingestion job that runs against it drives the full pipeline: NLP extraction from unstructured notes, OMOP conversion of structured and semi-structured data, terminology normalization across 40+ standard vocabularies, patient-level deduplication, and clinical reasoning and enrichment.
The Data Sources module supports this across all three clinical data modalities: structured data (FHIR resources, EHR extracts, Snowflake tables, and records imported directly from an existing OMOP CDM database), unstructured data (clinical notes, scanned documents), and imaging metadata (DICOM and DICOMweb). That breadth - combined with encrypted credential management, role-based access controls, and a full audit trail for every connection - makes it the governance anchor for the entire data supply chain feeding the platform.
FAQ
Patient Journey Intelligence supports ten connector types today: Amazon S3 and Google Cloud Storage for file-based ingestion, SFTP for secure file transfer, EHR for electronic health record sources, AWS HealthLake for FHIR-native data, AWS HealthImaging and DICOMweb for medical imaging, Snowflake for data warehouse tables, OMOP CDM for a direct connection to an existing OMOP database, and HTTP Plugin for RESTful APIs. Epic, Databricks Unity Catalog, and Databricks Delta CDM appear in the source type list but are still in development. Each connector type is configured through a guided wizard with contextual field descriptions.
All credential inputs are encrypted, masked, and stored in compliance with enterprise security and healthcare regulatory requirements. During edits, existing credentials are hidden by default - you can leave fields blank to keep current keys or enter new values to perform a secure key rotation.
Yes. Deleting a connector removes it from the active registry and stops future ingestion jobs, but all previously ingested data is retained in the platform. This allows you to decommission a connection while preserving the clinical data already processed through it.
No. Source type is locked after creation to preserve schema compatibility with ingested data. All other fields - name, connection parameters, credentials, and ingestion schedule - can be updated at any time without affecting previously ingested records.
Ingestion schedules (daily, weekly, monthly) are set during source creation or editing, and jobs are automatically queued in the ingestion pipeline on the configured cadence. If a job fails, the status indicator updates to Failed and error logs are surfaced in the monitoring view so the issue can be diagnosed and the job manually retriggered.
The Data Sources module is the entry point for all external data. Once a source is registered and a connection is validated, the Data Ingestion module handles the actual extraction, transformation, and loading of data through the full pipeline: NLP extraction, OMOP conversion, terminology normalization, deduplication, and enrichment. No ingestion job can run without a registered, active data source.
Ten connectors are available for operational use: Amazon S3, Google Cloud Storage, SFTP, EHR, AWS HealthLake, AWS HealthImaging, DICOMweb, Snowflake, OMOP CDM, and HTTP Plugin. Three more - Epic, Databricks Unity Catalog, and Databricks Delta CDM - are visible in the source type list but are not yet available, and will not complete a connection test until backend support ships. Plan integration work against the available list.
Use the OMOP CDM connector. It connects directly to your OMOP Common Data Model database, so there is no file export step in between. Configuration requires the database host, port, database name, schema, username, and password. You can select specific OMOP tables such as person, visit_occurrence, and condition_occurrence, or leave the table list empty to import every available table.
The DICOMweb connector works with any DICOMweb-compatible medical imaging server and supports four authentication methods: no authentication, basic authentication, bearer token, and OAuth 2.0. Configuration requires the server base URL and the chosen authentication method.
The Snowflake connector requires the Snowflake account, warehouse, database, schema, username, and password. Role, stage name, and filename are optional. Credentials are encrypted and masked in the same way as every other connector type, and can be rotated later without deleting the source.
Yes. The Google Cloud Storage connector accepts an optional prefix alongside the GCP cloud credential, bucket name, and project ID. Setting a prefix restricts ingestion to a single path inside the bucket, so one connector can target a department folder rather than the entire bucket.
Related tutorials
Walkthroughs that start by registering a source, in the Patient Journey Intelligence cookbook: