Ingest FHIR R4 into OMOP CDM, with or without NLP enrichment
Patient Journey Intelligence converts a FHIR R4 bundle into OMOP CDM records in a single ingestion job. Conditions, medications, observations, procedures, encounters, and visits map straight into OMOP domains. Clinical notes carried in the same bundle are either stored as plain text or run through de-identification, entity extraction, and terminology normalization before being merged with the structured facts.
Step-by-step: FHIR data ingestion into OMOP CDM
End-to-end walkthrough: uploading a FHIR bundle, configuring an ingestion pipeline, and validating OMOP output - with and without NLP enrichment.
Who this is for
Health IT architects and integration engineers at health systems, digital health companies, and EHR vendors who already have FHIR R4 access and need an OMOP research database from it. Also analytics teams standing up an environment for evaluation before committing to a full deployment.
Why it matters
An analytics team that wants to run OHDSI cohort definitions and standard analytics packages usually faces an ETL project first: vocabulary mapping, domain assignment, era construction, validation. That project is measured in months of engineering time, and it gets rebuilt whenever the source changes.
When the FHIR bundle already carries coded Conditions, MedicationRequests, Observations, Procedures, and Encounters, none of that content needs a language model. It needs mapping. When the same bundle also carries note text holding facts the coded resources never captured, one ingestion job can extract those facts rather than leave them behind.
What you gain
The shortest path from FHIR to a queryable OMOP patient timeline, and one pipeline configuration that covers both the coded and the narrative content of the same bundle. Skipping NLP removes the compute cost and the review burden that document processing carries, which matters when you are standing up an environment for evaluation or moving a large structured backlog.
Which path should you take?
Both paths run from the same ingestion job. The pipeline you select in step 5 decides which one you get.
| Your situation | Path | What the job does |
|---|---|---|
| The bundle already carries the coded facts you need | Direct | Maps FHIR clinical facts into OMOP domains. Selected notes are stored as plain text with no further processing. |
| The bundle carries note text holding facts the coded resources do not | NLP-enriched | De-identifies the selected notes, extracts clinical entities, normalizes them to SNOMED CT, RxNorm, and ICD-10, then merges those facts with the structured records. |
Most production deployments use both over time: the direct path for the structured backlog, the NLP-enriched path for the note corpus.
Before you start
- A valid FHIR R4 source containing clinical resources: Conditions, Medications, Observations, Procedures, Encounters, Visits
- Patient identifiers and encounter references that resolve consistently across resources. Broken references are the main cause of orphaned records after mapping
- A decision about which OMOP domains you need in this pass
- For the NLP-enriched path, the de-identification profile you want applied to note text
Step 1: Prepare the FHIR source
- Confirm that the source contains valid FHIR R4 resources.
- Review the available resource types, such as Conditions, Medications, Observations, Procedures, Encounters, and Visits.
- Decide whether Patient resources should be imported for demographics.
- Validate that patient identifiers and encounter references link consistently across resources.
Step 2: Start a new ingestion job
Open Data Ingestion in the left menu. Go to Ingestion Jobs and create a new ingestion job.
Choose the ingestion source. Local Upload takes the JSON file or archive containing your FHIR content. For bulk exports and scheduled refreshes, select a FHIR source already registered in Data Sources instead.
After upload, the platform lists the documents in the import package so you can inspect and preview the FHIR resources in the bundle before proceeding.
Step 3: Select the clinical notes to ingest
The platform shows the clinical notes available in the uploaded bundle. Preview each note before deciding whether to include it. Only the notes you select are loaded into the OMOP note table, and notes you exclude are not stored. This lets you ingest the structured FHIR facts from the full bundle while loading only the relevant unstructured text.
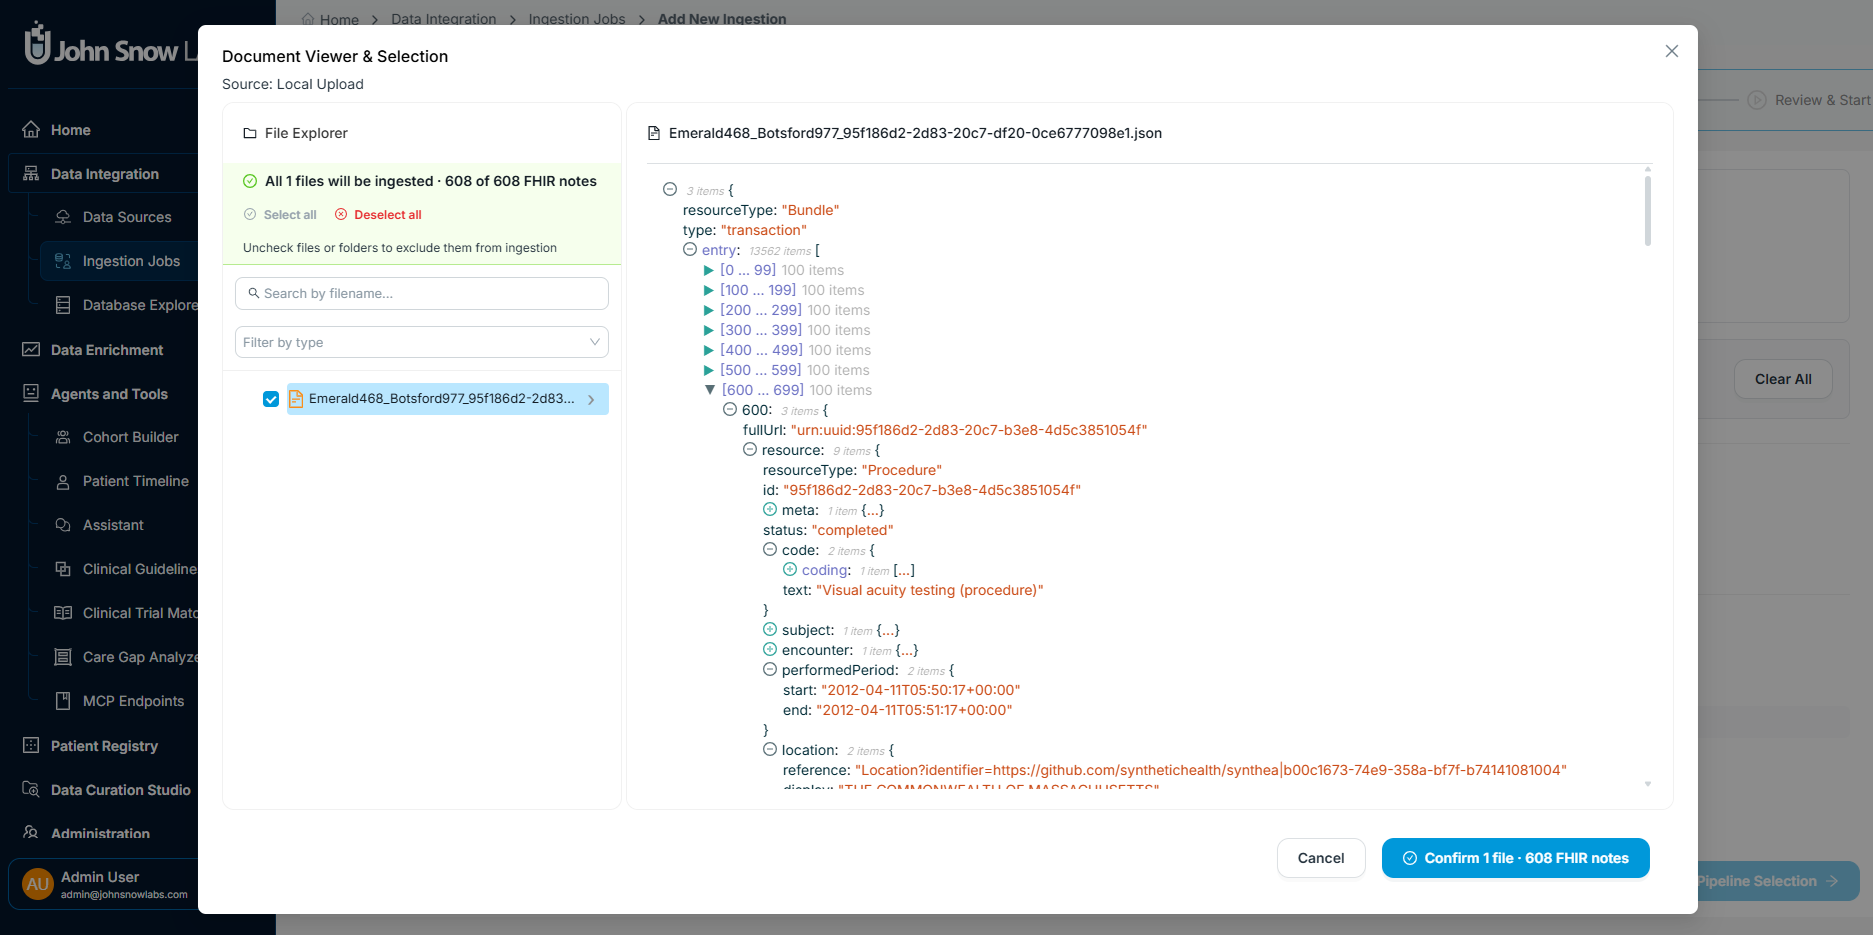
The document viewer lets you preview each clinical note in the FHIR bundle and select which ones to include in the ingestion.
Step 4: Define the ingestion job settings
Enter a name for the ingestion job, then choose when it should run: start immediately, schedule for a later time, or configure it to run within a specific time window.
This step also lets you:
- skip documents already ingested in a previous run
- import patient demographics from FHIR
Patientresources - update existing cohorts and registries with patients in the current ingestion
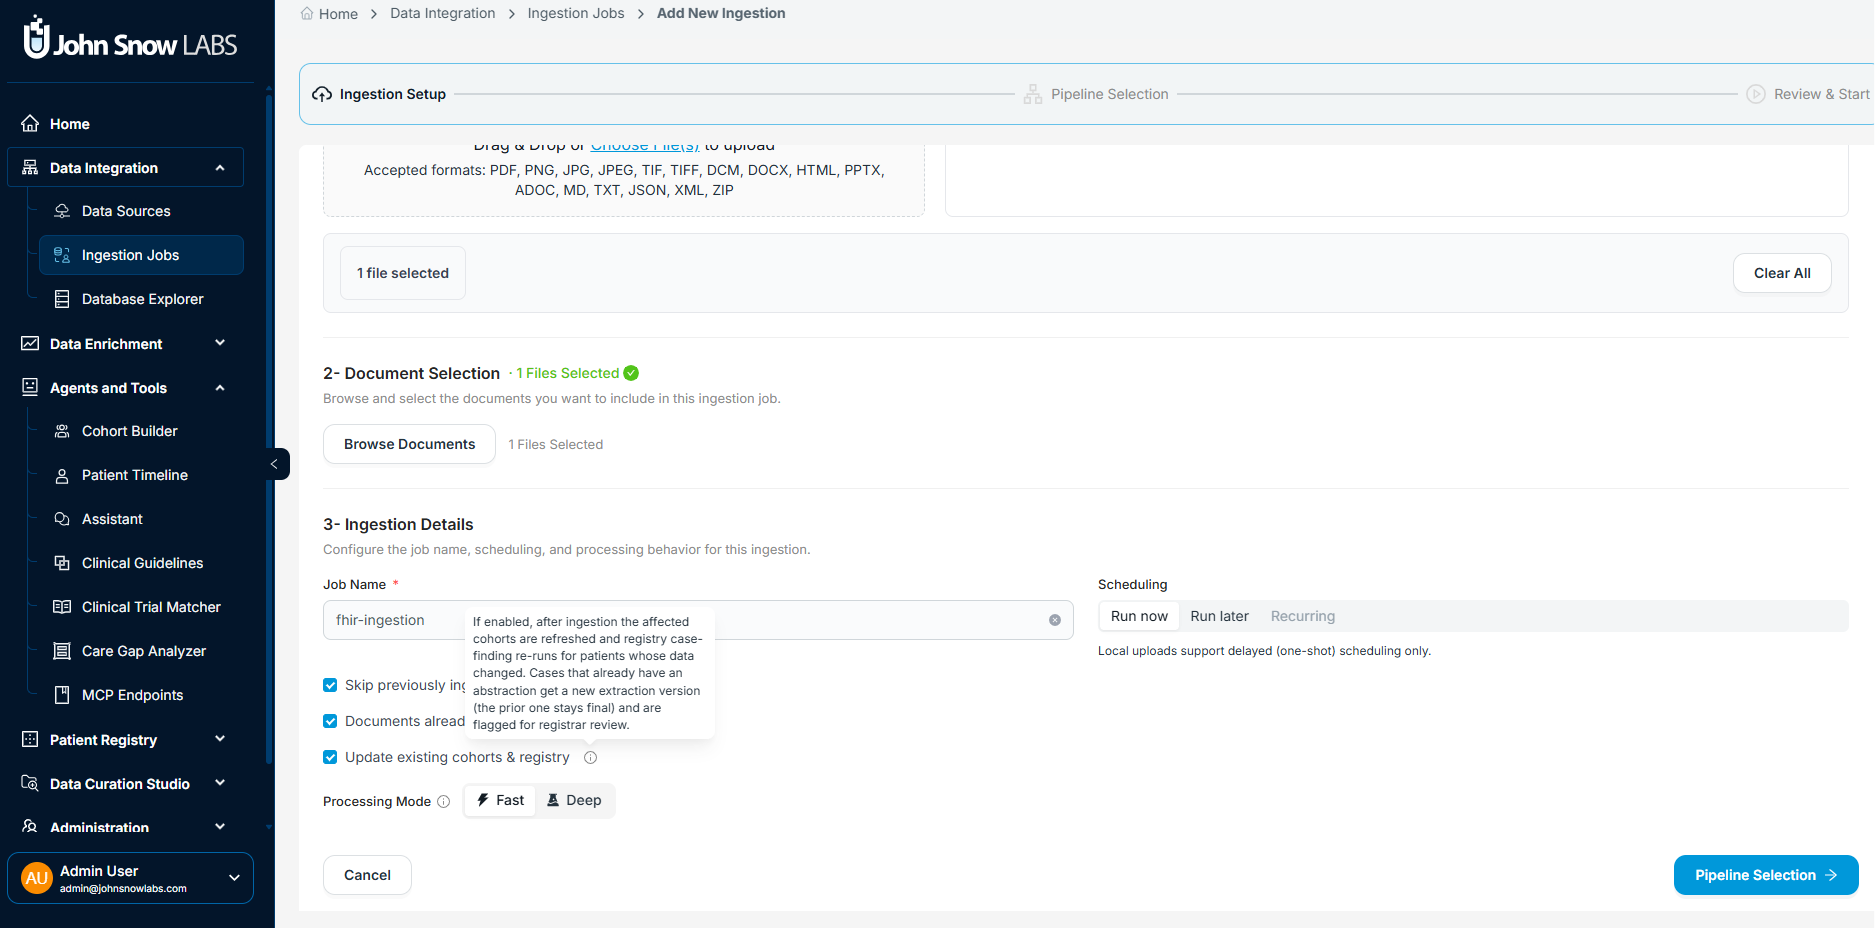
Define the job name, run schedule, and options for handling duplicate documents and patient demographics before starting the ingestion.
Step 5: Select or configure the ingestion pipeline
Choose an existing pipeline or create a new configuration and save it as a reusable template. The pipeline you select determines what happens to the data after the FHIR bundle is uploaded.
Direct path: structured ingestion without NLP
Select a pipeline that runs structured ingestion only. FHIR clinical facts are mapped directly to OMOP, and any selected notes are stored as plain text without further processing. Use this path when the bundle already contains the structured data you need.
NLP-enriched path
Select a pipeline that adds NLP processing for the notes you selected in step 3. This path:
- de-identifies note text using your selected de-identification profile
- extracts clinical entities from free text: diagnoses, medications, findings, and more
- maps extracted entities to standard terminologies: SNOMED CT, RxNorm, and ICD-10
- merges NLP-derived facts with structured FHIR data into unified OMOP records
Use this path when the FHIR bundle contains note text that requires de-identification, entity extraction, or concept mapping before downstream use.
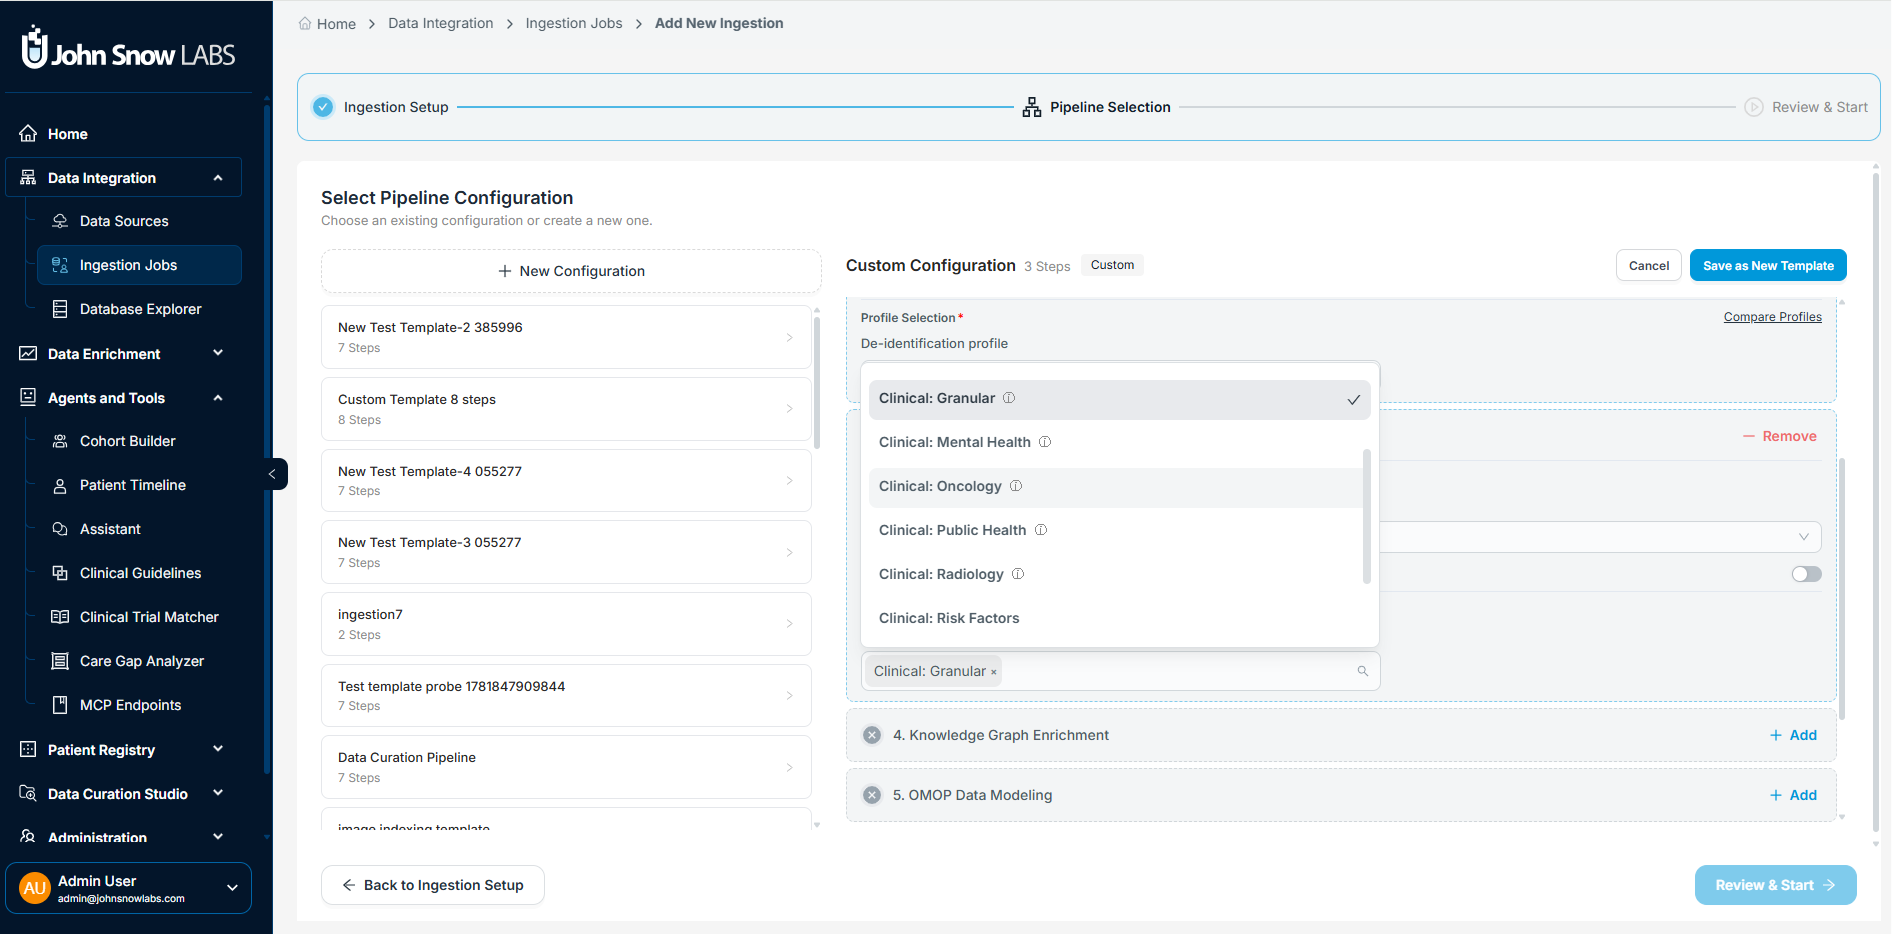
Select an existing pipeline or build a new one. Enable, disable, or tune individual steps to match your workflow, then save the configuration as a reusable template.
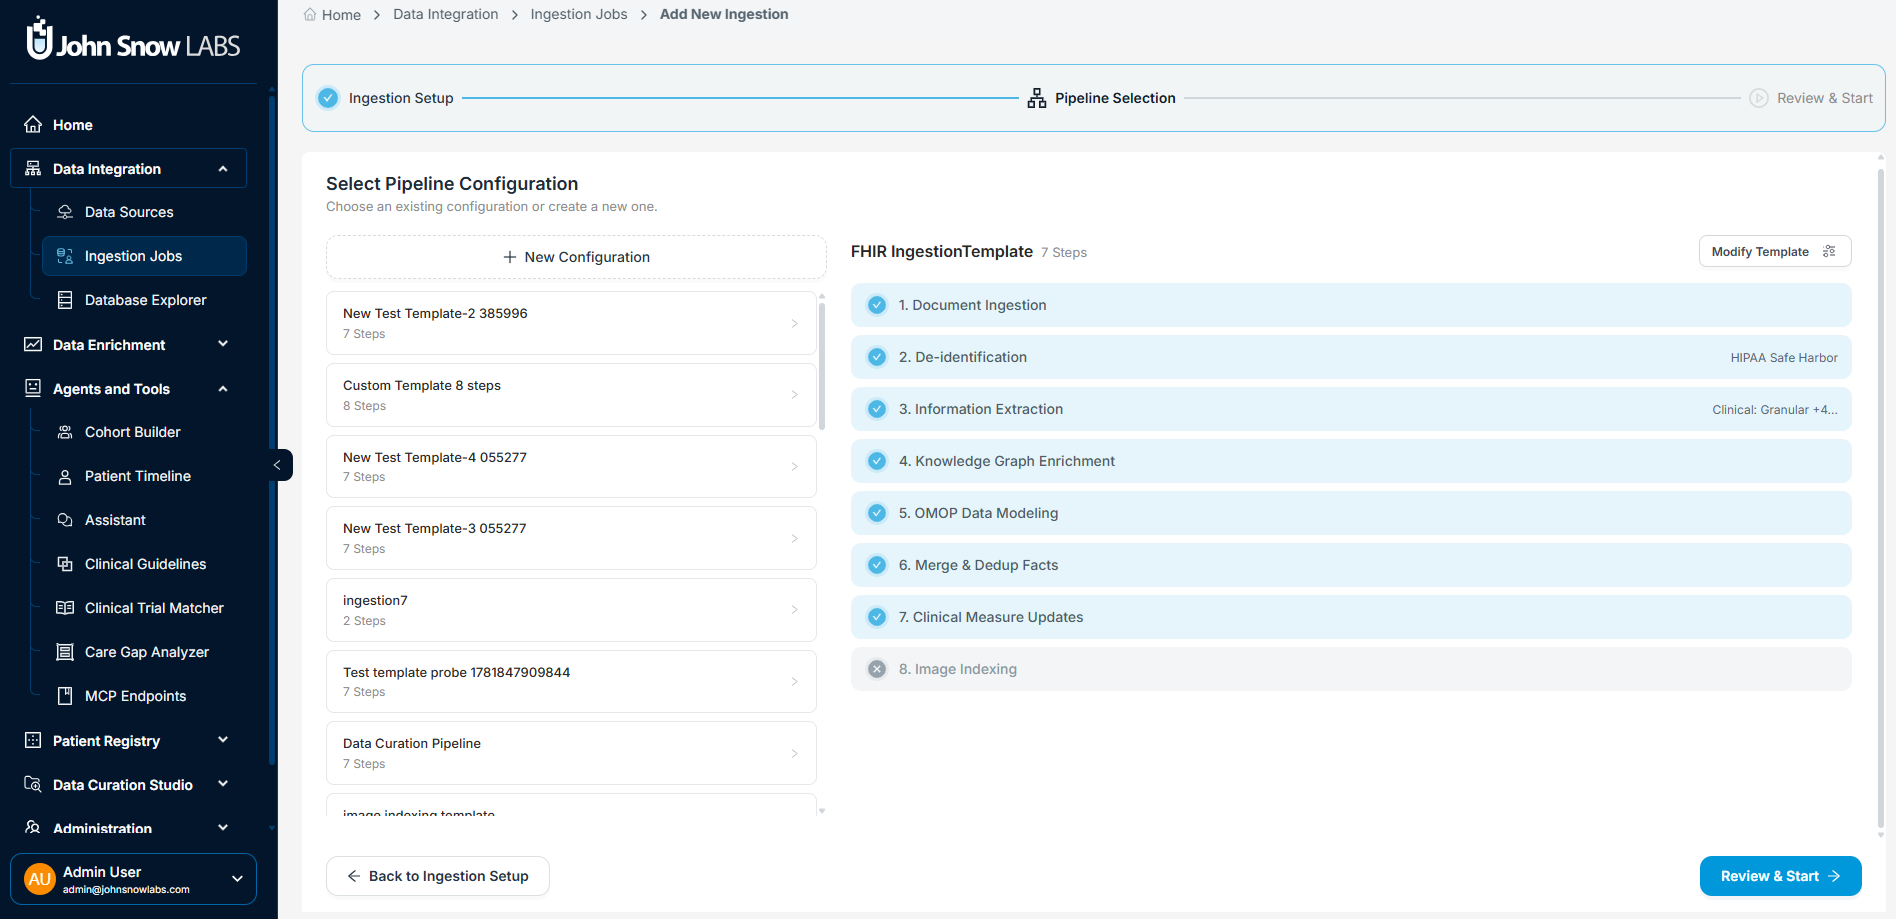
The confirmation screen summarizes every configured pipeline step. Review the full definition before starting the job.
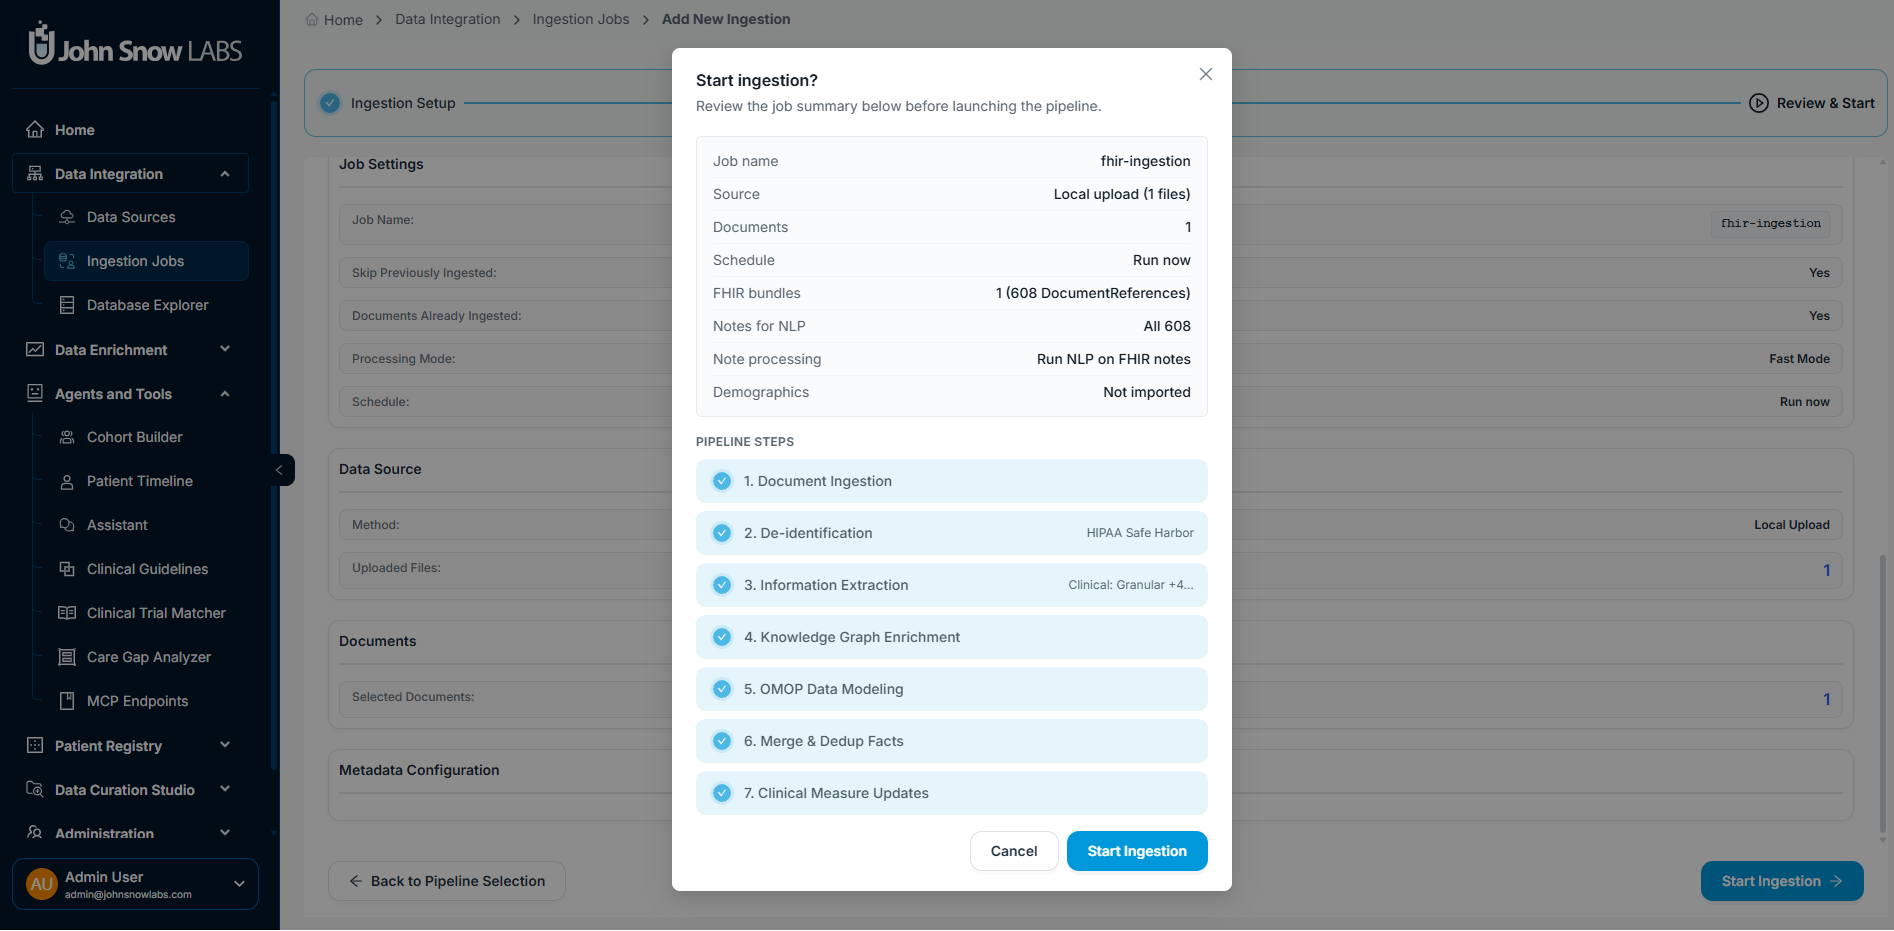
Review the complete job definition - source, pipeline, schedule, and options - then start the ingestion.
Step 6: Monitor ingestion progress
Once the job starts, the platform displays live step-level progress and logs. Each pipeline step reports its status and document counts in real time, so you can confirm the job is processing as configured without waiting for it to complete. Watch validation messages and failed-resource counts here: unresolved patient or encounter references surface at this stage rather than after mapping.
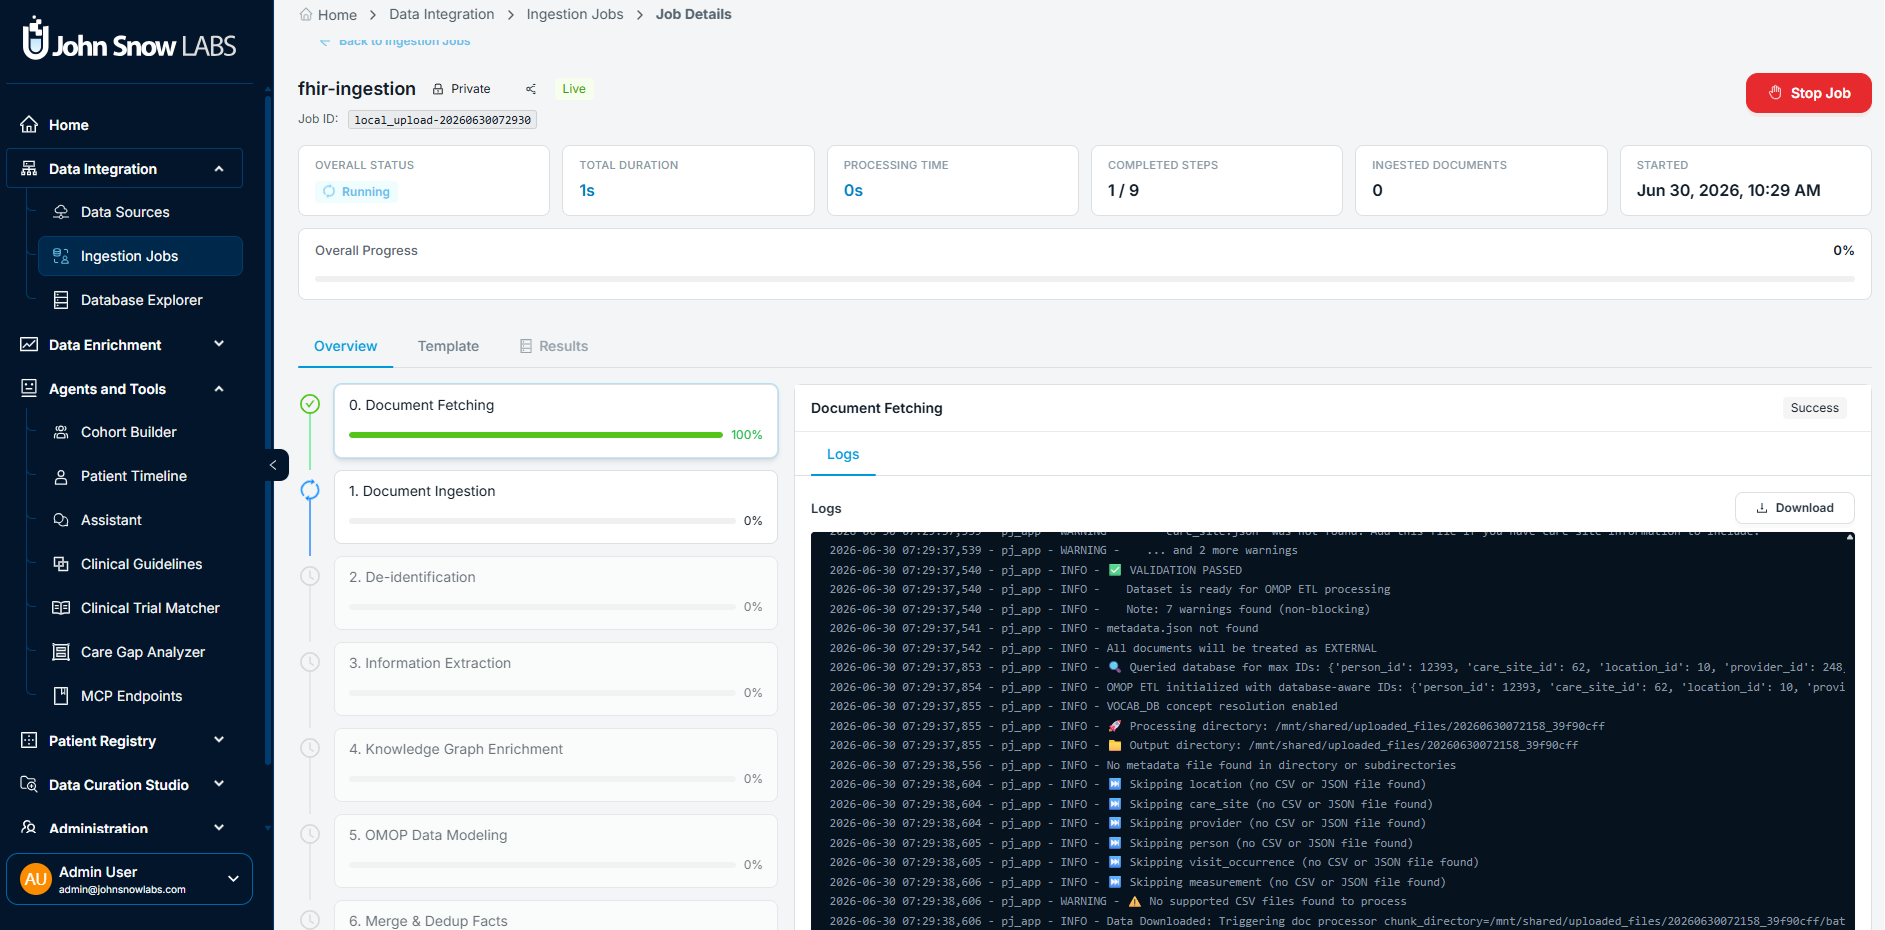
Each pipeline step reports status and document counts in real time. Expand any step to access detailed logs.
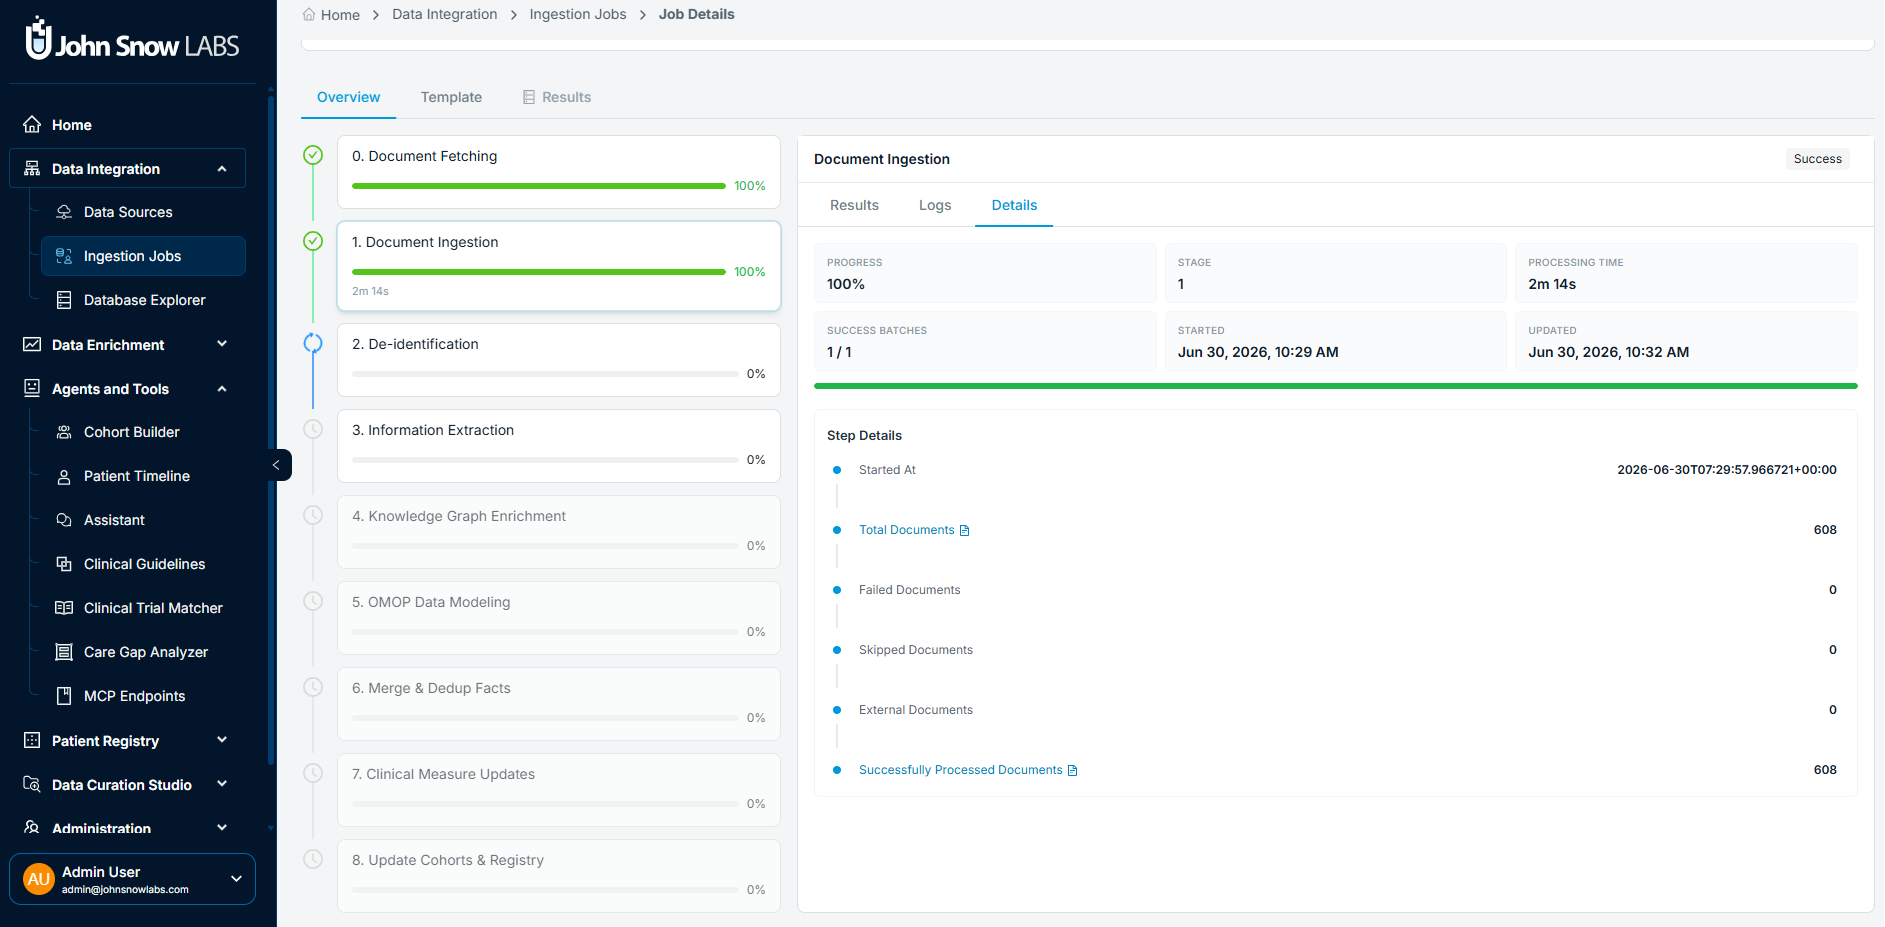
Detailed per step progress feedback with direct access to processing logs.
Step 7: Review the mapped OMOP records
FHIR clinical resources are converted into the matching OMOP domains: conditions into condition_occurrence, medications into the drug-related tables, and observations, labs, procedures, encounters, and visits into their corresponding OMOP tables. Source references are preserved so every record can be traced back to the original FHIR bundle.
Before the records reach production:
- Review the mapped records where validation is available.
- Resolve duplicate or conflicting records if the same clinical facts already exist.
- Merge the validated records into the production OMOP database.
- Confirm that the imported data is available to Patient Journey, Cohort Builder, Database Explorer, and other downstream modules.
In the direct path, those records reflect the structured FHIR facts, with selected notes stored as plain text. In the NLP-enriched path, the output additionally includes concept-linked clinical entities extracted from note text, merged with the structured FHIR data into a unified OMOP record per patient.
Step 8: Validate the Patient Journey output
- Open a patient represented in the FHIR bundle.
- Review demographics, conditions, medications, observations, procedures, encounters, and visits.
- Confirm that structured clinical events appear in the expected timeline and OMOP-backed views.
- Use Database Explorer or cohort filters to validate that the imported facts are queryable.
Edge cases and limitations
- The direct path is best when the FHIR bundle already contains the clinical facts needed for analysis.
- Free-text notes still require the NLP-enriched path if facts must be extracted from narrative text. Notes ingested through the direct path are stored, not parsed.
- Mapping quality depends on source coding, resource completeness, patient references, and terminology normalization.
- Patient demographic import should be configured deliberately when Patient resources are included.
- Notes excluded in step 3 are not stored at all. Re-ingesting the bundle is the only way to add them later.
Related pages
- Import an external OMOP CDM database for customers who already run OMOP CDM directly.
- Data Sources to register a FHIR source for bulk export and scheduled ingestion.
- Data Ingestion for the ingestion module reference.