


Welcome to a follow-up article on the “Serving Spark NLP via API” series, showcasing how to serve SparkNLP using Spring, Swagger, and Java.
Don’t forget to check the other articles in the series, namely:
- How to serve Spark NLP using Microsoft Synapse ML (Part 1/3), available here.
- How to server Spark NLP using FastAPI and LightPipelines(Part 2/3), available here.
- How to serve Spark NLP using Databricks Jobs and MLFlow Rest APIs (Part 3/3), available here.
Background
Spark NLP is a Natural Language Understanding Library built on top of Apache Spark, leveraging Spark MLLib pipelines, that allows you to run NLP models at scale, including SOTA Transformers. Therefore, it’s the only production-ready NLP platform that allows you to go from a simple PoC on 1 driver node, to scale to multiple nodes in a cluster, to process big amounts of data in a matter of minutes.
Before starting, if you want to know more about all the advantages of using Spark NLP (such as the ability to work at scale on air-gapped environments, for instance) we recommend you to take a look at the following resources:
- John Snow Labs webpage;
- The official technical documentation of Spark NLP;
- Spark NLP channel on Medium;
- Also, follow Veysel Kocaman, Data Scientist Lead and Head of Spark NLP for Healthcare, for the latest tips.
Motivation
Spark NLP is server-agnostic, which means it does not come with an integrated API server but offers plenty of options to serve NLP models using Rest APIs.
There is a wide range of possibilities to add a web server and serve Spark NLP pipelines using RestAPI. In this article, we will use Spring and Java.
This article shows only the essential steps to implement this solution with a deep focus on Spark NLP. You can check the implementation in detail in this Github repository.
Spring and Spark NLP Light Pipelines

Spring offers a flexible and comprehensive set of libraries with tools like security, reactive cloud-based microservices for the web, or complex streaming data flow.
In this article, we use Spring Boot to accelerate application development. In addition, we will use Swagger to simplify API development and visualize our exposed endpoints.
As we read in previous articles, we can use Python-based frameworks such as FastAPI for serving Spark NLP pipelines. However, a drawback of Python-based frameworks is they require serialization and deserialization to interact with Spark, adding overhead compared with Java-based frameworks. Since Spring is a Java-based framework, it can achieve a faster response time than FastAPI.
Read more about the performance advantages of using *LightPipelines *in this article created by John Snow Labs Data Scientist Lead Veysel Kocaman.
Strengths
- Lowest latency (even beats FastAPI)
- Adds flexibility to build and adapt a custom API for your models
- Easier scalability when containerizing along with tools like K8 or DC/OS
Weaknesses
- LightPipelines are executed sequentially and don’t leverage the distributed computation that Spark Clusters provide.
- As an alternative, you can use Spring with default pipelines and a custom LoadBalancer, to distribute the calls over your cluster nodes.
Prerequisites
To work with a Java-Spring project with Spark NLP, we will need:
- Java8 or Java11(heads-up: Java 8 support will end by January 2023, check details here)
- Because of transitive dependencies issues, we will need to exclude some dependencies from
spark-sqlartifact. Check all of those here.
Containerizing
You can serve Spark NLP + Spring on Docker. To do that, we will need to follow the steps below:
- Dockerfile: To build a docker image for running a Spring Boot application, we will use the official OpenJDK Docker image, with these configurations:
- Creating a spring user and a spring group to run the application.
- Using a
DEPENDENCYparameter pointing to a directory where we have unpacked our app fat JAR. This is possible thanks to the clean separation between dependencies and application resources that Spring Boot does to a fat JAR file.
FROM openjdk:11

        RUN addgroup --system spring && adduser --system spring && adduser spring spring
        USER spring:spring

        ARG DEPENDENCY=target/dependency
        COPY ${DEPENDENCY}/BOOT-INF/lib /app/lib
        COPY ${DEPENDENCY}/META-INF /app/META-INF
        COPY ${DEPENDENCY}/BOOT-INF/classes /app

        ENTRYPOINT ["java","-cp","app:app/lib/*","jsl.LightNLPApplication"]
- Docker Compose:It’s a tool usually used for running multi-container Docker applications. Here, we use a
docker-compose.ymlfile to grab the environment variables required for SparkNLP for Healthcare.
version: '3'

    services:
        jsl-light-nlp:
        ports:
            - "8080:8080"
        container_name: jsl-light-nlp
        environment:
            - AWS_ACCESS_KEY_ID=${AWS_ACCESS_KEY_ID}
            - AWS_SECRET_ACCESS_KEY=${AWS_SECRET_ACCESS_KEY}
            - SPARK_NLP_LICENSE=${SPARK_NLP_LICENSE}
        build: .
- Dot-Env File (.env):A file used to put values into
docker-compose.yml. So, here we will define the environment variables used by Docker Compose.
AWS_ACCESS_KEY_ID=MY_AWS_ACCESS_KEY_ID
        AWS_SECRET_ACCESS_KEY=MY_AWS_SECRET_ACCESS_KEY
        SPARK_NLP_LICENSE=MY_SPARK_NLP_LICENSE
Implementation
As an example to maximize the performance and minimize the latency, we are going to store two Spark NLP pipelines in memory, so that we load only once (at server start) and we just use them every time we get an API request to infer.
To do this, we have to call some method during bootstrapping to load the required Spark NLP models. So, in the main application class, we call CacheModels.getInsance that loads all model data.
@SpringBootApplication
        public class SpringBootJSLLightNLPApp implements CommandLineRunner {

          Logger logger = LoggerFactory.getLogger(SpringBootJSLLightNLPApp.class);

          public static void main(String[] args) {
            SpringApplication.run(SpringBootJSLLightNLPApp.class, args);
          }

          @Override
          public void run(String... args) {
            CacheModels.getInstance();
            logger.info("Pretrained models downloaded and loaded in memory");
          }
        }
CacheModels.getInsanceis a singleton class that encapsulates all logic required to store model data in memory.
private CacheModels() {
        Models models = new Models();
        Map<String, Pretrained> pretrainedModels = models.getPretrainedModels();
      }

      public static CacheModels getInstance() {
        if (cacheModels == null)
          cacheModels = new CacheModels();
        return cacheModels;
      }
The Model class is responsible for loading model data and downloading the models to our servers. Thus infer requests won’t need to download the model, reducing latency considerably.
private Map<String, Pretrained> pretrainedModels = new HashMap<>();

        public Models() {
          loadPublicModels();
          loadClinicalModels();
        }

        private void loadPublicModels() {

            Pretrained pretrained = new Pretrained();
            pretrained.setName =  "albert_xlarge_token_classifier_conll03_pipeline";
            pretrained.shortName = "albert_ner";

            pretrainedModels.put(shortName, pretrained);
            ResourceDownloader.downloadPipeline(pretrained.getName(), Option.apply(pretrained.getLanguage()),
                        pretrained.getLocation())
        }
Now, to expose an endpoint that will process the infer requests, we will use a LightNLPController
@Autowired LightPipelineService lightPipelineService;

        @PostMapping("/light/annotate")
        public ResponseEntity<> annotate(@RequestBody PretrainedRequest pretrainedRequest) {

          Map<String, List<String>> rawResponse =
            lightPipelineService.annotate(pretrainedRequest.getText(),
                                          pretrainedRequest.getModelName());

          return new ResponseEntity<>(rawResponse, HttpStatus.OK);
        }
The controller calls annotate method from LightPipelineService which is responsible for making the calls toLightPipelinefrom Spark NLP
public Map<String, List<String>> annotate(String input, String pretrainedModelName) {

        CacheModels cacheModels = CacheModels.getInstance();
        Pretrained pretrainedModel = cacheModels.getPretrainedModel(pretrainedModelName);

        PretrainedPipeline pretrainedPipeline = new PretrainedPipeline(pretrainedModel.getName(),
                      pretrainedModel.getLanguage(), pretrainedModel.getLocation(),
                      false, Option.empty());

        return pretrainedPipeline.annotateJava(input);
      }
Under the hood, the method pretrained.annotateJava introduced since Spark NLP 4.0, uses the LightPipelinefeature.
With this implementation, now the models will be ready and loaded in memory when our app is deployed on a server with a simple docker command:
docker-compose up --build
Since our app uses Swagger, we can check that our endpoints are up by accessing the Swagger UI URL.
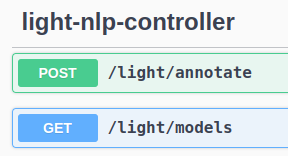
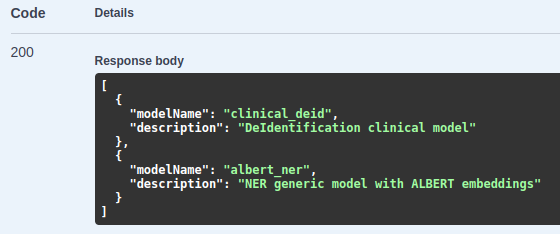
We can check the available models in the GET /light/models endpoint using Swagger or this Curl command:
curl -X 'GET' 'http://localhost:8080/light/models' -H 'accept: */*'
We will get a JSON response with all available models:
Now, that we know the models available, let’s play around with them.
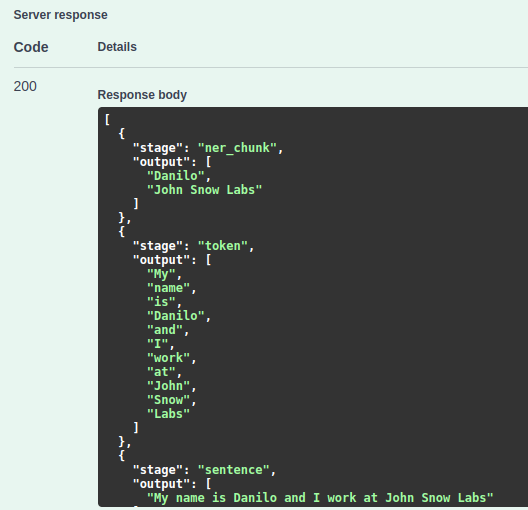
First, let’s send a request for the NER model. We can easily identify with Swagger that the /light/annotate endpoint expects a JSON request. So, we just fill the modelName field with the model we want to use and in the text field, we write the content.
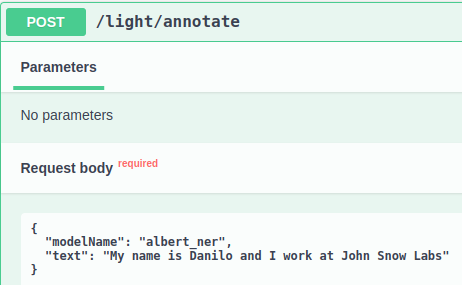
The JSON response will include all stages defined in the NLP pipeline, in this case: sentence,token,ner_chunk
Finally, let’s make a request to/light/annotateendpoint for the DeIdentification model and check the response answer.

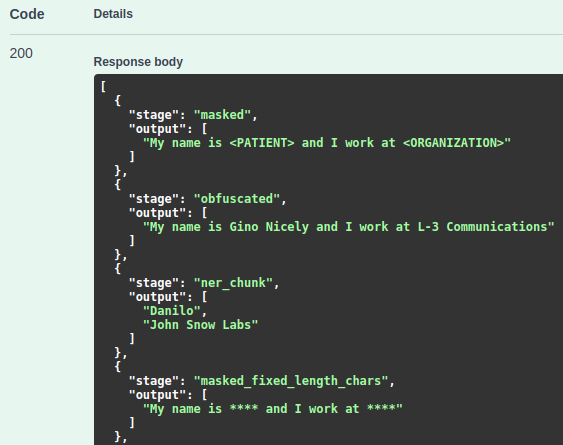
As we can see, the JSON response includes all stages defined in this NLP clinical pipeline, which are:
sentence, token, ner_chunk, masked, obfuscated, masked_fixed_length_chars, masked_with_chars
Do you want to know more?
- Check the example notebooks in the Spark NLP Workshop repository, available here
- Visit John Snow Labs and Spark NLP Technical Documentation websites
- Follow us on Medium: Spark NLP and Veysel Kocaman
- Write to support@johnsnowlabs.com for any additional requests you may have