


Welcome to Part II of the blog series on extracting entities from text reviews using NLP Lab. In the first part of the blog, we discussed the challenges faced by a market research company as they aimed to extract relevant entities from a vast dataset of hotel reviews. The tool of choice for this project was NLP Lab for its powerful pre-annotation capabilities, allowing them to annotate the dataset efficiently and train a tailored deep learning model for automatic pre-annotation of new content in a couple of clicks.
To recap, Part I covered the project creation and setup in NLP Lab, showcasing how to configure the environment and walked readers through an example of annotating text data. Building upon that foundation, Part II delves into the utilization of pre-annotation capabilities offered by NLP Lab. It explores the finer details of the automatic annotation process, including entity labeling using DL models but also using rules and prompts. It also demonstrates how NLP Lab streamlines the export of annotated data in various formats, enabling seamless integration with model deployment or data ingestion pipelines.
Through this blog post, my aim is to equip the user with the knowledge and practical insights needed to maximize the potential of NLP Lab. Whether you are a data scientist, a developer, or a domain expert, this guide will empower you to efficiently extract and understand entities from unstructured textual data.
By the end of this blog, you will have a comprehensive understanding of how to use the tool’s annotation features, enhance your data labeling workflow, and leverage the power of annotated data for training and deploying accurate models.
Manual Annotation
Selecting labels
In the previous blog, we imported the tasks successfully. Now, let’s proceed by randomly selecting a task from the imported tasks for manual annotation. The objective is to annotate the text by picking a label and using the mouse to select the text that represents the chosen label. The selected chunk will be visually highlighted with the corresponding label color, indicating that it has been labeled. To remove a label, simply select the labeled text and press the ‘Backspace’ button on the keyboard. Once the annotation process is complete, the task page will display the labeled entities as illustrated below.
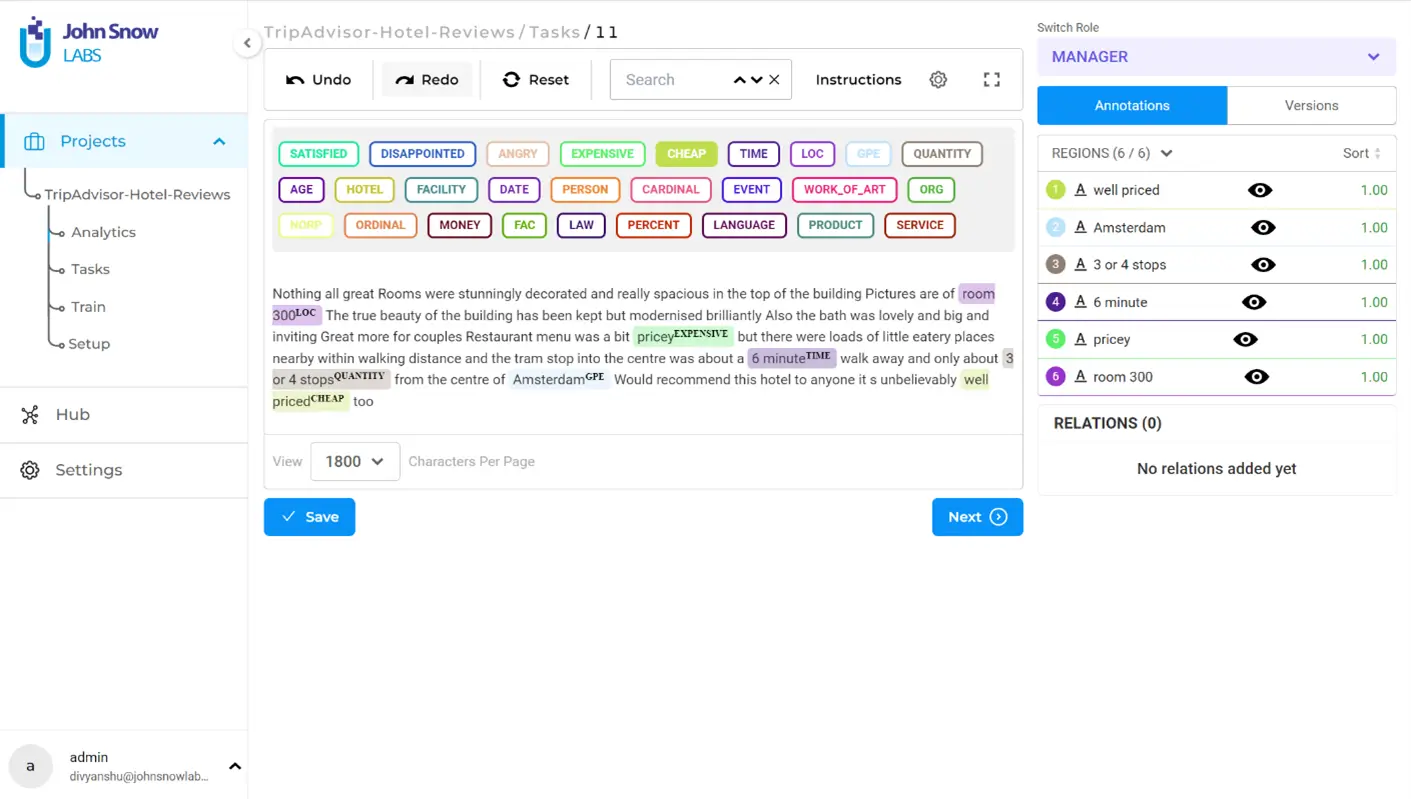
On the right panel under “Annotations” you will see the list of annotated entities with their respective confidence scores (which is always 1.00 in manual annotation, since human labeling is considered as the ground truth).
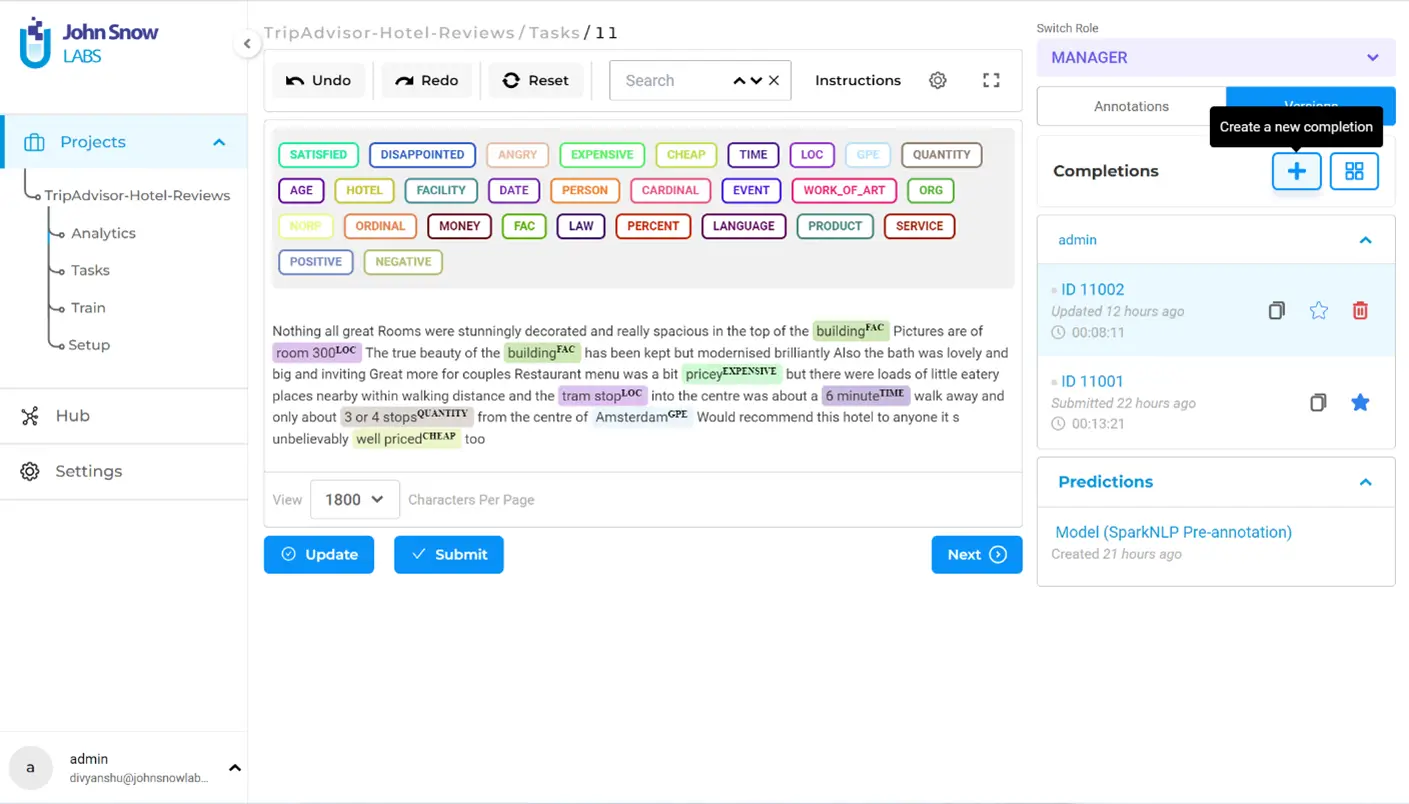
After making sure that you have labeled all the relevant entities, click on “Save” and then “Submit” to submit the completion. Note that once you submit a completion, it cannot be edited. If you wish to make changes on a submitted completion, you must create a cloned completion and edit that before submitting it as the new ground truth. This feature can be accessed on the right panel under “Versions”.
It is crucial to adhere to an important rule in the annotation process: all occurrences of a particular entity must be labeled consistently. Failure to follow this rule can lead to confusion during model training and result in inaccuracies when making predictions.
Build relations
Relations play a crucial role in labeling unstructured texts, as they contribute to a deeper understanding of the contextual framework in which entities are mentioned. To establish relations among entities, you can follow a simple process. First, select the first labeled region of interest, then press the ‘R’ key, and finally, click on the second labeled region of interest. This leads to the creation of meaningful connections between entities, enhancing the overall labeling process and improving the accuracy of the extracted information.
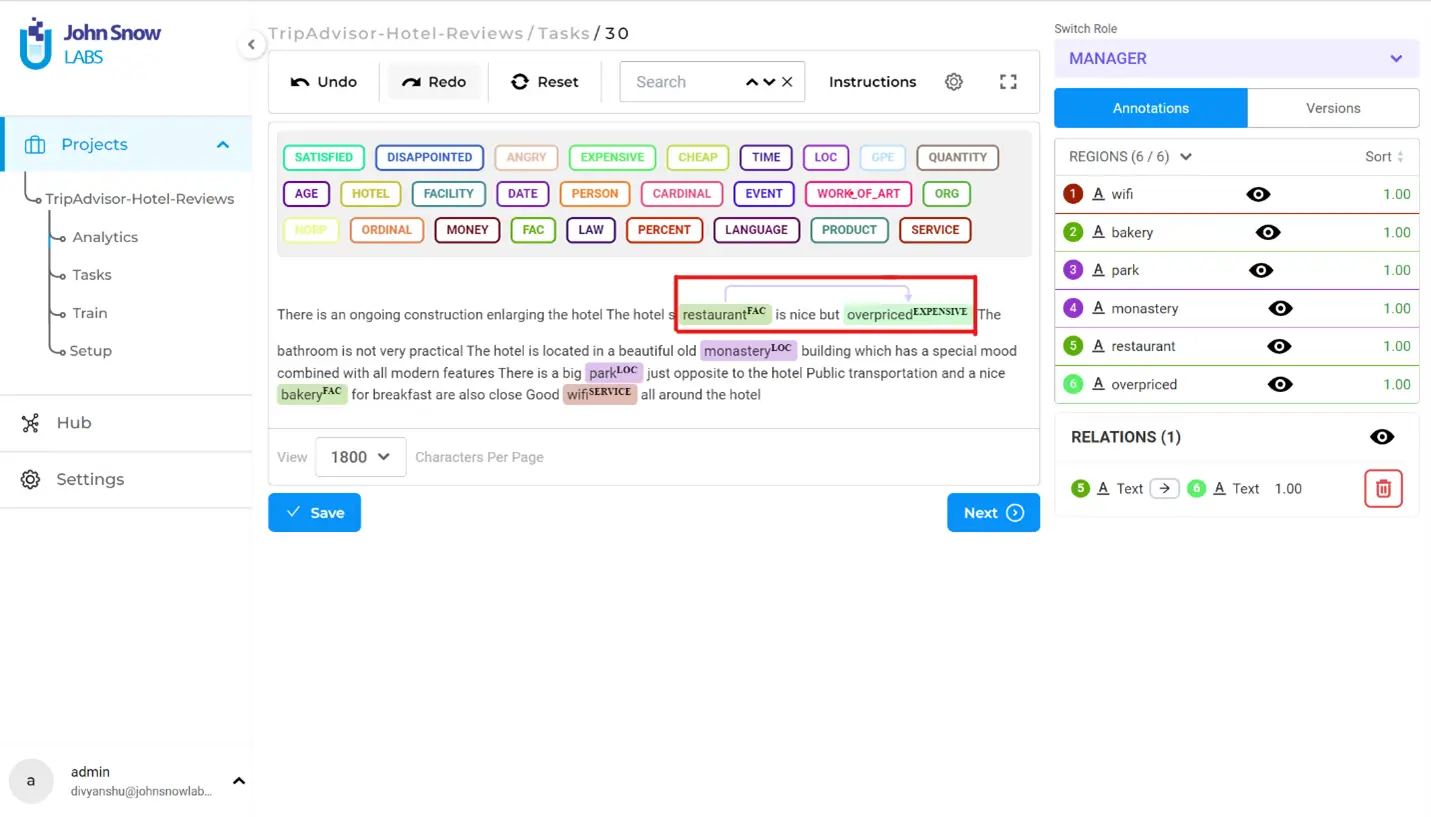
In the example provided, a relation has been established between two entities: “restaurant” and “overpriced”. The arrow connecting the first entity to the second entity represents this relation. In this context, it indicates that the restaurant is considered expensive. On the right panel, you can observe the specific details of the relations, including their directionality. It is crucial to pay attention to the direction of the arrow, as it signifies the distinction between the subject and object entities involved in the relation. In the above scenario, I have not named the relation, because it was not needed. But NLP Lab offers the feature to name a relation between entities – see the docs: NLP Lab docs.
Pre-Annotation
Pre annotation refers to the automated process of assigning preliminary labels or tags to specific elements within a given text. It leverages pre-existing models, rules, or prompts to generate annotations, and is usually performed before manual annotation takes place. This greatly speeds up the annotation process and serves as a starting point for further refinement.
By using pre-annotation techniques, NLP Lab can automatically identify and label relevant entities like hotel names, mentioned locations, services, or specific products mentioned in the reviews. This initial pre-annotation serves as a starting point for human annotators, who can then review and refine the annotations based on their expertise and the specific requirements of the project.
To perform pre-annotation, go to the tasks page, and click on “Pre-Annotate” on the top-right. A pop-up will appear where you must choose an existing server to use for pre-annotating your tasks on or create a new server. Then, the pop-up will show the details of the deployed configuration including the models, rules and prompts that will be used for pre-annotation.
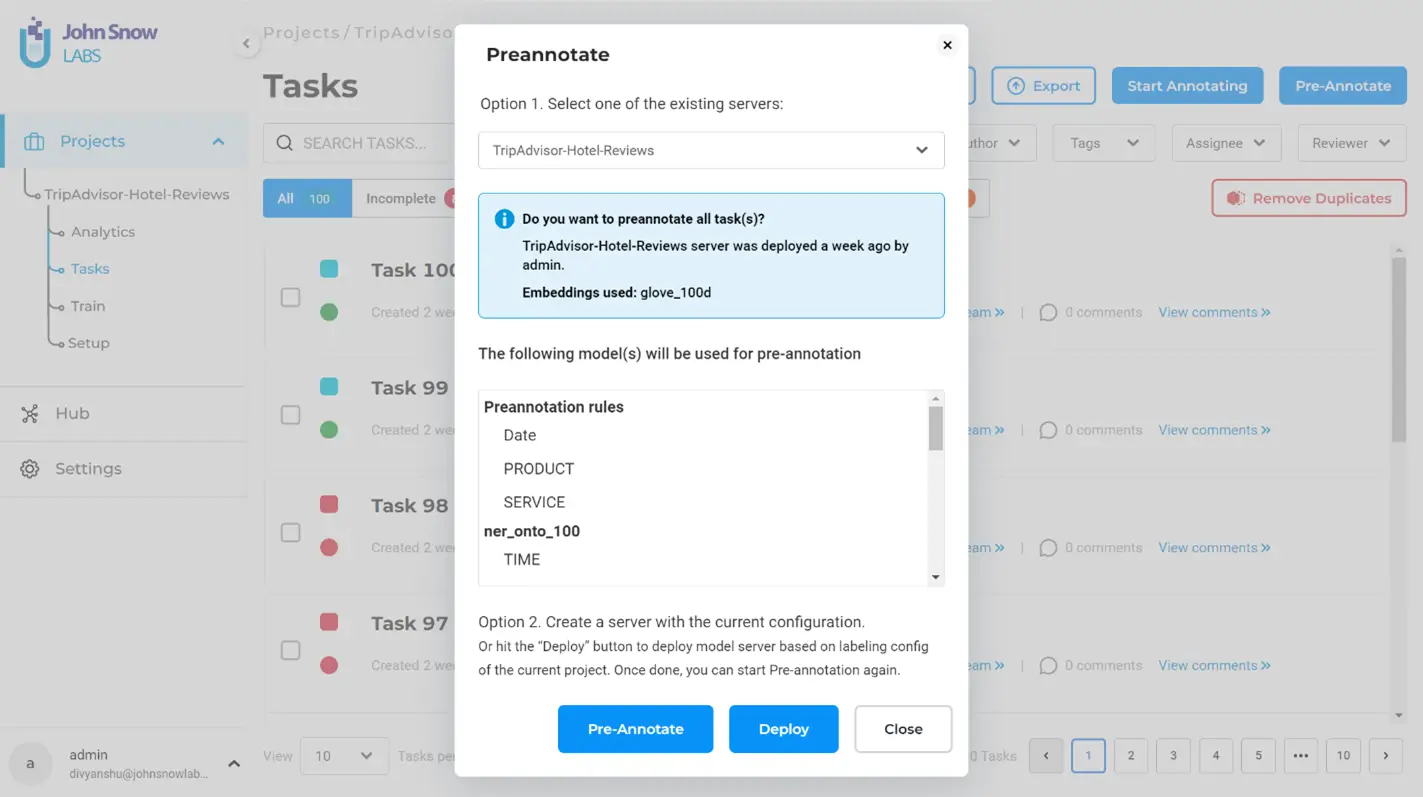
Click on “Pre-Annotate” to begin the pre-annotation process. When the pre-annotation is finished, you will see the tasks marked with a round marker, which can either be green (suggesting that there are some entities labeled using pre-annotation) or red (suggesting that pre-annotation could not detect any relevant entities to label).
After successful pre-annotation, a pre-annotated task would look like this:
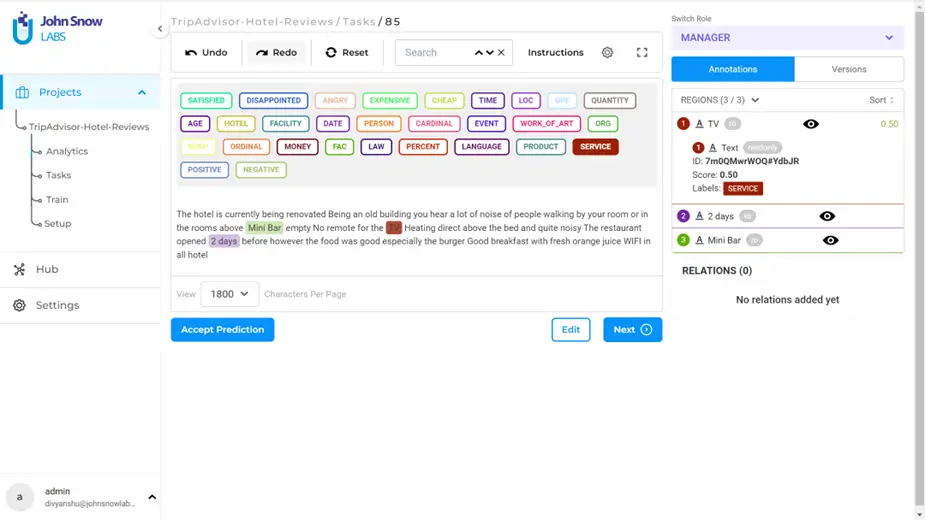
As you can see, pre-annotation was successful in detecting TIME, CARDINAL, ORDINAL and DATE related entities in this specific task. However, there could be relevant entities that pre-annotation could not detect probably because the model used for pre-annotation was trained on different kind of data. In that case, we must fine-tune the labeling in our tasks. Clicking on “Edit” will enable you to add more labels to the task. For the above example, this is how it would look like:
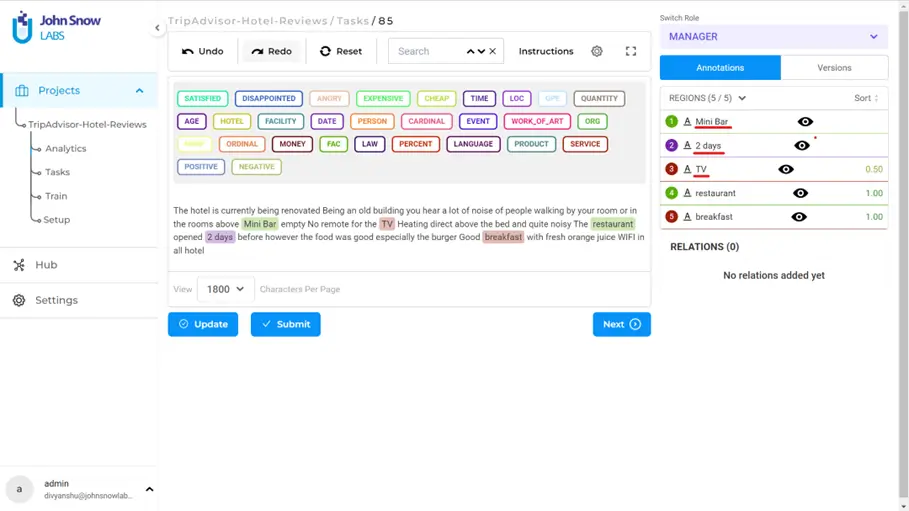
On the right panel, you can identify which of the labels are manually annotated and the ones that are pre-annotated by looking at the confidence scores. For example, after updating the task, you can see the last two entities on the right panel are manually added because they have a confidence score of 1.0. The entities above them are pre-annotated.
Task Export
Once all the tasks are annotated and fine-tuned, you can export them to your system. Click on “Export” button on the top, and select the file format you wish to save the tasks in. You can either export all the tasks or only the completions (tasks that are annotated and submitted). There are a few supported file formats in which you can export the data – JSON, JSON_MIN (which is JSON minified), CSV, TSV, and CONLL.

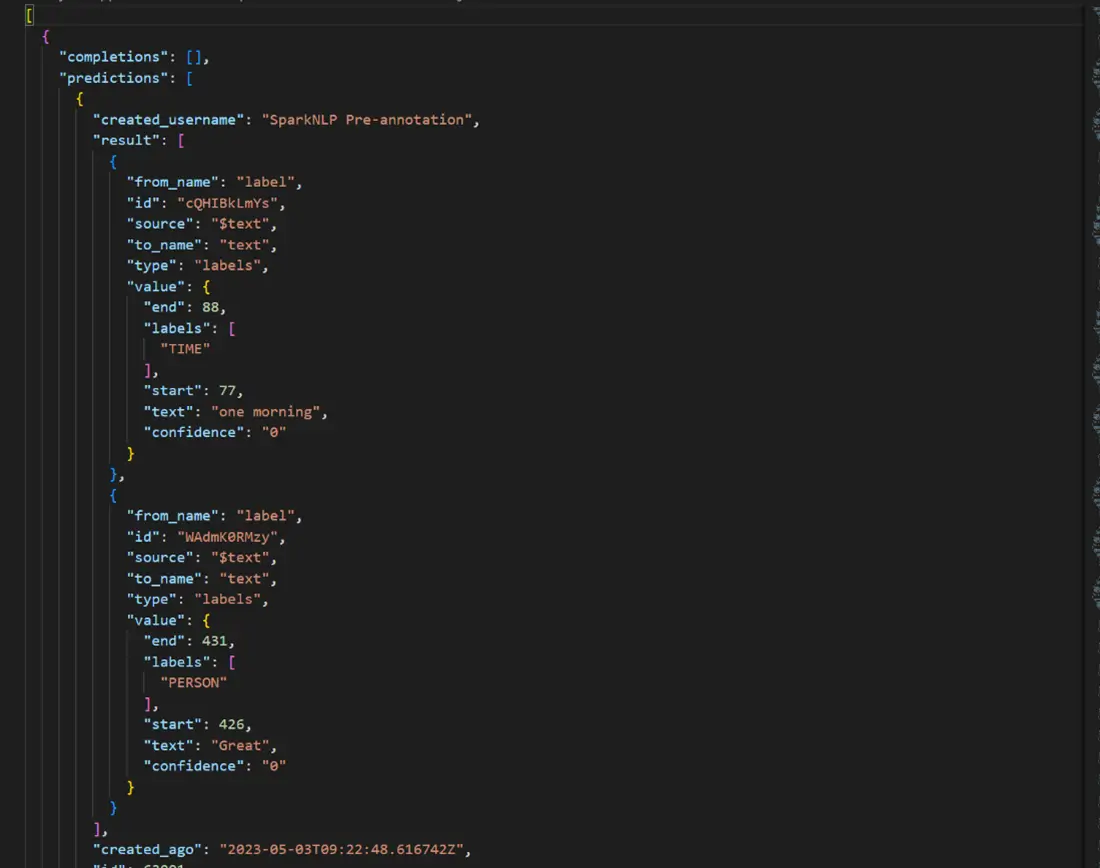
For example, a task exported in a JSON format will look like this:
Exporting a task is an optional step that can be skipped, allowing users to proceed directly to model training after annotating all the tasks. However, exporting the tasks offers the convenience of easily importing the annotated tasks into a new project. This functionality proves particularly useful when users want to leverage their annotated data across multiple projects or share it with other team members.
In this blog post, we explored the process of manual text annotation, the benefits of pre-annotation, the significance of building relations among entities, and the efficient task export after successful annotation. We discussed the importance of accurate and comprehensive labeling in unstructured text analysis and how it contributes to training reliable models. By leveraging data annotation tool like NLP Lab, we can streamline the annotation workflow, enhance contextual understanding, and extract valuable insights from textual data. In the next part of this blog series, we will cover model training and test the accuracy of the trained model based on certain metrics.