


In this article we’re going to review the functionalities of one of our most flexible annotators: ContextualParser. It’s a licensed annotator that allows users to extract entities from documents based on pattern matching.
The ContextualParser annotator provides more functionality than its open-source counterpart EntityRuler by allowing users to customize specific characteristics for pattern matching. You’re able to find entities using regex rules for full and partial matches or using a dictionary with normalizing options and context parameters to take into account things such as token distances. Everything discussed in this tutorial can be found in the form of a notebook over here. We’ll first dive into the details of the ContextualParser annotator, understanding how to use it, and then try running two different pipelines on some sample text and visualize their results.
Understanding the Contextual Parser
There are 3 components necessary to understand when using the ContextualParser annotator:
- The
ContextualParserannotator’s parameters - JSON configuration file
- Dictionary
1. ContextualParser Annotator Parameters
Here are all the parameters available to use with the ContextualParserApproach:
contextualParser = ContextualParserApproach() \
.setInputCols(["sentence", "token"]) \
.setOutputCol("entity") \
.setCaseSensitive(True) \
.setJsonPath("context_config.json") \
.setPrefixAndSuffixMatch(True) \
.setDictionary("dictionary.tsv", options={"orientation":"vertical"})
We will dive deeper into the details of each parameter, but here’s a quick overview:
setCaseSensitive: do you want the matching to be case sensitive (applies to all JSON properties apart from the regex property)setJsonPath: the path to your JSON configuration filesetPrefixAndSuffixMatch: do you want to match using both the prefix AND suffix properties from the JSON configuration filesetDictionary: the path to your dictionary, used for normalizing entities
Let’s start by looking at the JSON configuration file.
2. JSON Configuration File
Here is a fully utilized JSON configuration file.
{
"entity": "Gender",
"ruleScope": "sentence",
"regex": "girl|boy",
"completeMatchRegex": "true",
"matchScope": "token",
"prefix": ["birth", "growing", "assessment"],
"suffix": ["faster", "velocities"],
"contextLength": 100,
"contextException": ["slightly"],
"exceptionDistance": 40
}
2.1. Basic Properties
There are 5 basic properties you can set in your JSON configuration file:
entityruleScoperegexcompleteMatchRegexmatchScope
Let’s first look at the 3 most essential properties to set:
{
    "entity": "Digit",
    "ruleScope": "sentence",
    "regex": "\\d+" # Note here: backslashes are escape characters in JSON, so for regex pattern "\d+" we need to write it out as "\\d+"
    }
Here, we’re looking for tokens in our text that match the regex: “\d+” and assign the “Digit” entity to those tokens. When ruleScope is set to “sentence“, we’re looking for a match on each token of a sentence. You can change it to “document” to look for a match on each sentence of a document. The latter is particularly useful when working with multi-word matches, but we’ll explore this at a later stage.
The next properties to look at are completeMatchRegex and matchScope. To understand their use case, let’s take a look at an example where we’re trying to match all digits in our text.
Let’s say we come across the following string: XYZ987
Depending on how we set the completeMatchRegex and matchScope properties, we’ll get the following results:
        {
            "entity": "Digit",
            "ruleScope": "sentence",
            "regex": "\\d+",
            "completeMatchRegex": "false",
            "matchScope": "token"
            }
OUTPUT: [XYZ987]
{
    "entity": "Digit",
    "ruleScope": "sentence",
    "regex": "\\d+",
    "completeMatchRegex": "false",
    "matchScope": "sub-token"
    }
OUTPUT: [987]
{
    "entity": "Digit",
    "ruleScope": "sentence",
    "regex": "\\d+",
    "completeMatchRegex": "true"
    # matchScope is ignored here
    }
OUTPUT: []
"completeMatchRegex": "true" will only return an output if our string was modified in the following way (to get a complete, exact match): XYZ 987
{
    "entity": "Digit",
    "ruleScope": "sentence",
    "regex": "\\d+",
    "completeMatchRegex": "true",
    "matchScope": "token" # Note here: sub-token would return the same output
    }
OUTPUT: [987]
2.2. Context Awareness Properties
There are 5 properties related to context awareness:
- contextLength
- prefix
- suffix
- contextException
- exceptionDistance
Let’s look at a similar example. Say we have the following text: At birth, the typical boy is growing slightly faster than the typical girl, but growth rates become equal at about seven months.
If we want to match the gender that grows faster at birth, we can start by defining our regex: “girl|boy”
Next, we add a prefix (“birth“) and suffix (“faster“) to ask the parser to match the regex only if the word “birth” comes before and only if the word “faster” comes after. Finally, we will need to set the contextLength – this is the maximum number of tokens after the prefix and before the suffix that will be searched to find a regex match.
Here’s what the JSON configuration file would look like:
{
    "entity": "Gender",
    "ruleScope": "sentence",
    "regex": "girl|boy",
    "contextLength": 50,
    "prefix": ["birth"],
    "suffix": ["faster"]
    }
OUTPUT: [boy]
If you remember, the annotator tool has a setPrefixAndSuffixMatch() parameter. If you set it to True, the previous output would remain as is. However, if you had set it to False and used the following JSON configuration:
{
    "entity": "Gender",
    "ruleScope": "sentence",
    "regex": "girl|boy",
    "contextLength": 50,
    "prefix": ["birth"],
    "suffix": ["faster", "rates"]
    }
OUTPUT: [boy, girl]
The parser now takes into account either the prefix OR suffix, only one of the conditions has to be fulfilled for a match to count.
Here’s the sentence again: At birth, the typical boy is growing slightly faster than the typical girl, but growth rates become equal at about seven months.
The last 2 properties related to context awareness are contextException and exceptionDistance. This rules out matches based on a given exception:
{
    "entity": "Gender",
    "ruleScope": "sentence",
    "regex": "girl|boy",
    "contextLength": 50,
    "prefix": ["birth"],
    "suffix": ["faster", "rates"],
    "contextException": ["At"],
    "exceptionDistance": 5
    }
OUTPUT: [girl]
Here we’ve asked the parser to ignore a match if the token “At” is within 5 tokens of the matched regex. This caused the token “boy” to be ignored.
3. Dictionary
Another key feature of the ContextualParser annotator is the use of dictionaries. You can specify a path to a dictionary in tsv or csv format using the setDictionary() parameter. Using a dictionary is useful when you have a list of exact words that you want the parser to pick up when processing some text.
3.1. Orientation
The first feature to be aware of when it comes to feeding dictionaries is the format of the dictionaries. The ContextualParser annotator will accept dictionaries in the horizontal format and in a vertical format. This is how they would look in practice:
Horizontal:

Vertical:
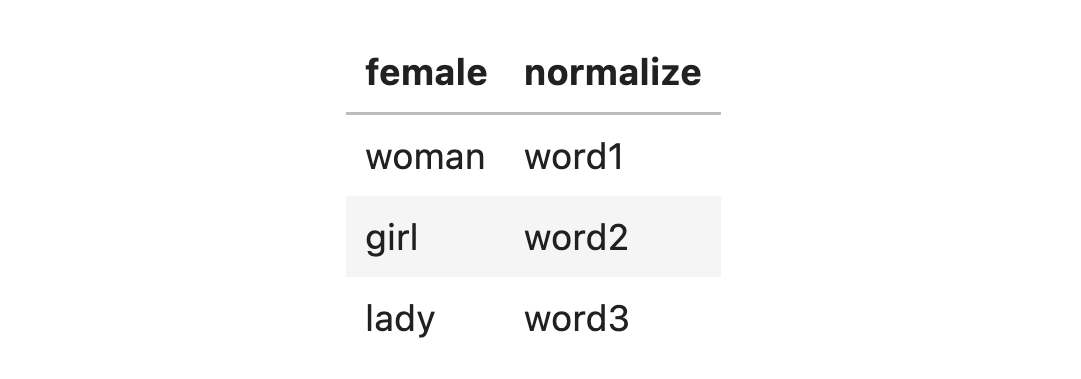
As you can see, your dictionary needs to have a normalize field that lets the annotator know which entity labels to use, and another field that lets the annotator know a list of words it should be looking to match. Here’s how to set the format that your dictionary uses:
    contextualParser = ContextualParserApproach() \
    .setDictionary("dictionary.tsv", options={"orientation":"vertical"}) # default is horizontal
3.2. Dictionary-related JSON Properties
When working with dictionaries, there are 2 properties in the JSON configuration file to be aware of:
ruleScopematchScope
This is especially true when you have multi-word entities in your dictionary.
Let’s take an example of a dictionary that contains a list of cities, sometimes made up of multiple words:

Let’s say we’re working with the following text: I love New York. Salt Lake City is nice too.
With the following JSON properties, here’s what you would get:
{
    "entity": "City",
    "ruleScope": "sentence",
    "matchScope": "sub-token",
    }
OUTPUT: []
When ruleScope is set to "sentence", the annotator attempts to find matches at the token level, parsing through each token in the sentence one by one, looking for a match with the dictionary items. Since "New York" and "Salt Lake City" are made up of multiple tokens, the annotator would never find a match from the dictionary. Let’s change ruleScope to "document":
{
    "entity": "City",
    "ruleScope": "document",
    "matchScope": "sub-token",
    }
OUTPUT: [New York, Salt Lake City]
When ruleScope is set to "document", the annotator attempts to find matches by parsing through each sentence in the document one by one, looking for a match with the dictionary items. Beware of how you set matchScope. Taking the previous example, if we were to set matchScope to "token" instead of "sub-token", here’s what would happen:
{
    "entity": "City",
    "ruleScope": "document",
    "matchScope": "token"
    }
OUTPUT: [I love New York., Salt Lake City is nice too.]
As you can see, when ruleScope is at the document level, if you set your matchScope to the token level, the annotator will output each sentence containing the matched entities as individual chunks.
3.3. Working with Multi-Word Matches
Although not directly related to dictionaries, if we build on top of what we’ve just seen, there is a use-case that is particularly in demand when working with the ContextualParserannotator: finding regex matches for chunks of words that span across multiple tokens.
Let’s re-iterate how theruleScopeproperty works: when ruleScope is set to “sentence“, we’re looking for a match on each token of a sentence. When ruleScope is set to “document“, we’re looking for a match on each sentence of a document.
So now let’s imagine you’re parsing through medical documents trying to tag the Family History headers in those documents.
{
    "entity": "Family History Header",
    "regex": "[f|F]amily\s+[h|H]istory",
    "ruleScope": "document",
    "matchScope": "sub-token"
    }
OUTPUT: [Family History, family history, Family history]
If you had set ruleScope to “sentence“, here’s what would have happened:
{
    "entity": "Family History Header",
    "regex": "[f|F]amily\s+[h|H]istory",
    "ruleScope": "sentence",
    "matchScope": "sub-token"
    }
OUTPUT: []
Since Family History is divided into two different tokens, the annotator will never find a match since it’s now looking for a match on each token of a sentence.
Running a Pipeline
Let’s try running through some examples to build on top of what we’ve learned so far.
Example 1: Detecting Cities
In this first example, we’ll try a simple task: detecting city entities from some sample text using a dictionary in the vertical format. We’ll use the following sentence:
    # Here's some sample text
    sample_text = "I love New York. Salt Lake City is nice too."
We start by creating a vertical dictionary and a JSON file with our chosen parameters.
# Create a dictionary to detect cities
cities = """City\nNew York\nSalt Lake City\nChicago\nSan Antonio"""with open("cities.tsv", "w") as f:
    f.write(cities)# Create JSON file
cities = {
"entity": "City",
"ruleScope": "document",
"matchScope":"sub-token",
"completeMatchRegex": "false"
} import json
with open("cities.json", "w") as f:
    json.dump(cities, f)
Next, we can build a pipeline that includes the ContextualParserApproach annotator.
# Build pipeline
document_assembler = DocumentAssembler() \
.setInputCol("text") \
.setOutputCol("document")sentence_detector = SentenceDetector() \
.setInputCols(["document"]) \
.setOutputCol("sentence")tokenizer = Tokenizer() \
.setInputCols(["sentence"]) \
.setOutputCol("token")contextual_parser = ContextualParserApproach() \
.setInputCols(["sentence", "token"])\
.setOutputCol("entity")\
.setJsonPath("cities.json")\
.setCaseSensitive(True)\
.setDictionary("cities.tsv", options={"orientation":"vertical"})chunk_converter = ChunkConverter() \
.setInputCols(["entity"]) \
.setOutputCol("ner_chunk")parserPipeline = Pipeline(stages=[
        document_assembler,
        sentence_detector,
        tokenizer,
        contextual_parser,
        chunk_converter
        ])
We then annotate the sample text using a LightPipeline model.
    # Create a lightpipeline model
    empty_data = spark.createDataFrame([[""]]).toDF("text")parserModel = parserPipeline.fit(empty_data)light_model = LightPipeline(parserModel)# Annotate the sample text
    annotations = light_model.fullAnnotate(sample_text)[0]
Let’s check our outputs!
    # Check outputs
    annotations.get("ner_chunk")
As you can see, both New York and Salt Lake City have been detected using the parameters that we set:
[Annotation(chunk, 7, 14, New York,
{'field': 'City',
'normalized': 'City',
'confidenceValue': '1.00',
'entity': 'City',
'sentence': '0'}),Annotation(chunk, 17, 30, Salt Lake City,
{'field': 'City',
'normalized': 'City',
'confidenceValue': '1.00',
'entity': 'City',
'sentence': '1'})]
We can then quickly visualize our outputs using the sparknlp-display library:
# Visualize outputs
from sparknlp_display import NerVisualizer visualiser = NerVisualizer() visualiser.display(annotations, label_col="ner_chunk", document_col="document")

Sweet! Feel free to experiment with the annotator parameters and JSON properties to see how the output might change.
Example 2: Detect Gender and Age
In this second example, we’ll be detecting gender and age entities from some sample text using a dictionary in the horizontal format. We’ll use the following sentences:
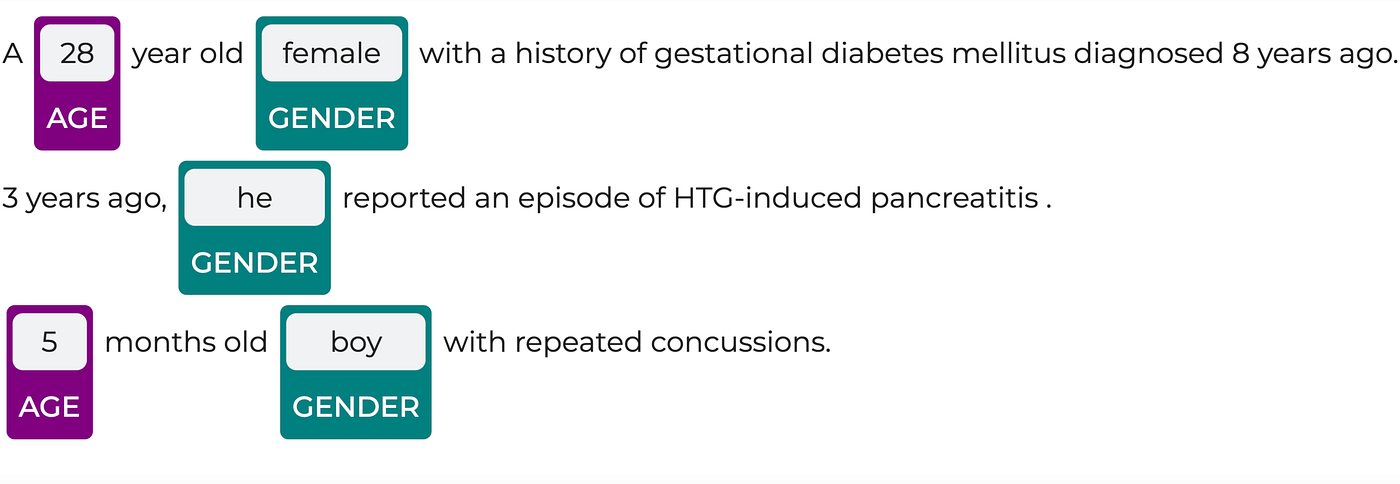
# Here's some sample text
sample_text = """
A 28 year old female with a history of gestational diabetes mellitus diagnosed 8 years ago. 3 years ago, he reported an episode of HTG-induced pancreatitis. 5 months old boy with repeated concussions.
"""
As you can see there are some tricky rules to consider when working with the entities related to age. We start by creating a JSON file with regex rules that will allow us to capture age and add properties that will prevent us from capturing things like 5 years ago.
# Create JSON file for age
age = {
"entity": "Age",
"ruleScope": "sentence",
"matchScope":"token",
"regex":"\\d{1,3}",
"prefix":["age of", "age"],
"suffix": ["-years-old", "years-old", "-year-old",
            "-months-old", "-month-old", "-months-old",
            "-day-old", "-days-old", "month old",
            "days old", "year old", "years old",
            "years", "year", "months", "old"],
"contextLength": 25,
"contextException": ["ago"],
"exceptionDistance": 10
}with open("age.json", "w") as f:
    json.dump(age, f)
Next, we create a horizontal dictionary and a JSON file with our chosen parameters for the gender entity class.
# Create a dictionary to detect gender
gender = """male,man,male,boy,gentleman,he,him
female,woman,female,girl,lady,old-lady,she,her
neutral,they,neutral,it"""with open("gender.csv", "w") as f:
    f.write(gender)# Create JSON file for gender
gender = {
    "entity": "Gender",
    "ruleScope": "sentence",
    "completeMatchRegex": "true",
    "matchScope":"token"
}import json
with open("gender.json", "w") as f:
    json.dump(gender, f)
We can build a pipeline that includes the ContextualParserApproach annotator.
False# Build pipelineFalse
document_assembler = DocumentAssembler() \
.setInputCol("text") \
.setOutputCol("document")sentence_detector = SentenceDetector() \
.setInputCols(["document"]) \
.setOutputCol("sentence")tokenizer = Tokenizer() \
.setInputCols(["sentence"]) \
.setOutputCol("token")gender_contextual_parser = ContextualParserApproach() \
    .setInputCols(["sentence", "token"]) \
    .setOutputCol("entity_gender") \
    .setJsonPath("gender.json") \
    .setCaseSensitive(False) \
    .setDictionary("gender.csv", options={"delimiter":","}) \
    .setPrefixAndSuffixMatch(False)   age_contextual_parser = ContextualParserApproach() \
    .setInputCols(["sentence", "token"]) \
    .setOutputCol("entity_age") \
    .setJsonPath("age.json") \
    .setCaseSensitive(False) \
    .setPrefixAndSuffixMatch(False)  gender_chunk_converter = ChunkConverter() \
.setInputCols(["entity_gender"]) \
.setOutputCol("chunk_gender")age_chunk_converter = ChunkConverter() \
.setInputCols(["entity_age"]) \
.setOutputCol("chunk_age")chunk_merger = ChunkMergeApproach() \
.setInputCols(["chunk_gender", "chunk_age"]) \
.setOutputCol("ner_chunk")parserPipeline = Pipeline(stages=[
    document_assembler,
    sentence_detector,
    tokenizer,
    gender_contextual_parser,
    age_contextual_parser,
    gender_chunk_converter,
    age_chunk_converter,
    chunk_merger
    ])
Next, we annotate the sample text using a LightPipeline model.
# Create a lightpipeline model
empty_data = spark.createDataFrame([[""]]).toDF("text")parserModel = parserPipeline.fit(empty_data)light_model = LightPipeline(parserModel)False# Annotate the sample textFalse
annotations = light_model.fullAnnotate(sample_text)[0]
Let’s check our outputs!
# Check outputs
annotations.get("ner_chunk")
Looks like we’ve covered all entities in the paragraph:
[Annotation(chunk, 2, 3, 28, {'entity': 'Age', 'field': 'Age', 'chunk': '0', 'normalized': '', 'sentence': '0', 'confidenceValue': '1.00'}),Annotation(chunk, 14, 19, female, {'entity': 'Gender', 'field': 'Gender', 'chunk': '1', 'normalized': 'female', 'sentence': '0', 'confidenceValue': '1.00'}),Annotation(chunk, 123, 124, he, {'entity': 'Gender', 'field': 'Gender', 'chunk': '2', 'normalized': 'male', 'sentence': '1', 'confidenceValue': '1.00'}),Annotation(chunk, 194, 194, 5, {'entity': 'Age', 'field': 'Age', 'chunk': '3', 'normalized': '', 'sentence': '2', 'confidenceValue': '1.00'}),Annotation(chunk, 207, 209, boy, {'entity': 'Gender', 'field': 'Gender', 'chunk': '4', 'normalized': 'male', 'sentence': '2', 'confidenceValue': '1.00'})]
Let’s visualize our results.
    False# Visualize outputsFalse
    from sparknlp_display import NerVisualizervisualiser = NerVisualizer()visualiser.display(annotations, label_col
=”
ner_chunk", document_col
=”
document")
Once again, feel free to experiment with the annotator parameters and JSON properties to see how the output might change. If you’re looking to work on running the pipeline on a full dataset, just make sure to use the fit() and transform() methods directly on your dataset instead of using the light pipeline. Here’s how that would work:
# Create example dataframe with sample text
data = spark.createDataFrame([[sample_text]]).toDF("text")# Fit and show
results = parserPipeline.fit(data).transform(data)
Conclusion
This article introduced you to ContextualParserApproach() one of the most flexible annotators in our library, allowing users to extract entities from a document based on pattern matching. Here’s a link to a notebook that puts together everything discussed in this tutorial.
If you’re looking for more powerful, deep learning-based NER models, make sure to head to our Models Hub to check out all our pre-trained NER models for the general and medical domains.