


Hear Me Out: How to Convert Your Voice to Text with Spark NLP and Python
Automatic Speech Recognition — ASR (or Speech to Text) is an essential task in Natural Language Processing (NLP) that can create text transcriptions of audio files. The open-source NLP Python library by John Snow Labs implemented two models for ASR: Facebook’s Wav2Vec version 2.0 and HuBERT, which achieve state-of-the-art accuracy on most public datasets. You learn how to use the library to extract texts from a given audio file and apply Named Entity Recognition to the extracted text.
Introduction
Automatic Speech Recognition (ASR), or Speech to Text, is an NLP task that converts audio inputs into text. It is helpful for many applications, including automatic caption generation for videos, dictation to generate reports and other documents, or creating transcriptions of audio recordings.
To perform this task, modern models use transformers-based deep learning models, and out of those, we have:
- Wav2Vec 2.0, created and shared by a Facebook researcher on wav2vec 2.0: A Framework for Self-Supervised Learning of Speech Representations by Alexei Baevski, Henry Zhou, Abdelrahman Mohamed, Michael Auli
- HuBERT, also proposed by Facebook on HuBERT: Self-Supervised Speech Representation Learning by Masked Prediction of Hidden Units by Wei-Ning Hsu, Benjamin Bolte, Yao-Hung Hubert Tsai, Kushal Lakhotia, Ruslan Salakhutdinov, Abdelrahman Mohamed
These models use the encoder-decoder architecture based on Transformers. By the end of this post, you will have a better understanding of ASR and how to use Spark NLP to create pipelines, process audio files, and extract their texts at scale.
Background
Both Wav2Vec and HuBERT models consist of an encoder-decoder architecture. They encode the audio (converted in arrays of float numbers) into a dense representation and then decode this representation using attention-based (Transformers) models of NLP to generate the text.
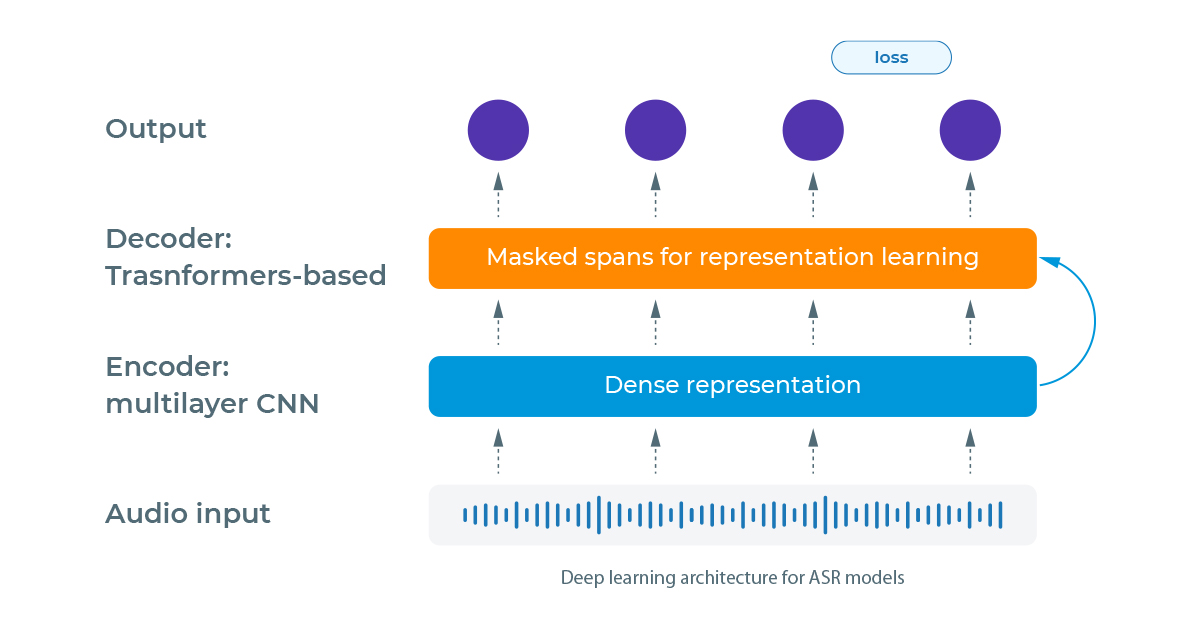
The main differences between Wav2Vec 2.0 and HuBERT are how they process the audio input and the loss function to measure the performance of the outputs and backpropagate the errors during training.
While Wav2Vec 2.0 transforms the audio using the quantization technique with a Gumbel Softmax sampling to determine the candidate words, the HuBERT model uses the K-means algorithm to cluster the audio inputs and create embeddings of them that are used in the prediction step. As for the loss function, the Wav2Vec 2.0 uses the CTC loss together with a Diversity loss, and the HuBERT model uses cross-entropy.
After learning about the models, let’s see how to use them in Spark NLP. But wait, what is Spark NLP?
Introduction to Spark NLP
Spark NLP is an open-source library maintained by John Snow Labs. It is built on top of Apache Spark and Spark ML. It provides simple, performant & accurate NLP annotations for machine learning pipelines that can scale quickly in a distributed environment.
To install Spark NLP, you can simply use any package manager like conda or pip. For example, using pip, you can run pip install spark-nlp. For different installation options, check the official documentation.
Spark NLP processes the data using Pipelines, a structure that contains all the steps to be run on the input data the same way Spark ML does.
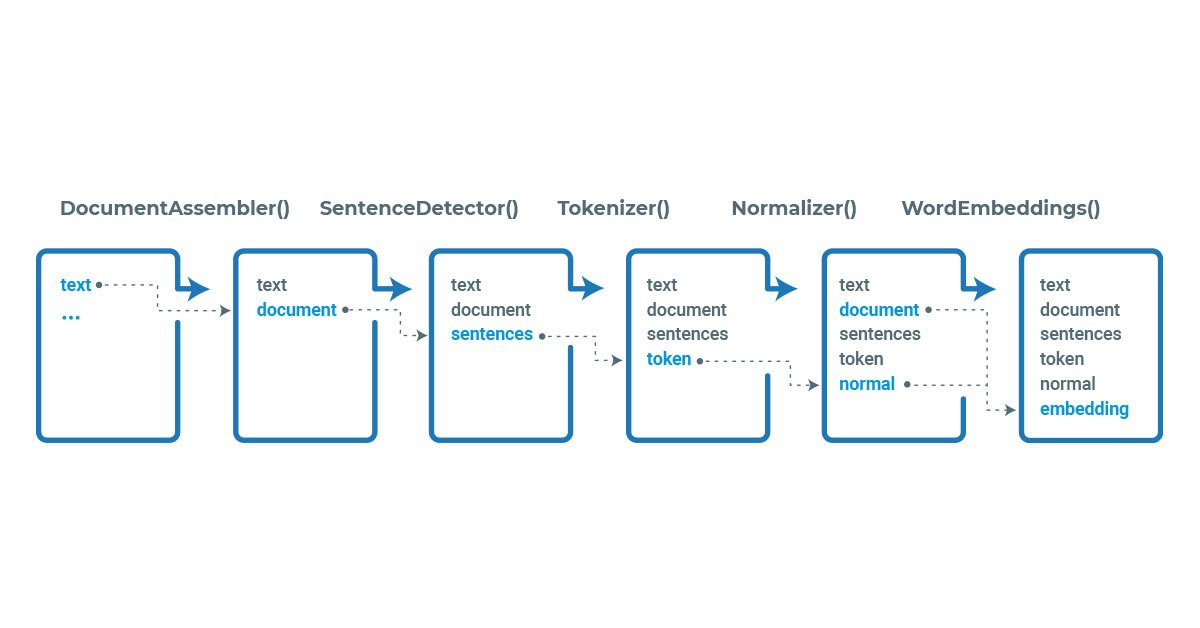
Example pipeline in Spark NLP
Each stage of the pipeline is created by an annotator that uses one or more of the previous information to create a new annotation. Each annotator can be of two types, AnnotatorModel which can be used to make predictions based on pretrained models and AnnotatorApproach which can be used to train new custom models. Pretrained models can be found in the NLP Models Hub.
As part of the spark ecosystem, before using the library, we need to start a spark session, which can be done by:
import sparknlp


spark = sparknlp.start()
Pre-processing audio files
To extract text from audio files, we must first load the audio in memory as an array of float numbers and then send the data to spark for processing. Let’s see how to use the library librosa to do that.
First, we make sure that the library is installed.
pip install librosa
For this post, we will use a sample audio file available at John Snow Labs’ public database
We use librosa to load the audio file as a numpy array and then convert the data into a list of float numbers (Spark NLP annotators are not compatible with numpy.float32 data type at this moment):
data, sampling_rate = librosa.load("sample_file.mp3", sr=16000)

data = data.tolist()
We used a sampling rate of 16 kHz, which is enough for our purposes and is commonly used in ASR applications. The .load() method can resample the audio to fit our needs by passing the parameter. sr=16000. Next, we will send this information to a spark data frame:
spark_df = spark.createDataFrame([[data]], ["audio_content"])
Now we have a spark data frame with one column named audio_content containing the array of the audio input. This is the required format to be processed by the ASR models.
Creating the Spark NLP pipeline for processing
Next, we can create a pipeline for processing the audio file and extracting the text. Let’s import the required modules and annotators to do that:
from sparknlp.base import Pipeline, AudioAssembler
from sparknlp.annotator import Wav2Vec2ForCTC, HubertForCTC


# Data Frame manipulations
import pyspark.sql.functions as F
We need the AudioAssembler annotator to transform the audio array into an AUDIO type annotation, which will be used by any of the Wav2Vec2ForCTC or HubertForCTC annotators to extract its text. We can use both models in the same pipeline without duplicating the audio annotations. This is helpful when experimenting with different models for quick comparison.
Currently, Spark NLP has more than 2,600 pretrained models for the Wave2Vec 2.0 model while having only one pretrained model for the HuBERT model. The available models can be found in the NLP Models Hub. We will use similar models for a fair comparison, trained in the LibriSpeech dataset.
# Creates `AUDIO` annotations
audio_assembler = (
    AudioAssembler()
    .setInputCol("audio_content")
    .setOutputCol("audio")
)

# Transcribe the audio into `DOCUMENT` annotation
wav2vec = (
    Wav2Vec2ForCTC()
    .pretrained("asr_wav2vec2_large_960h", "en")
    .setInputCols("audio")
    .setOutputCol("wav2vec")
)

# Transcribe the audio into `DOCUMENT` annotation
hubert = (
    HubertForCTC()
    .pretrained("asr_hubert_large_ls960", "en")
    .setInputCols("audio")
    .setOutputCol("hubert")
)

# Defines the pipeline
pipeline = Pipeline(stages=[
    audio_assembler,
    wav2vec,
    Hubert
])
With this, the pipeline is defined, having the class Pipeline from Spark ML. To make predictions, we need first to fit the model to data, obtaining a PipelineModel. As we have only pretrained stages in our pipeline, no training will be performed, and this will be only a formality.
# Obtain a Spark ML's PipelineModel
model = pipeline. Fit(spark_df)
Next, we will run the model on the same audio file and examine its results.
Extracting text from audio with Spark NLP
To extract the text, we can simply run the obtained PipelineModel on the spark data frame we created. Then we can display the obtained text using the .show() method.
result = model.transform(spark_df)

result.select(
    F.expr("wav2vec.result as wav2vec"), F.expr("hubert.result as hubert")
).show(truncate=False)
+------------------------------------------------------------------------------------------------------+------------------------------------------------------------------------------------------------------+
|wav2vec                                                                                               |hubert                                                                                                |
+------------------------------------------------------------------------------------------------------+------------------------------------------------------------------------------------------------------+
|[THE MONA LISA IS A SIXTENTH CENTURY OIL PAINTING CREATED BY LEONARDO ITS HELD AT THE LUVRA IN PARIS ]|[THE MONALISA IS A SIXTENTH CENTURY OIL PAINTING CREATED BY LEONARDO IT'S HELD AT THE LUVRA IN PARIS ]|
+------------------------------------------------------------------------------------------------------+------------------------------------------------------------------------------------------------------+
We can put the obtained texts together for better visualization (I added extra spaces for better comparison):
THE **MONA LISA** IS A SIXTENTH CENTURY OIL PAINTING CREATED BY LEONARDO **ITS**  HELD AT THE LUVRA IN PARIS
THE **MONALISA**  IS A SIXTENTH CENTURY OIL PAINTING CREATED BY LEONARDO **IT'S** HELD AT THE LUVRA IN PARIS
We can see that for this example file, both models achieved equivalent results.
One-liner alternative
In October 2022, John Snow Labs released the open-source johnsnowlabs library that contains all the company products, open-source and licensed, under one common library.
This simplified the workflow, especially for users that work with more than one of the libraries (e.g., Spark NLP + Healthcare NLP). To use the library, you first need to install it with your preferred package manager:
pip install johnsnowlabs
Then we can import any of the libraries by using the corresponding modules:
from johnsnowlabs import nlp # Wrap around Spark NLP and NLU
from johnsnowlabs import medical # Wrap around Healthcare NLP
from johnsnowlabs import finance # Wrap around Finance NLP
from johnsnowlabs import legal # Wrap around Legal NLP
from johnsnowlabs import viz # Wrap around Spark NLP Display
NOTE: when using johnsnowlabs library, make sure you initialize the spark session with the configuration you have available. Since some libraries are licensed, you may need to set the path to your license file.
If you want to use the open-source libraries only, you can start the session with spark = nlp.start(nlp=False). The default parameters for the start function include using the licensed Healthcare NLP library with nlp=True, but we can set that to False and use all the resources of the open-source libraries such as Spark NLP, Spark NLP Display, and NLU.
Then, to run a Wav2Vec2ForCTC annotator directly on the audio file, we can run the following command:
nlp.load('en.speech2text.wav2vec2.v2_base_960h').predict("sample_file.mp3")
Which will return a Pandas data frame with two columns: audio_content containing the audio array of float numbers and text containing the extracted text. Simple as that!
Fast inference with LightPipelines
We can use Spark NLP’s LightPipeline to run fast inference directly on text (or list of text) instead of using spark data frames.
Let’s check how to do that.
from sparknlp.base import LightPipeline

# Simply define the LightPipeline on the PipelineModel
lp = LightPipeline(model)
For audio data (list of float numbers), we should use the .fullAnnotate() method of LightPipeline. The .annotate() method is not currently supported for audio inputs.
The .fullAnnotate() method returns a list containing each stage annotation with all metadata included.
lp_result = lp.fullAnnotate(data)[0]
lp_result.keys()
dict_keys(['audio_assembler', 'text'])
lp_result["text"]
[Annotation(document, 0, 44, PEOPLE WHO DIED WHILE LIVING IN OTHER PLACES , Map(audio -> 0, sentence -> 0, length -> 69632), [])]
lp_result["text"][0].result
'PEOPLE WHO DIED WHILE LIVING IN OTHER PLACES '
Easy as that!
Application: Identifying Named Entities in the transcripts
Now that we have the transcripts obtained from the audio file, we can use other Spark NLP annotators to make additional NLP analyses and process them. For example, we can use pretrained Named Entity Recognition (NER) models to identify special mentions on the transcripts.
We will apply the standard preprocessing on the obtained transcripts: lowercasing the text, and removing non-letter characters (punctuation and numbers). We could go one extra mile by adding more complex steps such as spell checking and correction, removing stopwords, etc.
To use the NER model, we need both TOKEN and WORD_EMBEDDING annotations, which can be obtained by Spark NLP’s Tokenizer and BertEmbeddings annotators.
# Import additional annotators

from sparknlp.annotator import (
    Tokenizer,
    Normalizer,
    BertEmbeddings,
    NerDLModel,
    NerConverter,
)
The pretrained NER model can be obtained with the NerModel annotator. We will use the onto_small_bert_L4_256 model, which was trained with the small_bert_L4_256 embedding model. We need to use the same embeddings used during the training of the NER model. Finally, we will add the NerConverter annotator that cleans the output of NER entities in a more readable way. Note that for this example, we will use the output of the Wav2Vec model, so the input column of the Tokenizer annotator is “wav2vec”.
Let’s see how to complete the pipeline:
token = Tokenizer() \
    .setInputCols("wav2vec") \
    .setOutputCol("token")

# Standard text cleaning
normalizer = Normalizer() \
    .setInputCols("token") \
    .setOutputCol("normalized") \
    .setLowercase(True)

bert = BertEmbeddings.pretrained("small_bert_L4_256") \
    .setInputCols("wav2vec", "normalized") \
    .setOutputCol("embeddings")

ner_onto = NerDLModel.pretrained("onto_small_bert_L4_256", "en") \
    .setInputCols(["wav2vec", "normalized", "embeddings"]) \
    .setOutputCol("ner")

entities = NerConverter() \
    .setInputCols(["wav2vec", "normalized", "ner"]) \
    .setOutputCol("entities")

ner_pipeline = Pipeline(stages=[
    token,
    normalizer,
    bert,
    ner_onto,
    entities
])
Now we can use the NER pipeline on the previously obtained transcriptions. We will use the pyspark.sql.functions to manipulate the obtained data frame and extract the relevant information from the annotations.
ner_results = ner_pipeline.fit(spark_df).transform(spark_df)

ner_result.select(
    F.explode(
        F.arrays_zip(ner_results.entities.result, ner_results.entities.metadata)
    ).alias("entities")
).select(
    F.expr("entities['0']").alias("chunk"),
    F.expr("entities['1'].entity").alias("entity"),
).show(
    truncate=False
)
Obtaining:
+----------------+-----------+
|chunk           |entity     |
+----------------+-----------+
|THE MONA LISA   |WORK_OF_ART|
|SIXTENTH CENTURY|DATE       |
|LEONARDO        |PERSON     |
|THE LUVRA       |FAC        |
|PARIS           |GPE        |
+----------------+-----------+
Many relevant entities were correctly identified, even with spelling errors. That’s very impressive using only pretrained models freely available and ready to use at scale!
Additional resources
- ASR page on Hugging Face
- Hubert page on Hugging Face
- Automatic Speech Recognition (ASR) Software — An Introduction, by UsabilityGeek
- Documentation: HubertForCTC, Wav2Vec2forCTC
- Python Docs: HubertForCTC, Wav2Vec2ForCTC
- Scala Docs: HubertForCTC, Wav2Vec2ForCTC
- One-liner additional examples
- For other examples of usage, see the Spark NLP Workshop repository.
2025 Results & 2026 Trends in Healthcare ASR (Spark NLP)
By 2025, clinical-grade speech-to-text systems powered by advanced ASR models approached 90%+ accuracy in controlled hospital environments, with some deployments reporting around 93% accuracy for specialized medical vocabulary. Early pilots also indicated a significant reduction in documentation time, which signaled the beginning of a broader shift toward real-time transcription as a standard tool in clinical practice (source).
Another key development emerging in 2025 was the integration of multilingual medical ASR models. As healthcare became increasingly globalized, systems trained on diverse datasets successfully supported cross-lingual transcription for major languages such as English, Mandarin, German, French, and Vietnamese, paving the way for widespread adoption in emergency and telemedicine services.
Finally, recent studies highlight the growing importance of federated learning in healthcare NLP, showing that decentralized training can improve transcription quality while maintaining compliance with privacy regulations such as HIPAA and GDPR. This trend, continuing into 2026, shows that responsible AI methods not only enhance model performance but also safeguard patient privacy at scale.
FAQ
- How accurate is Spark NLP for speech-to-text in healthcare settings as of 2025?
Spark NLP provides strong performance for speech-to-text in clinical environments, especially in controlled hospital settings. Accuracy may vary depending on background noise, recording quality, and medical terminology, but the technology is considered reliable enough to support tasks like medical dictation, reporting, and integration with EHR systems. - Can Spark NLP handle multilingual medical transcription?
Yes. Multilingual ASR models introduced in 2025 support English, Spanish, Mandarin, and Arabic, making them highly effective in telemedicine and international healthcare. - How does federated learning improve privacy in speech-to-text models?
Federated learning enables hospitals to train models without centralizing sensitive data, improving transcription accuracy while staying compliant with HIPAA and GDPR. - What are the main use cases for ASR in healthcare today?
The most common applications include real-time transcription for electronic health records (EHRs), automatic report generation, medical dictation, and multilingual patient communication. - What trends in 2026 will shape the future of speech-to-text in healthcare?
Key trends include broader adoption of multilingual ASR, integration with clinical decision support systems, and scalable deployment of privacy-preserving NLP models in hospital networks.