


In this article, we are going to explain how to attach a custom Spark NLP, Spark NLP for Healthcare, and Spark OCR Docker image to SageMaker Studio.
Requirements:
- AWS Account with IAM permissions granted for ECR, SageMaker, and Network Traffic (AWS credentials should be set)
- Docker
- Valid license keys for Spark NLP for Healthcare and Spark OCR. (License keys are not required for Spark NLP public — please modify the Dockerfile if needed) To get a trial license, please refer to: https://www.johnsnowlabs.com/install/
Instructions and files are taken from this repo.
1. Unzipping the code
Unzip the sagemaker_template.zip file, if you have not done so. Inside, you should find the following files:
Dockerfile
- ipynb
- app-image-config-input.json
- sh
- yml
- md
- json
2. Set your license
license.json is empty. You should overwrite it with your own license with both OCR and Healthcare secret and license codes. The following fields are required and should be present in your license(s). if not, please contact the JSL team at support@johnsnowlabs.com.
        {
        "AWS_ACCESS_KEY_ID": "",
        "AWS_SECRET_ACCESS_KEY": "",
        "SPARK_OCR_LICENSE": "",
        "SPARK_OCR_SECRET": "",
        "PUBLIC_VERSION": "",
        "OCR_VERSION": "",
        "SPARK_NLP_LICENSE": "",
        "SECRET": "",
        "JSL_VERSION": ""
        }
3. Configure ECR
The Docker Image for SageMaker should reside in AWS ECR.
To configure your ECR, you need to open ecr_configure.sh and set the following fields:
        REGION=      # Your AWS region for ECR. Example, eu-central-1
        ACCOUNT_ID= # Your AWS Account Id. Example, 123456789
        IMAGE_NAME= # Any name may work here, for example, SparkNLP
        REPO_NAME=   # The repo name in ECR. It will try to create one if it is not present. Example: JSL
        ROLE_ARN=    # AWS ARN Role, something that usually you create when starting Sagemaker, and that allows using ECR and grants other permission
4. Execute ecr_configure.sh
After configuring ecr_configure.sh variables as described in the previous section, you will be able to create a Docker image using the available Dockerfile file, and this script will build it and upload it to your ECR. Just run:
./ecr_configure.sh
If it does not have execution rights, just use bash ./ecr_configure.sh or grant permissions by executing chmod +x ecr_configure.sh
Don’t close the terminal, you will need the output (especially the image URI) for adding it to SageMaker.
After running .sh file, please make sure these outputs are present:
– A message saying repository is created. If the repository already existed, you will get an `An error occurred (RepositoryAlreadyExistsException) when calling the CreateRepository operation: The repository with name ‘jsl’ already exists in the registry with id “XXXX”` you can ignore.
Login SucceededImage successfully tagged, Building 2.6s (18/18) FINISHED and/or information about the output of the Dockerfile build, depending on your version of Docker and OS.Pushed the image properlyor information about the creation of all the layers of the Docker image, for example:
        The push refers to repository [ACCOUNT_ID.dkr.ecr.REGION.amazonaws.com/REPO_NAME]ada4ff8fc3ed: Pushed95b2e5a9f88d: Pushed
        1c38ff1b8f8b: Pushed
        2429bf5919e0: Pushed…
ImageVersionStatusisCREATED:
        {
        "BaseImage": "ACCOUNT_ID.dkr.ecr.REGION.amazonaws.com/REPO_NAME:IMAGE_NAME",
        "ContainerImage": "ACCOUNT_ID.dkr.ecr.REGION.amazonaws.com/REPO_NAME@sha256:eXXXXXXXXXXXXXXXXXXXXXXXXXXXXXXXXXXXXXXXXXXXXXXXXXXXXXXXXXX",
        "CreationTime": "2021-12-15T13:24:31.162000+00:00",
        "ImageArn": "arn:aws:sagemaker:REGION:ACCOUNT_ID:image/IMAGE_NAME",
        "ImageVersionArn": "arn:aws:sagemaker:REGION:ACCOUNT_ID:image-version/IMAGE_NAME/1",
        "ImageVersionStatus": "CREATED",
        "LastModifiedTime": "2021-12-15T13:24:31.525000+00:00",
        "Version": 1
        }
NOTE: If the REPO_NAME is an existing name in your ECR, the first command will show a warning that it already exists. You can ignore it.
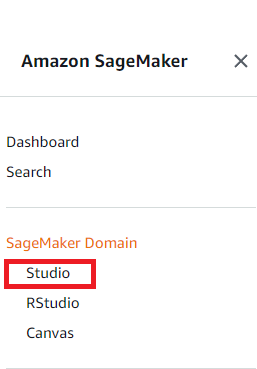
5. Open SageMaker
In Sagemaker, go to SageMaker Domain -> Studio. Make sure you have an active user, with the role arn you have set in ROLE_ARN in Section 3.
On the bottom part of the screen, you will see Customer SageMaker Studio images attached to domain.
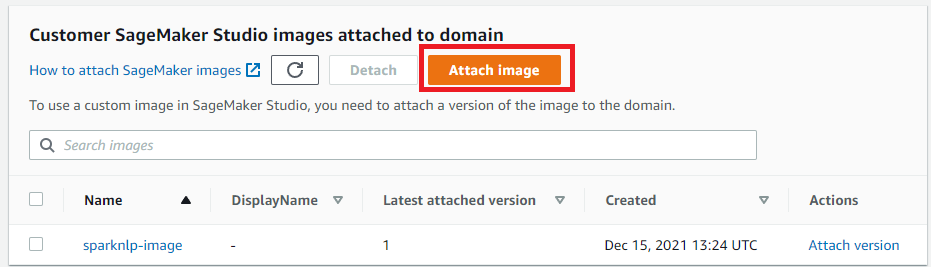
6. Attach image
In the Choose image source, click on New Image, and then in the Enter an ECR image URI, add the URI you will see in the logs from step 4. Click on “Next”.
Configuration for attaching image
Configuration for attaching image
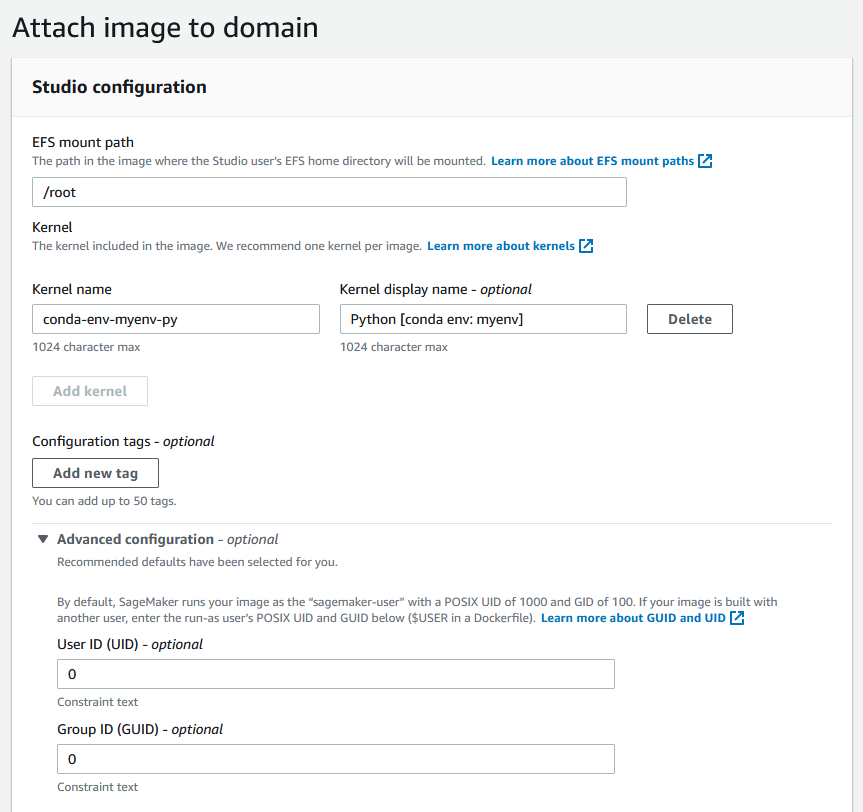
Then, in Image properties, fill Image name (same as IMAGE_NAME in step 3), and Image display name (also use IMAGE_NAME). In IAM role, make sure you select the same ROLE_ARN from section 3 in the dropdown. Click on “Next”.
EFS mount path should be /root. Kernel name should be conda-env-myenv-py. Kernel display name should be Python [conda env: myenv]. Click on “Advanced Configuration”. Set User ID (UID) to 0. Set Group ID (GUID) to 0. Click on Submit.
7. Launching SageMaker Studio
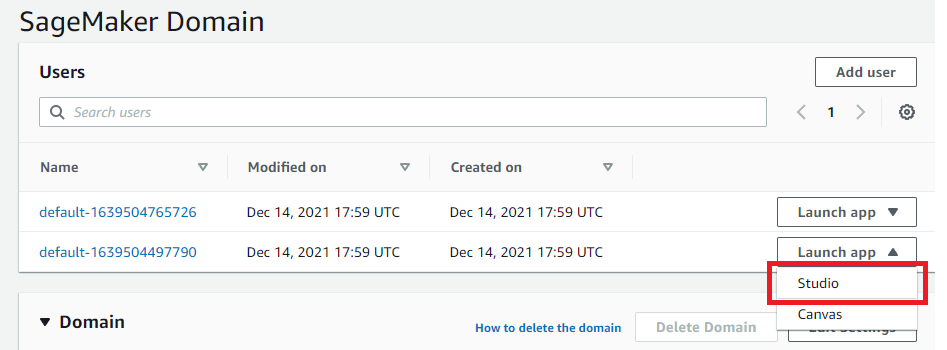
After clicking on submit, you will see a Ready status in the Sagemaker Domain -> Studio screen. Go to Users (top of the screen), click on Launch app and select Studio.
SageMaker Studio will take some time to launch because will instantiate a container of the image we have added. After that, you can start a new notebook. Make sure you see as active the Python [conda env: myenv] kernel. It may take also some time to spin.
7.1 Important Note:
IMPORTANT!!! Please make sure the very first command in the notebook is:
!echo "127.0.0.1 $HOSTNAME" >> /etc/hosts
Once spun, you are ready to go. Find in the .zip folder a SparkNLP_sagemaker.ipynb example notebook you can upload to test that your installation is working.
8. Any doubt?
Write us to support@johnsnowlabs.com