


Speed up state-of-the-art ViT models in Hugging Face 🤗 up to 2300% (25x times faster ) with Databricks, Nvidia, and Spark NLP 🚀
Scaling out transformer-based models by using Databricks, Nvidia, and Spark NLP
I am one of the contributors to the Spark NLP open-source project and just recently this library started supporting end-to-end Vision Transformers (ViT) models. I use Spark NLP and other ML/DL open-source libraries for work daily and I have decided to deploy a ViT pipeline for a state-of-the-art image classification task and provide in-depth comparisons between Hugging Face and Spark NLP.
The purpose of this article is to demonstrate how to scale out Vision Transformer (ViT) models from Hugging Face and deploy them in production-ready environments for accelerated and high-performance inference. By the end, we will scale a ViT model from Hugging Face by 25x times (2300%) by using Databricks, Nvidia, and Spark NLP.
In Part 1 of this article, I will:
- A short introduction to Vision Transformer (ViT)
- Benchmark Hugging Face inside Dell server on CPUs & GPUs
- Benchmark Spark NLP inside Dell server on CPUs & GPUs
In the spirit of full transparency, all the notebooks with their logs, screenshots, and even the excel sheet with numbers are provided here on GitHub
Introduction to Vision Transformer (ViT) models
Back in 2017, a group of researchers at Google AI published a paper that introduced a transformer model architecture that changed all Natural Language Processing (NLP) standards. The paper describes a novel mechanism called self-attention as a new and more efficient model for language applications. For instance, the two of the most popular families of transformer-based models are GPT and BERT.
A bit of Transformer history https://huggingface.co/course/chapter1/4
There is a great chapter about “How Transformers Work” which I highly recommend for reading if you are interested.
Although these new Transformer-based models seem to be revolutionizing NLP tasks, their usage in Computer Vision (CV) remained pretty much limited. The field of Computer Vision has been dominated by the usage of convolutional neural networks (CNNs) and there are popular architectures based on CNNs (like ResNet). This had been the case until another team of researchers this time at Google Brain introduced the “Vision Transformer” (ViT) in June 2021 in a paper titled: “An Image is Worth 16×16 Words: Transformers for Image Recognition at Scale”
This paper represents a breakthrough when it comes to image recognition by using the same self-attention mechanism used in transformer-based models such as BERT and GPT as we just discussed. In Transformed-based language models like BERT, the input is a sentence (for instance a list of words). However, in ViT models we first split an image into a grid of sub-image patches, we then embed each patch with a linear project before having each embedded patch become a token. The result is a sequence of embeddings patches which we pass to the model similar to BERT.
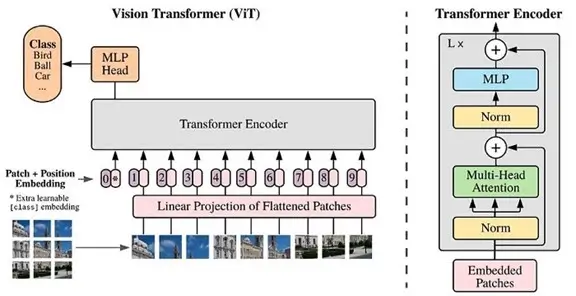
An overview of the ViT model structure as introduced in Google Research’s original 2021 paper —
Vision Transformer focuses on higher accuracy but with less compute time. Looking at the benchmarks published in the paper, we can see the training time against the Noisy Student dataset (published by Google in Jun 2020) has been decreased by 80% even though the accuracy state is more or less the same. For more information regarding the ViT performance today you should visit its page on Papers With Code:
Comparison with state of the art on popular image classification benchmarks. (https://arxiv.org/pdf/2010.11929.pdf)
It is also important to mention that once you have trained a model via ViT architecture, you can pre-train and fine-tune your transformer just as you do in NLP. (that’s pretty cool actually!)
If we compare ViT models to CNNs we can see that they have higher accuracy with much lower cost for computations. You can use ViT models for a variety of downstream tasks in Computer Vision like image classification, detecting objects, and image segmentation. This can be also domain-specific in Healthcare you can pre-train/fine-tune your ViT models for femur fractures, emphysema, breast cancer, COVID-19, and Alzheimer’s disease.¹
I will leave references at the end of this article just in case you want to dig deeper into how ViT models work.
[1]: Deep Dive: Vision Transformers On Hugging Face Optimum Graphcore https://huggingface.co/blog/vision-transformersSome ViT models in actions
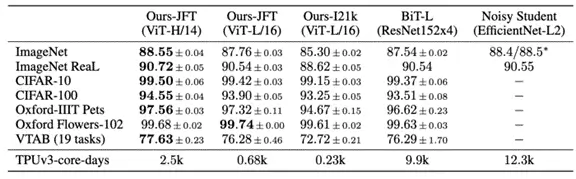
Vision Transformer (ViT) model (vit-base-patch16–224) pre-trained on ImageNet-21k (14 million images, 21,843 classes) at resolution 224×224, and fine-tuned on ImageNet 2012 (1 million images, 1,000 classes) at resolution 224×224:
 |
 |
https://huggingface.co/google/vit-base-patch16-224
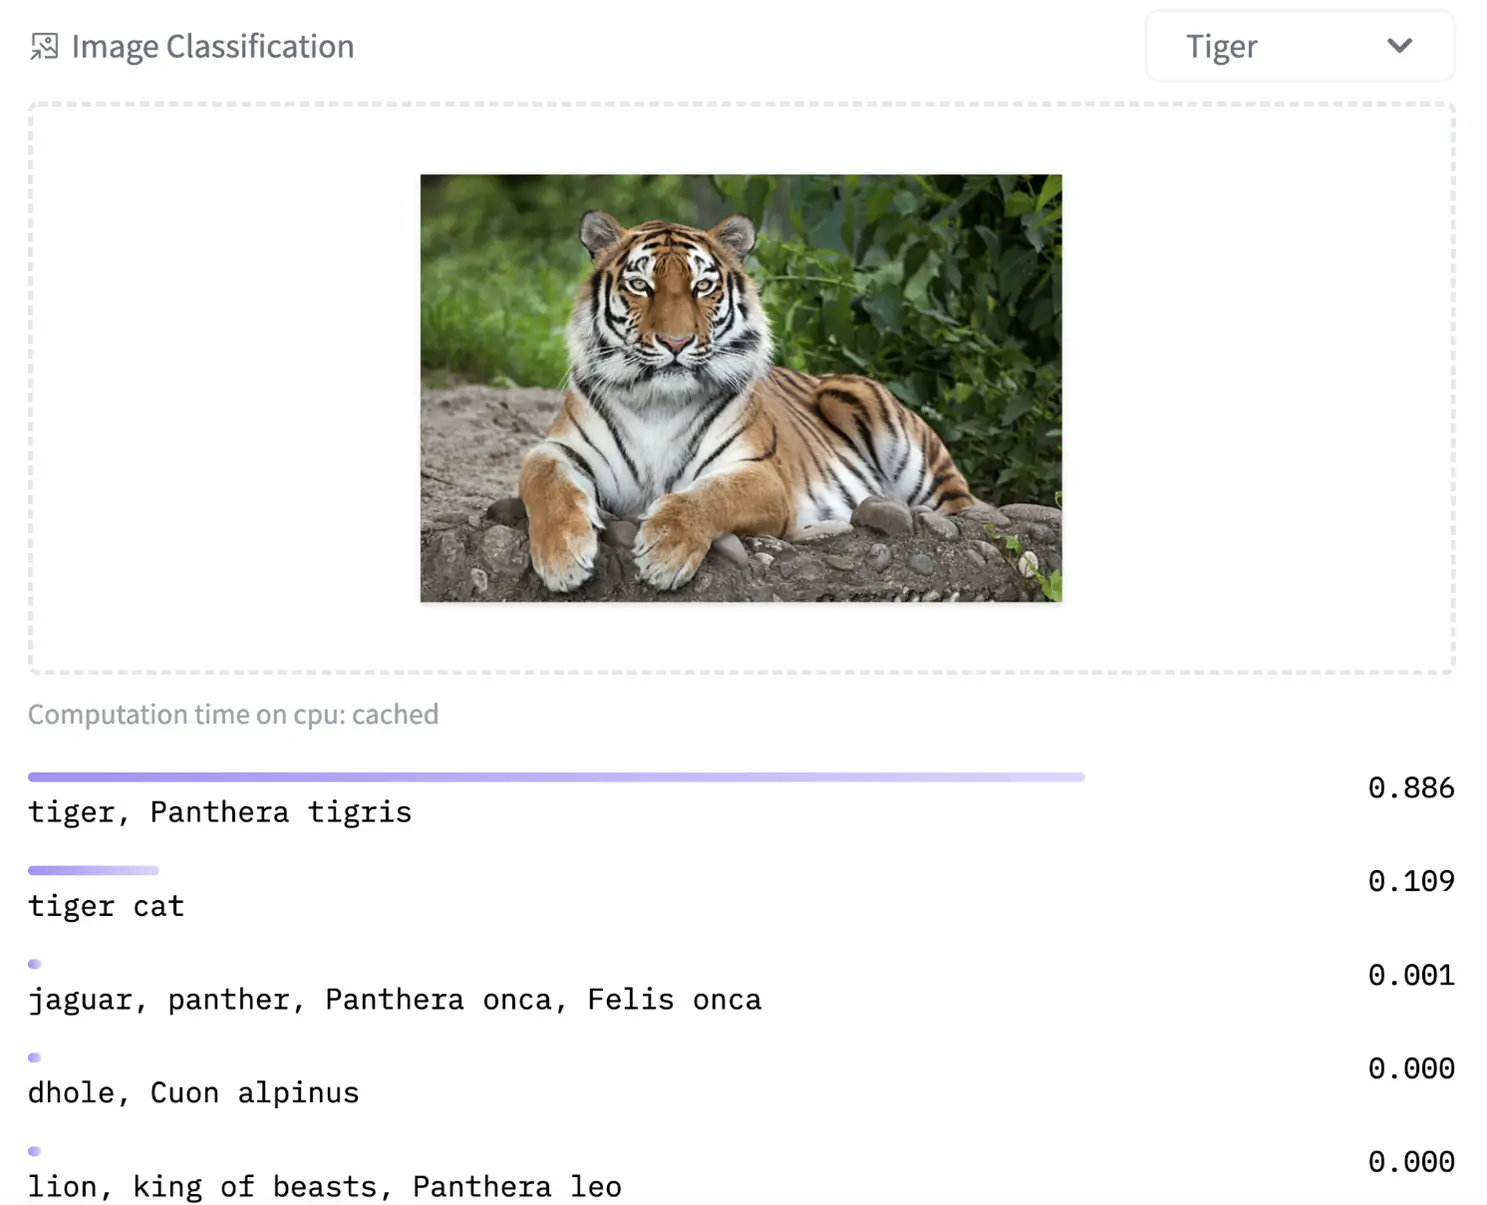
Fine-tuned ViT models used for food classification:
 |
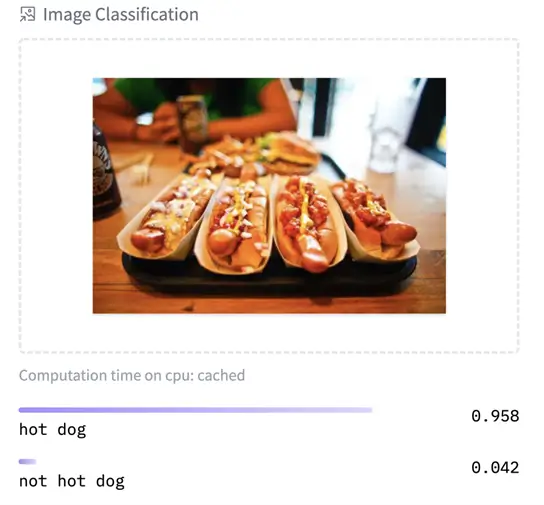 |
https://huggingface.co/nateraw/food — https://huggingface.co/julien-c/hotdog-not-hotdog
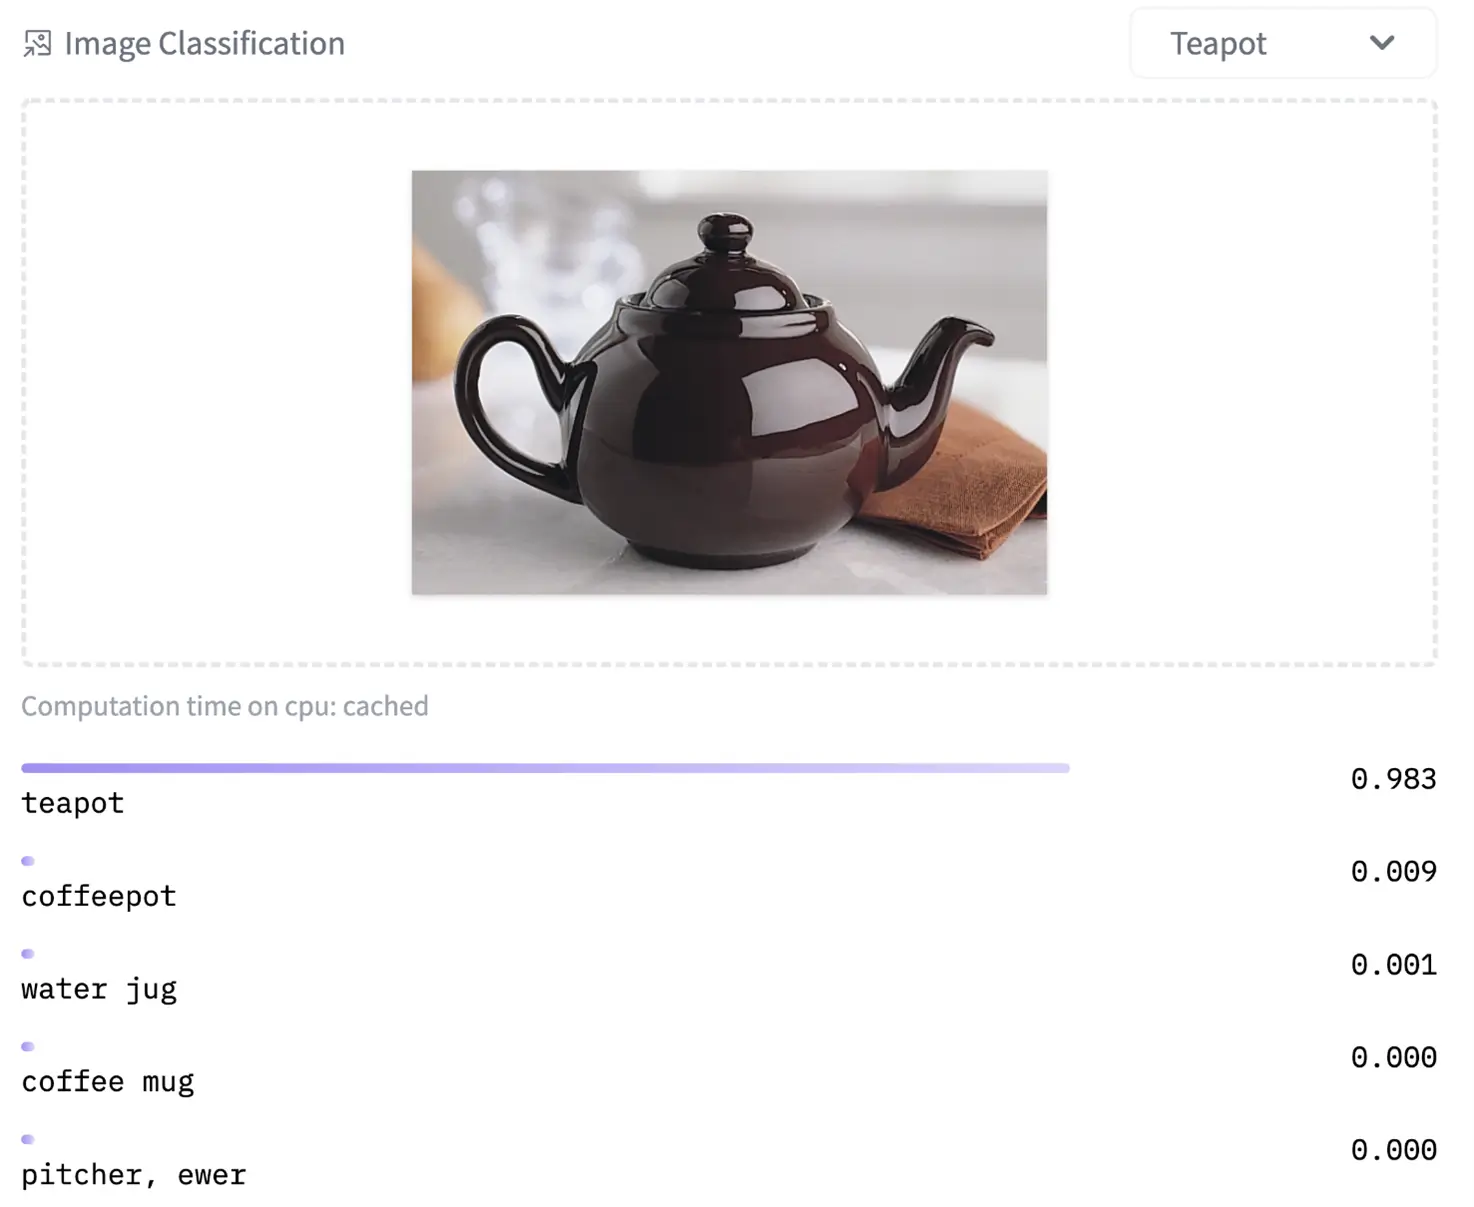
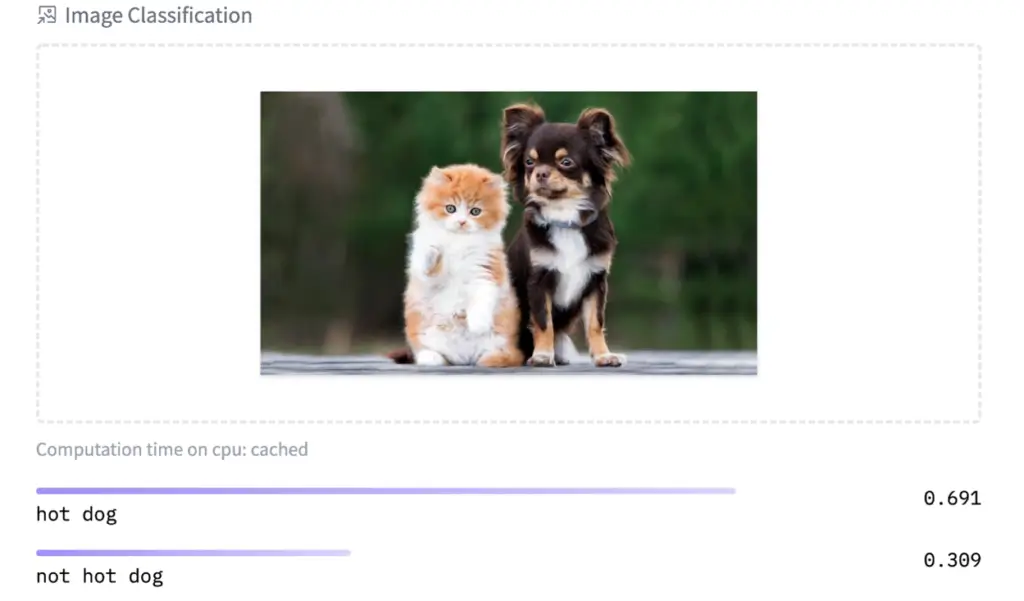
There are however limitations & restrictions to any DL/ML models when it comes to prediction. There is no model with 100% accuracy so keep in mind when you are using them for something important like Healthcare:
 |
 |
Image is taken from: https://www.akc.org/expert-advice/lifestyle/do-you-live-in-dog-state-or-cat-state/ —
ViT model: https://huggingface.co/julien-c/hotdog-not-hotdog
Can we use these models from Hugging Face or fine-tune new ViT models and use them for inference in real production? How can we scale them by using managed services for distributed computations such as AWS EMR, Azure Insight, GCP Dataproc, or Databricks?
Hopefully, some of these will be answered by the end of this article.
Let the Benchmarks Begin!
Some details about our benchmarks:
1- Dataset: ImageNet mini: sample (>3K) — full (>34K)
I have downloaded ImageNet 1000 (mini) dataset from Kaggle: https://www.kaggle.com/datasets/ifigotin/imagenetmini-1000
I have chosen the train directory with over 34K images and called it imagenet-mini since all I needed was enough images to do benchmarks that take longer. In addition, I have randomly selected less than 10% of the full dataset and called it imagenet-mini-sample which has 3544 images for my smaller benchmarks and also to fine-tune the right parameters like the batch size.
2- Model: The “vit-base-patch16–224” by Google
We will be using this model from Google hosted on Hugging Face: https://huggingface.co/google/vit-base-patch16-224
3- Libraries: Transformers 🤗 & Spark NLP 🚀
Benchmarking Hugging Face on a Bare Metal Server
ViT model on a Dell PowerEdge C4130
What is a bare-metal server? A bare–metal server is just a physical computer that is only being used by one user. There is no hypervisor installed on this machine, there are no virtualizations, and everything is being executed directly on the main OS (Linux — Ubuntu) — the detailed specs of CPUs, GPUs, and the memory of this machine are inside the notebooks.
As my initial tests plus almost every blog post written by the Hugging Face engineering team comparing inference speed among DL engines have revealed, the best performance for inference in the Hugging Face library (Transformer) is achieved by using PyTorch over TensorFlow. I am not sure whether this is due to TensorFlow being a second-class citizen in Hugging Face due to fewer supported features, fewer supported models, fewer examples, outdated tutorials, and yearly surveys for the last 2 years answered by users asking more for TensorFlow or PyTorch just has a lower latency in inference on both CPU and GPU.
TensorFlow remains the most-used deep learning framework
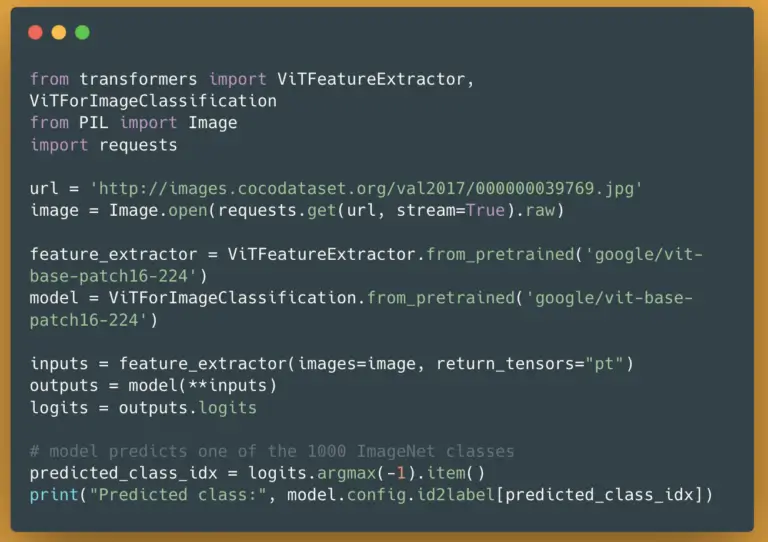
Regardless of the reason, I have chosen PyTorch in the Hugging Face library to get the best results for our image classification benchmarks. This is a simple code snippet to use a ViT model (PyTorch of course) in Hugging Face:
from transformers import ViTFeatureExtractor, ViTForImageClassification
        from PIL import Image
        import requests

        url = 'http://images.cocodataset.org/val2017/000000039769.jpg'
        image = Image.open(requests.get(url, stream=True).raw)

        feature_extractor = ViTFeatureExtractor.from_pretrained('google/vit-base-patch16-224')
        model = ViTForImageClassification.from_pretrained('google/vit-base-patch16-224')

        inputs = feature_extractor(images=image, return_tensors="pt")
        outputs = model(**inputs)
        logits = outputs.logits

        predicted_class_idx = logits.argmax(-1).item()
        print("Predicted class:", model.config.id2label[predicted_class_idx])
https://huggingface.co/google/vit-base-patch16-224#how-to-use
This may look straightforward to predict an image as an input, but it is not suitable for larger amounts of images, especially on a GPU. To avoid predicting images sequentially and to take advantage of accelerated hardware such as GPU is best to feed the model with batches of images which is possible in Hugging Face via Pipelines. Needless to say, you can implement your batching technique either by extending Hugging Face’s Pipelines or doing it on your own.
A simple pipeline for Image Classification will look like this:
from transformers import ViTFeatureExtractor, ViTForImageClassification
        from transformers import pipeline

        feature_extractor = ViTFeatureExtractor.from_pretrained('google/vit-base-patch16-224')
        model = ViTForImageClassification.from_pretrained('google/vit-base-patch16-224')

        pipe = pipeline("image-classification", model=model, feature_extractor=feature_extractor, device=-1)
https://huggingface.co/docs/transformers/main_classes/pipelines#transformers.ImageClassificationPipeline
As per documentation, I have downloaded/loaded google/vit-base-patch16–224 for the feature extractor and model (PyTorch checkpoints of course) to use them in the pipeline with image classification as the task. There are 3 things in this pipeline that is important to our benchmarks:
- device: If it’s -1(default) it will only use CPUs while if it’s a positive int number it will run the model on the associated CUDA device id.(it’s best to hide the GPUs and force PyTorch to use CPU and not just rely on this number here).
- batch_size: When the pipeline will use DataLoader(when passing a dataset, on GPU for a Pytorch model), the size of the batch to use, for inference is not always beneficial.
- You have to use either DataLoader or PyTorch Dataset to take full advantage of batching in Hugging Face pipelines on a GPU.
Before we move forward with the benchmarks, you need to know one thing regarding the batching in Hugging Face Pipelines for inference, that it doesn’t always work. As it is stated in Hugging Face’s documentation, setting batch_size may not increase the performance of your pipeline at all. It may slow down your pipeline:

https://huggingface.co/docs/transformers/main_classes/pipelines#pipeline-batching
To be fair, in my benchmarks I used a range of batch sizes starting from 1 to make sure I can find the best result among them. This is how I benchmarked the Hugging Face pipeline on CPU:
from transformers import pipeline

        pipe = pipeline("image-classification", model=model, feature_extractor=feature_extractor, device=-1)

        for batch_size in [1, 8, 32, 64, 128]:
            print("-" * 30)
            print(f"Streaming batch_size={batch_size}")
            for out in tqdm(pipe(dataset, batch_size=batch_size), total=len(dataset)):
                pass
Benchmark Hugging Face Pipeline
Let’s have a look at the results of our very first benchmark for the Hugging Face image classification pipeline on CPUs over the sample (3K) ImageNet dataset:
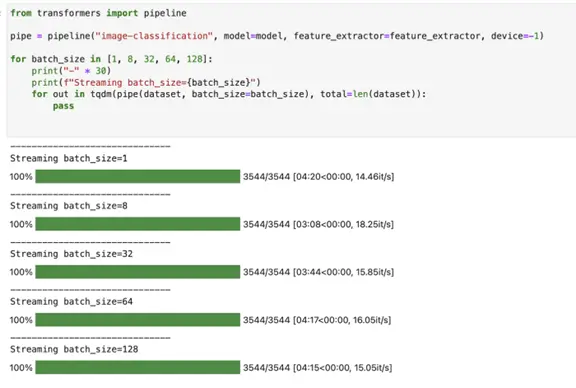
Hugging Face image-classification pipeline on CPUs — predicting 3544 images
As it can be seen, it took around 3 minutes (188 seconds) to finish processing around 3544 images from the sample dataset. Now that I know which batch size (8) is the best for my pipeline/dataset/hardware, I can use the same pipeline over a larger dataset (34K images) with this batch size:

Hugging Face image-classification pipeline on CPUs — predicting 34745 images
This time it took around 31 minutes (1,879 seconds) to finish predicting classes for 34745 images on CPUs.
To improve most deep learning models, especially these new transformer-based models, one should use accelerated hardware such as GPU. Let’s have a look at how to benchmark the very same pipeline over the very same datasets but this time on a GPU device. As mentioned before, we need to change the device to a CUDA device id like 0 (the first GPU):
from transformers import ViTFeatureExtractor, ViTForImageClassification
    from transformers import pipeline
    import torch

    device = "cuda:0" if torch.cuda.is_available() else "cpu"
    print(device)

    feature_extractor = ViTFeatureExtractor.from_pretrained('google/vit-base-patch16-224')
    model = ViTForImageClassification.from_pretrained('google/vit-base-patch16-224')
    model = model.to(device)

    pipe = pipeline("image-classification", model=model, feature_extractor=feature_extractor, device=0)

    for batch_size in [1, 8, 32, 64, 128, 256, 512, 1024]:
        print("-" * 30)
        print(f"Streaming batch_size={batch_size}")
        for out in tqdm(pipe(dataset, batch_size=batch_size), total=len(dataset)):
            pass
In addition to setting device=0, I also followed the recommended way to run a PyTorch model on a GPU device via .to(device) . Since we are using accelerated hardware (GPU) I also increased the maximum batch size for my testings to 1024 to find the best result.
Let’s have a look at our Hugging Face image classification pipeline on a GPU device over the sample ImageNet dataset (3K):
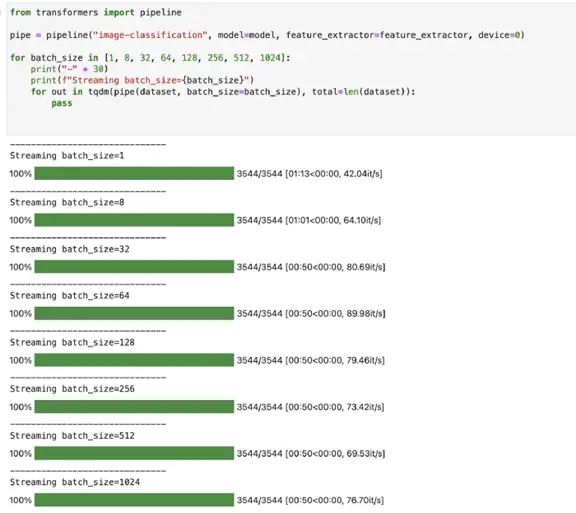
Hugging Face image-classification pipeline on a GPU — predicting 3544 images
As it can be seen, it took around 50 seconds to finish processing around 3544 images from our imagenet-mini-sample dataset on a GPU device. The batching improved the speed especially compare to the results coming from the CPUs, however, the improvements stopped around the batch size of 32. Although the results are the same after batch size 32, I have chosen batch size 256 for my larger benchmark to utilize enough GPU memory as well.
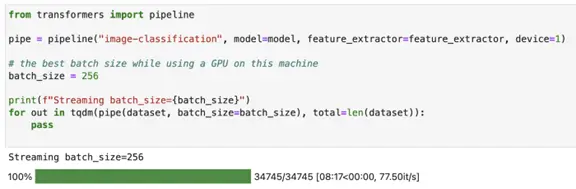
Hugging Face image-classification pipeline on a GPU — predicting 34745 images
This time our benchmark took around 8:17 minutes (497 seconds) to finish predicting classes for 34745 images on a GPU device. If we compare the results from our benchmarks on CPUs and a GPU device we can see that the GPU here is the winner:
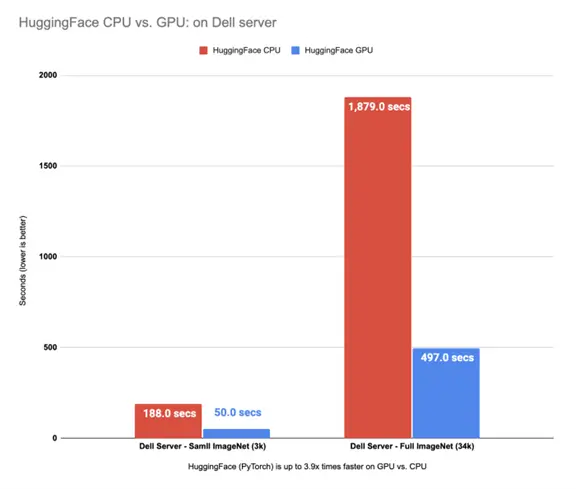
Hugging Face (PyTorch) is up to 3.9x times faster on GPU vs. CPU
I used Hugging Face Pipelines to load ViT PyTorch checkpoints, load my data into the torch dataset, and use out-of-the-box provided batching to the model on both CPU and GPU. The GPU is up to ~3.9x times faster compared to running the same pipelines on CPUs.
We have improved our ViT pipeline to perform image classification by using a GPU device instead of CPUs, but can we improve our pipeline further on both CPU & GPU in a single machine before scaling it out to multiple machines? Let’s have a look at the Spark NLP library.
Spark NLP: State-of-the-Art Natural Language Processing
Spark NLP is an open-source state-of-the-art Natural Language Processing library (https://github.com/JohnSnowLabs/spark-nlp)
Spark NLP is a state-of-the-art Natural Language Processing library built on top of Apache Spark. It provides simple, performant & accurate NLP annotations for machine learning pipelines that scale easily in a distributed environment. Spark NLP comes with 7000+ pretrained pipelines and models in more than 200+ languages. It also offers tasks such as Tokenization, Word Segmentation, Part-of-Speech Tagging, Word and Sentence Embeddings, Named Entity Recognition, Dependency Parsing, Spell Checking, Text Classification, Sentiment Analysis, Token Classification, Machine Translation (+180 languages), Summarization & Question Answering, Text Generation, Image Classification (ViT), and many more NLP tasks.
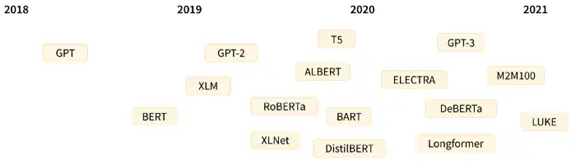
Spark NLP is the only open-source NLP library in production that offers state-of-the-art transformers such as BERT, CamemBERT, ALBERT, ELECTRA, XLNet, DistilBERT, RoBERTa, DeBERTa, XLM-RoBERTa, Longformer, ELMO, Universal Sentence Encoder, Google T5, MarianMT, GPT2, and Vision Transformer (ViT) not only to Python and R, but also to JVM ecosystem (Java, Scala, and Kotlin) at scale by extending Apache Spark natively.
Benchmarking Spark NLP on a Bare Metal Server
ViT models on a Dell PowerEdge C4130
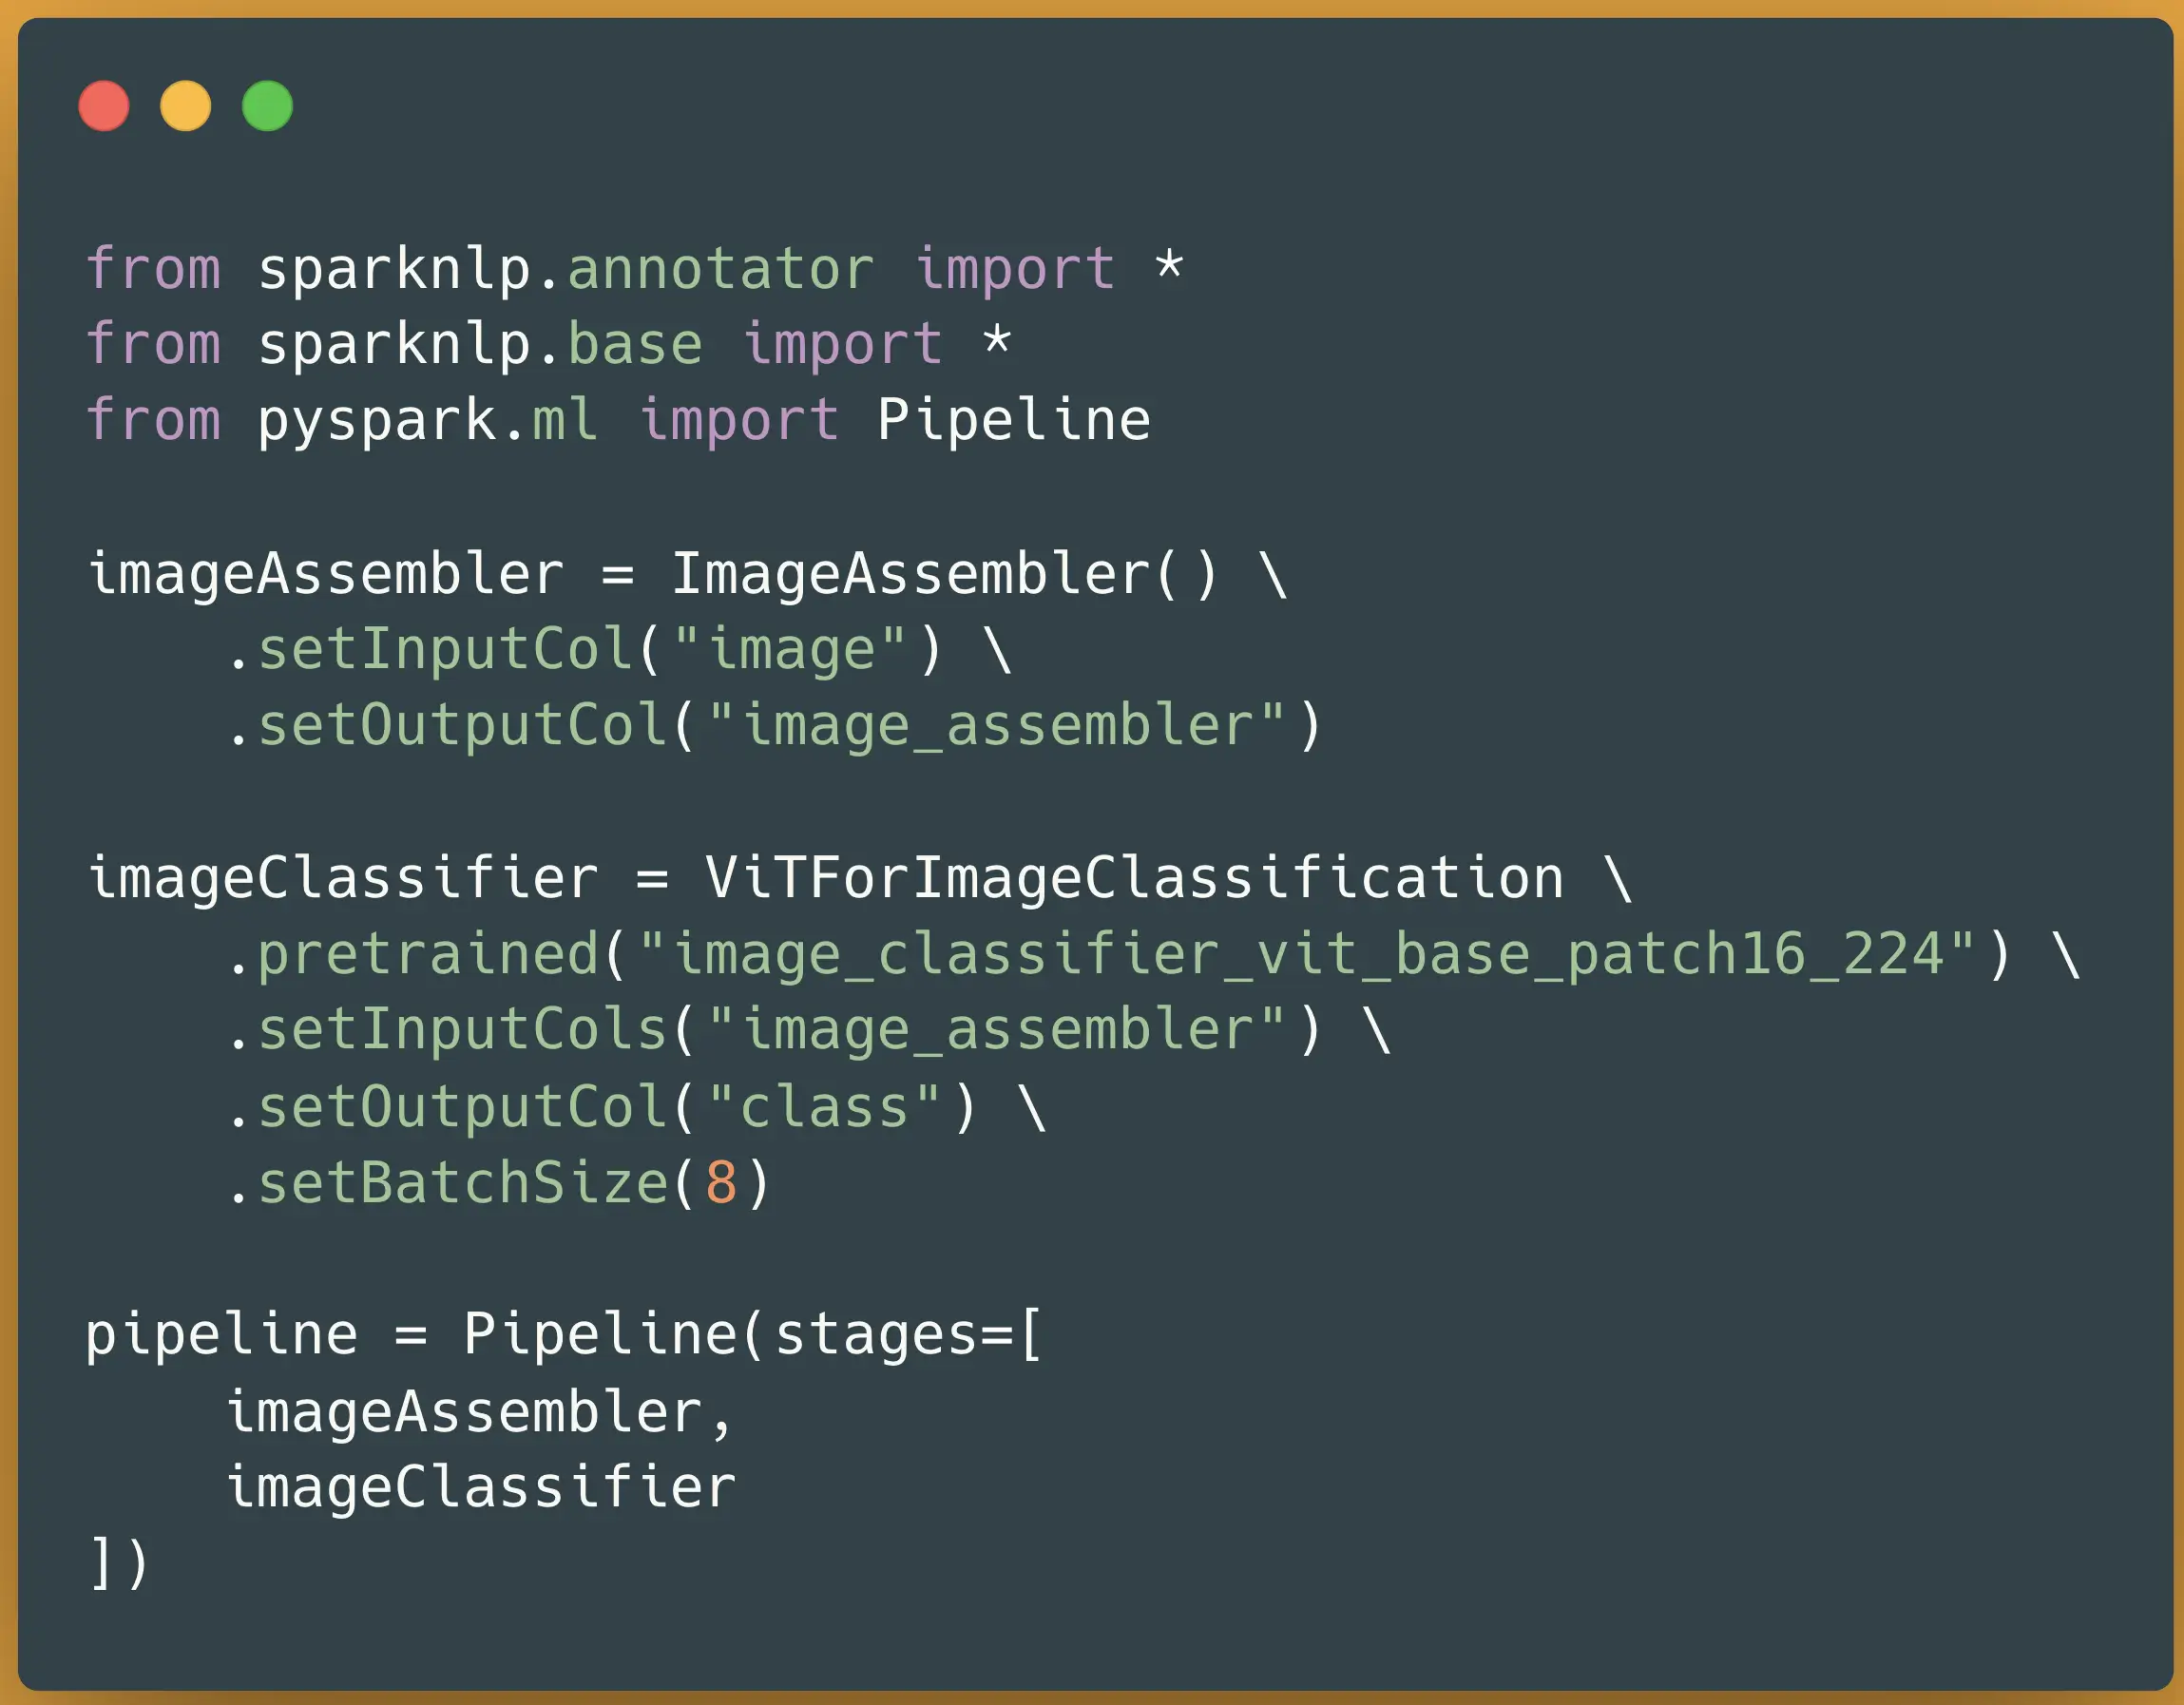
Spark NLP has the same ViT features for Image Classification as Hugging Face which were added in the recent 4.1.0 release. The feature is called ViTForImageClassification, it has over 240 pre-trained models ready to go, and a simple code to use this feature in Spark NLP looks like this:
from sparknlp.annotator import *
        from sparknlp.base import *

        from pyspark.ml import Pipeline

        imageAssembler = ImageAssembler() \
            .setInputCol("image") \
            .setOutputCol("image_assembler")

        imageClassifier = ViTForImageClassification \
            .pretrained("image_classifier_vit_base_patch16_224") \
            .setInputCols("image_assembler") \
            .setOutputCol("class") \
            .setBatchSize(8)

        pipeline = Pipeline(stages=[
            imageAssembler,
            imageClassifier
        ])
If we compare Spark NLP and Hugging Face side by side for downloading and loading a pre-trained ViT model for an Image Classification prediction, apart from loading images and using post calculations like argmax outside the Hugging Face library, they are both pretty straightforward. Also, they both can be saved and serve later as a pipeline to reduce these lines into only 1 line of code:
 |
 |
Loading and using ViT models for Image Classification in Spark NLP (left) and Hugging Face (right)
Since Apache Spark has a concept called Lazy Evaluation it doesn’t start the execution of the process until an ACTION is called. Actions in Apache Spark can be .count() or .show() or .write() and so many other RDD-based operations which I won’t get into it now and you won’t need to know them for this article. I usually choose either count() the target column or write() the results on disks to trigger executing all the rows in the DataFrame. Also, like Hugging Face benchmarks, I will loop through selected batch sizes to make sure I can have all the possible results without missing the best outcome.
Now, we know how to load ViT model(s) in Spark NLP, we also know how to trigger an action to force computation over all the rows in our DataFrame to benchmark, and all that is left to learn is oneDNN from oneAPI Deep Neural Network Library (oneDNN). Since the DL engine in Spark NLP is TensorFlow, you can also enable oneDNN to improve the speed on CPUs (like everything else, you need to test this to be sure it improves the speed and not the other way around). I will also be using this flag in addition to normal CPUs without oneDNN enabled
Now that we know all the ViT models from Hugging Face are also available in Spark NLP and how to use them in a pipeline, we will repeat our previous benchmarks on the bare-metal Dell server to compare CPU vs. GPU. Let’s have a look at the results of Spark NLP’s image classification pipeline on CPUs over our sample (3K) ImageNet dataset:
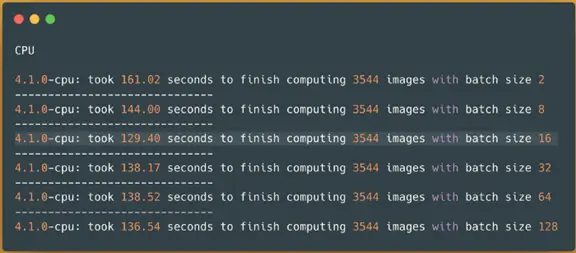
Spark NLPimage-classification pipeline on a CPU without oneDNN — predicting 3544 images
It took around 2.1 minutes (130 seconds) to finish processing around 3544 images from our sample dataset. Having a smaller dataset to try different batch sizes is helpful to choose the right batch size for your task, your dataset, and your machine. Here is clear that batch size 16 is the best size for our pipeline to deliver the best result.
I would like to also enable oneDNN to see if in this specific situation it improves my benchmark compare to the CPUs without oneDNN. You can enable oneDNN in Spark NLP by setting the environment variable of TF_ENABLE_ONEDNN_OPTS to 1. Let’s see what happens if I enable this flag and re-run the previous benchmark on the CPU to find the best batch size:
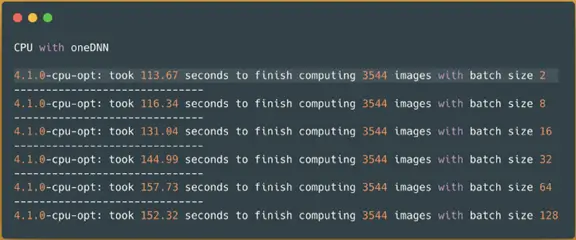
Spark NLPimage-classification pipeline on a CPU with oneDNN — predicting 3544 images
OK, so clearly enabling oneDNN for TensorFlow in this specific situation improved our results by at least 14%. Since we don’t have to do/change anything and all it takes is to say export TF_ENABLE_ONEDNN_OPTS=1 I am going to use that for the benchmark with a larger dataset as well to see the difference. Here is around seconds faster, but 14% on the larger dataset can shave off minutes of our results.
Now that I know the batch size of 16 for CPU without oneDNN and batch size of 2 for CPU with oneDNN enabled have the best results I can continue with using the same pipeline over a larger dataset (34K images):
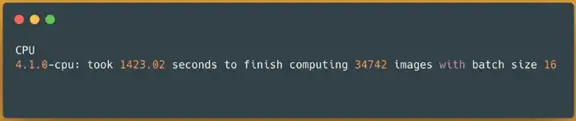
Spark NLP image-classification pipeline on CPUs without oneDNN — predicting 34745 images
This time our benchmark took around 24 minutes (1423 seconds) to finish predicting classes for 34745 images on a CPU device without oneDNN enabled. Now let’s see what happens if I enable oneDNN for TensorFlow and use the batch size of 2 (the best results):

Spark NLP image-classification pipeline on CPUs with oneDNN — predicting 34745 images
This time it took around 21 minutes (1278 seconds). As expected from our sample benchmarks, we can see around 11% improvements in the results which did shave off minutes compared to not having oneDNN enabled.
Let’s have a look at how to benchmark the very same pipeline on a GPU device. In Spark NLP, all you need to use GPU is to start it with gpu=True when you are starting the Spark NLP session:
spark = sparknlp.start(gpu=True)
# you can set the memory here as well
spark = sparknlp.start(gpu=True, memory="16g")
That’s it! If you have something in your pipeline that can be run on GPU it will do it automatically without the need to do anything explicitly.
Let’s have a look at our Spark NLP image classification pipeline on a GPU device over the sample ImageNet dataset (3K):

Spark NLPimage-classification pipeline on a GPU — predicting 3544 images
Out of curiosity to see whether my crusade to find a good batch size on a smaller dataset was correct I ran the same pipeline with GPU on a larger dataset to see if the batch size 32 will have the best result:
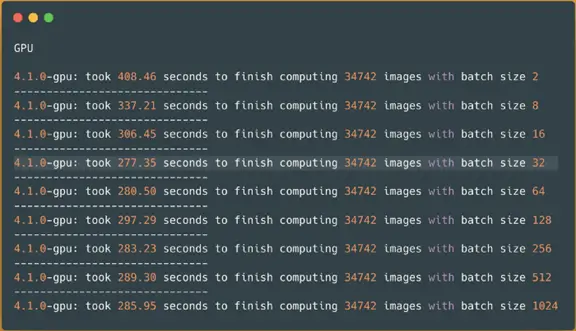
Spark NLP image-classification pipeline on a GPU — predicting 34745 images
Thankfully, it is batch size 32 that yields the best time. So it took around 4 and a half minutes (277 seconds).
I will pick the results from CPUs with oneDNN since they were faster and I will compare them to the GPU results:
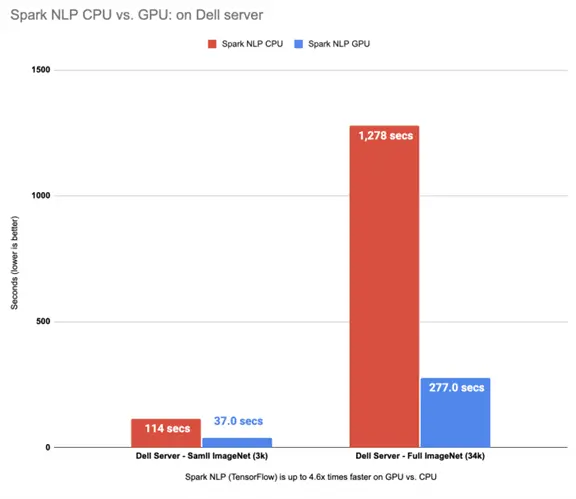
Spark NLP (TensorFlow) is up to 4.6x times faster on GPU vs. CPU (oneDNN)
This is great! We can see Spark NLP on GPU is up to 4.6x times faster than CPUs even with oneDNN enabled.
Let’s have a look at how these results are compared to Hugging Face benchmarks:
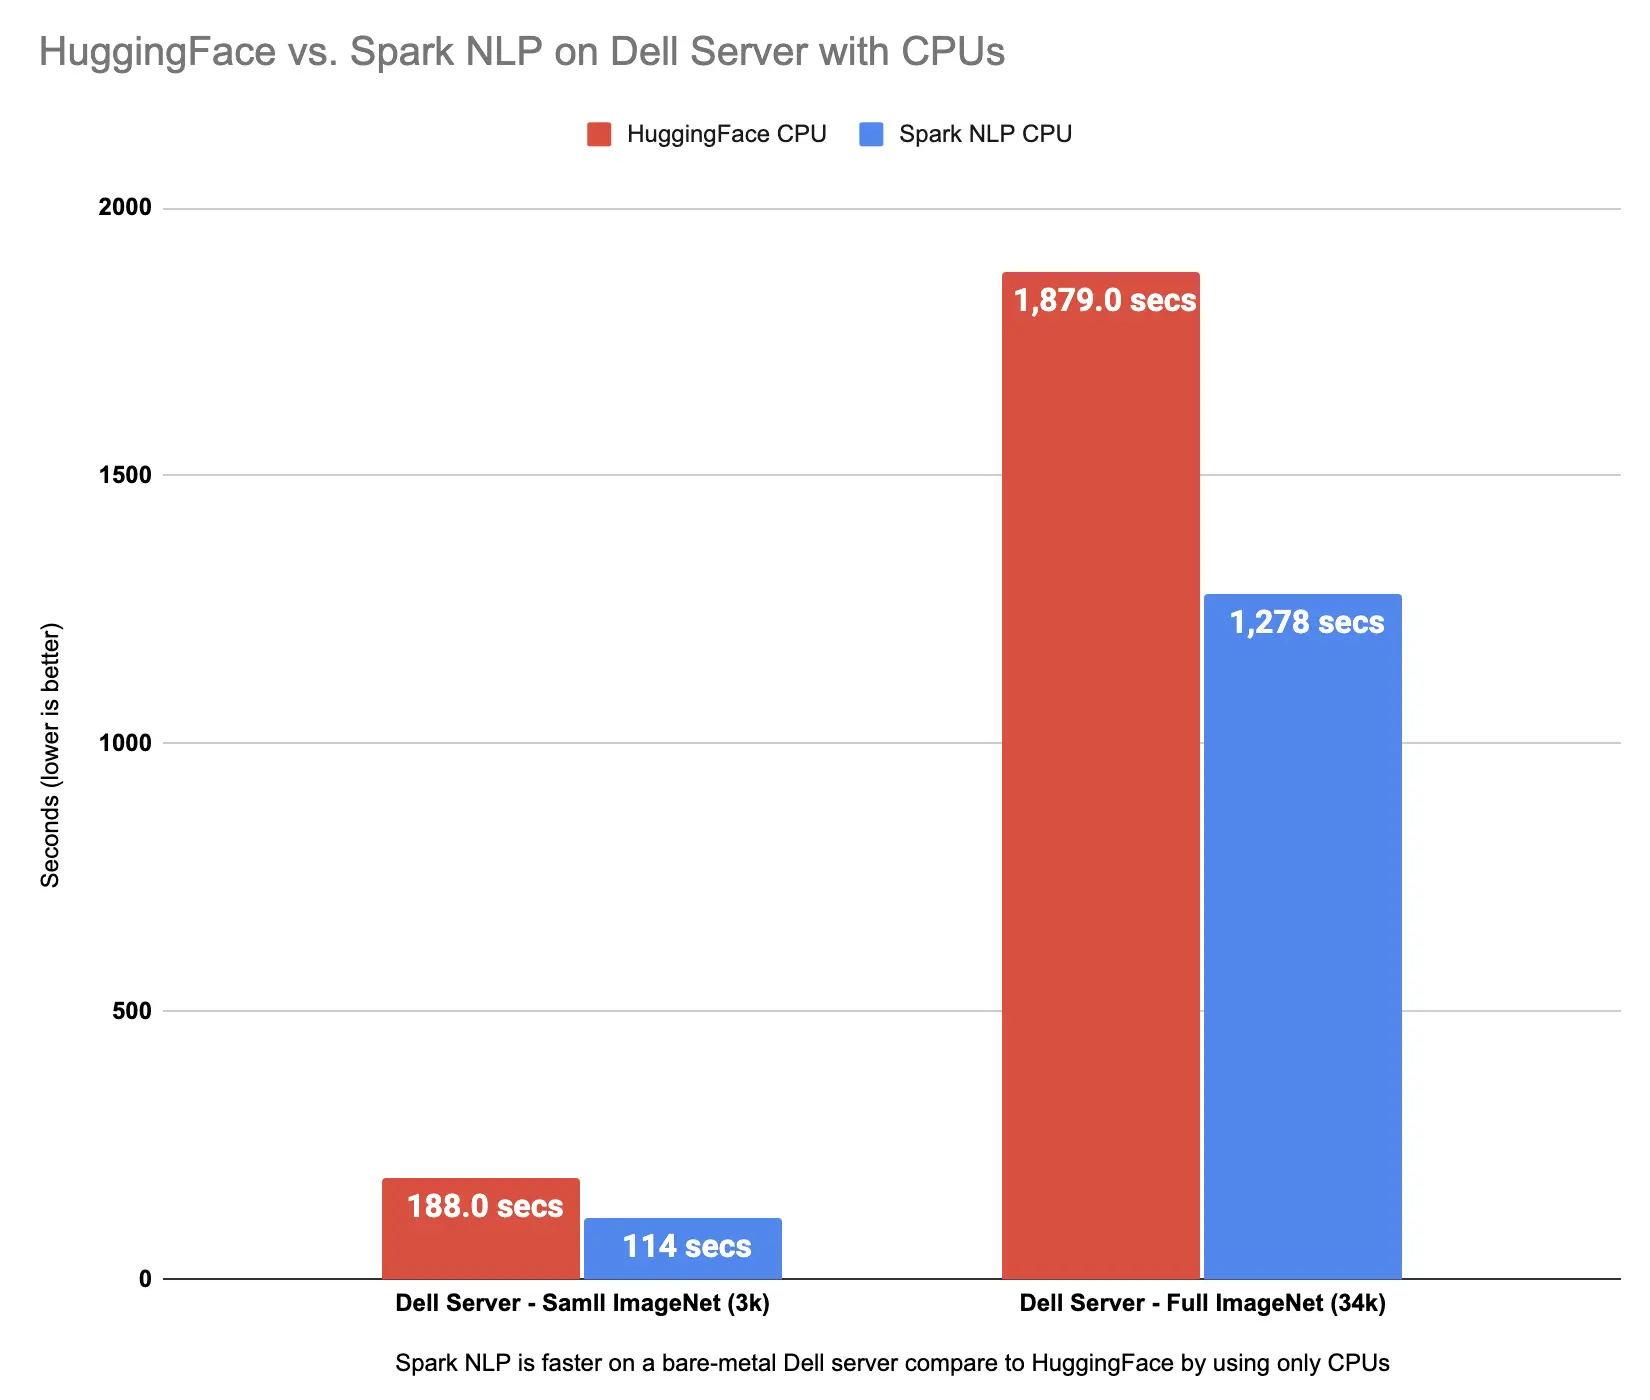 |
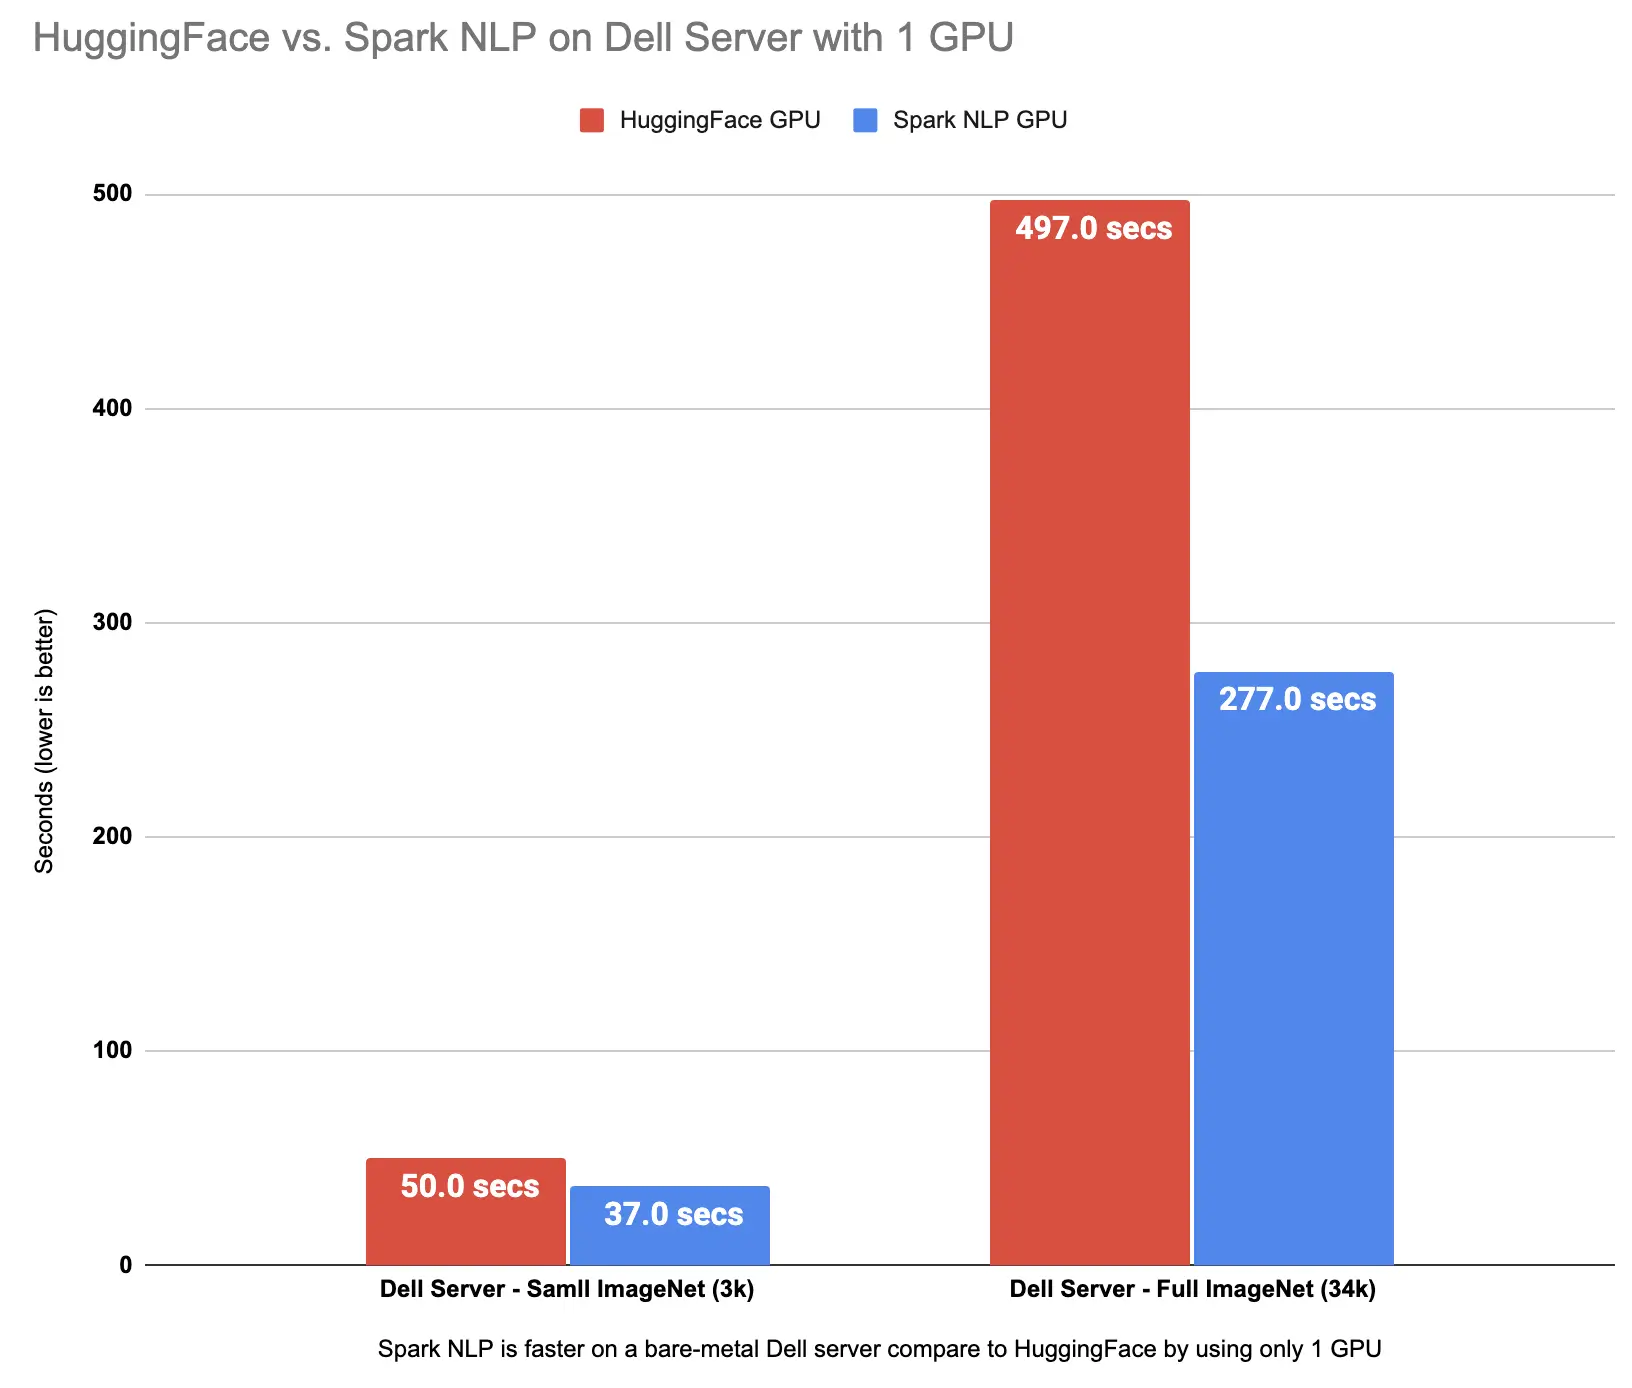 |
Spark NLP is faster than Hugging Face on both CPU and GPU for ViT models inference
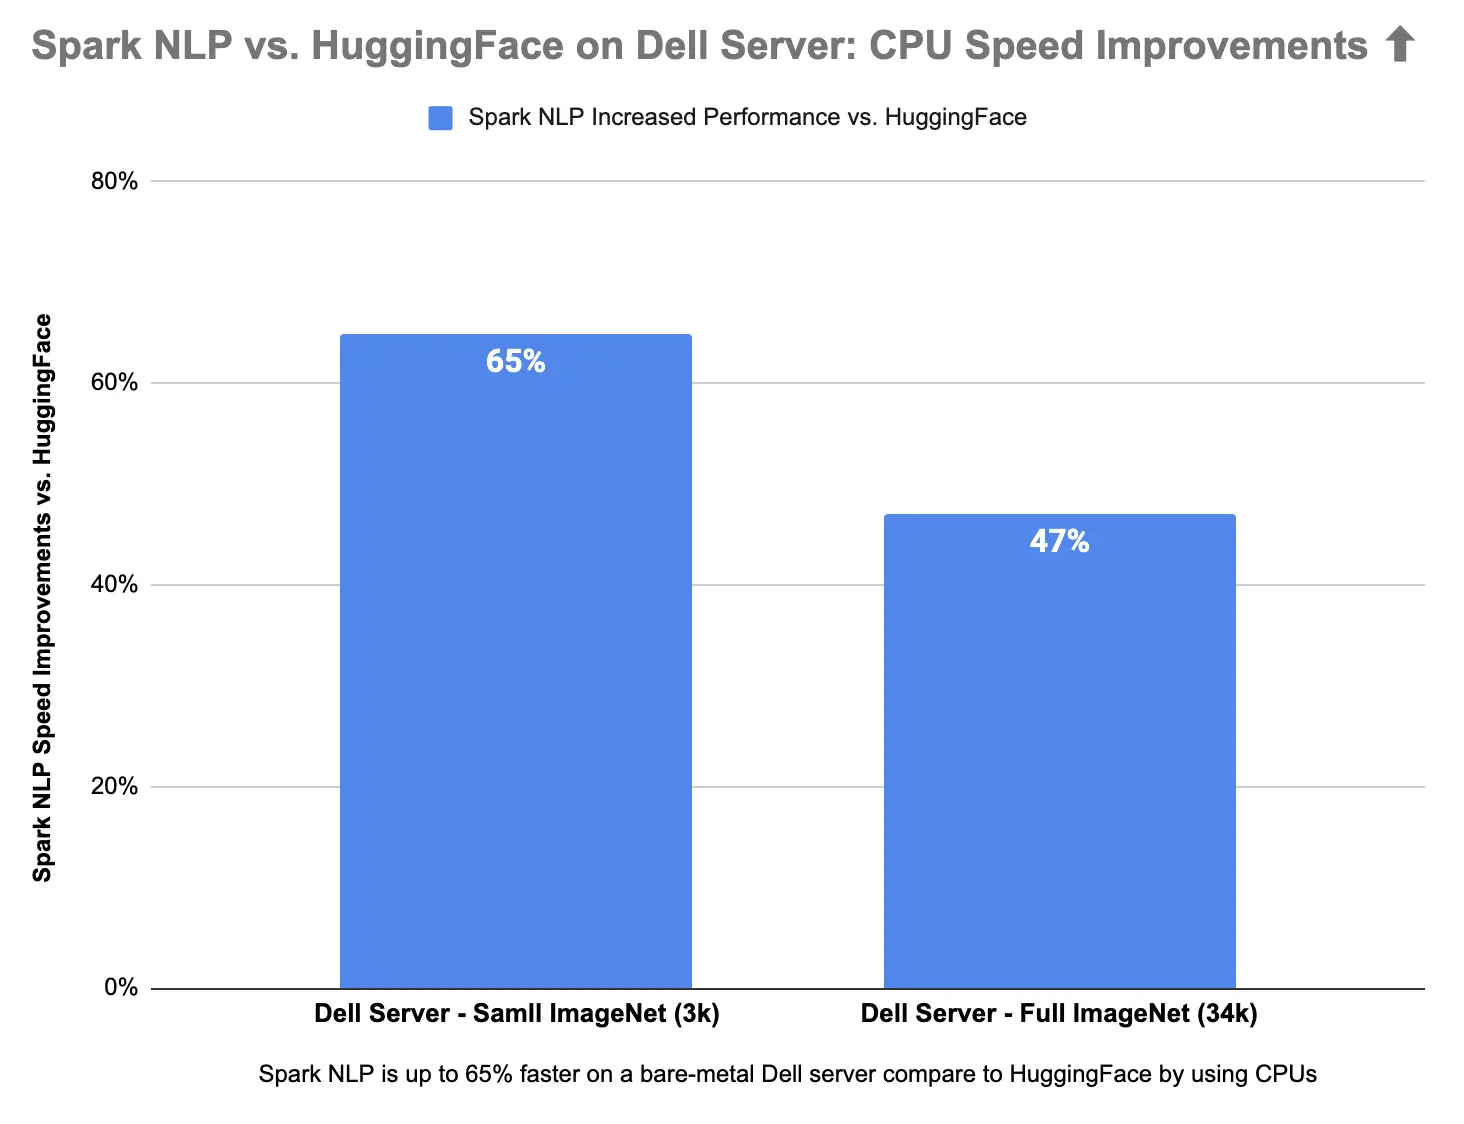
Spark NLP is 65% faster than Hugging Face on CPUs in predicting image classes for the sample dataset with 3K images and 47% on the larger dataset with 34K images. Spark NLP is also 79% faster than Hugging Face on a single GPU inference larger dataset with 34K images and up to 35% faster on a smaller dataset.
 |
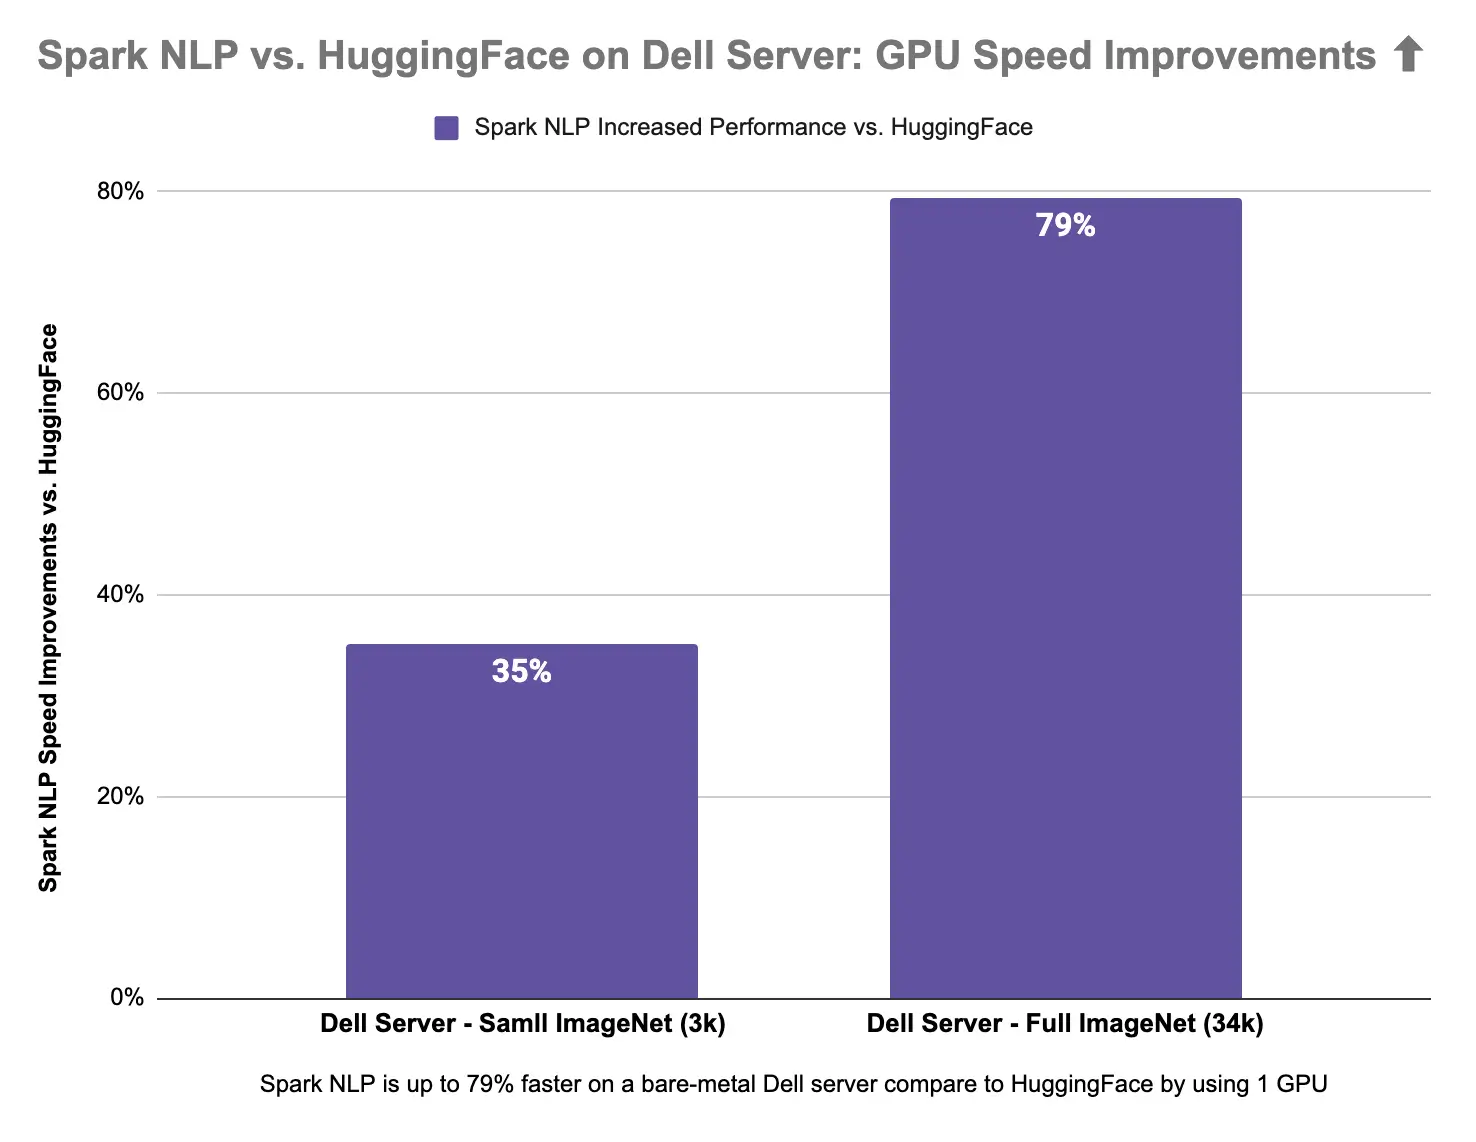 |
Spark NLP is up to 65% faster on CPU and up to 79% faster on GPU compare to Hugging Face
Spark NLP was faster than Hugging Face in a single machine by using either CPU or GPU — image classification by using Vision Transformer (ViT)
In Part 2 I will run the same benchmarks on Databricks Single Node (CPU & GPU) to compare Spark NLP vs. Hugging Face.
References
ViT
- https://arxiv.org/pdf/2010.11929.pdf
- https://github.com/google-research/vision_transformer
- Vision Transformers (ViT) in Image Recognition — 2022 Guide
- https://github.com/lucidrains/vit-pytorch
- https://medium.com/mlearning-ai/an-image-is-worth-16×16-words-transformers-for-image-recognition-at-scale-51f3561a9f96
- https://medium.com/nerd-for-tech/an-image-is-worth-16×16-words-transformers-for-image-recognition-at-scale-paper-summary-3a387e71880a
- https://gareemadhingra11.medium.com/summary-of-paper-an-image-is-worth-16×16-words-3f7f3aca941
- https://medium.com/analytics-vidhya/vision-transformers-bye-bye-convolutions-e929d022e4ab
- https://medium.com/syncedreview/google-brain-uncovers-representation-structure-differences-between-cnns-and-vision-transformers-83b6835dbbac
Hugging Face
- https://huggingface.co/docs/transformers/main_classes/pipelines
- https://huggingface.co/blog/fine-tune-vit
- https://huggingface.co/blog/vision-transformers
- https://huggingface.co/blog/tf-serving-vision
- https://huggingface.co/blog/deploy-tfserving-kubernetes
- https://huggingface.co/google/vit-base-patch16-224
- https://huggingface.co/blog/deploy-vertex-ai
- https://huggingface.co/models?other=vit
Databricks
- https://www.databricks.com/spark/getting-started-with-apache-spark
- https://docs.databricks.com/getting-started/index.html
- https://docs.databricks.com/getting-started/quick-start.html
- See the best of DATA+AI SUMMIT 2022
- https://www.databricks.com/blog/2020/05/15/shrink-training-time-and-cost-using-nvidia-gpu-accelerated-xgboost-and-apache-spark-on-databricks.html
Spark NLP
- Spark NLP GitHub
- Spark NLP Workshop(Spark NLP examples)
- Spark NLP Transformers
- Spark NLP Models Hub
- Speed Optimization & Benchmarks in Spark NLP 3: Making the Most of Modern Hardware
- Hardware Acceleration in Spark NLP
- Serving Spark NLP via API: Spring and LightPipelines
- Serving Spark NLP via API (1/3): Microsoft’s Synapse ML
- Serving Spark NLP via API (2/3): FastAPI and LightPipelines
- Serving Spark NLP via API (3/3): Databricks Jobs and MLFlow Serve APIs
- Leverage deep learning in Scala with GPU on Spark 3.0
- Getting Started with GPU-Accelerated Apache Spark 3
- Apache Spark Performance Tuning
Possible extra optimizations on GPUs: RAPIDS Accelerator for Apache Spark Configuration