


The Normalizer annotator in Spark NLP performs text normalization on data. It is used to remove all dirty characters from text following a regex pattern, convert text to lowercase, remove special characters, punctuation, and transform words based on a provided dictionary.
The Normalizer annotator in Spark NLP is often used as part of a preprocessing step in NLP pipelines to improve the accuracy and quality of downstream analyses and models. It is a configurable component that can be customized based on specific use cases and requirements.
Normalization refers to the process of converting text to a standard format, which can help improve the accuracy and efficiency of subsequent natural language processing (NLP) tasks. Normalization typically involves removing or replacing certain characters or words, converting text to lowercase or uppercase, removing punctuation etc.
The Normalizer Annotator works by taking a token, and then applying a series of text transformations to it. These transformations can be configured by the user to meet their specific needs. Once the transformations have been applied, the output is returned as a normalized token.
P.S.: in Spark NLP, a token is defined as a basic unit of text that has been segmented from a larger body of text. Tokens are typically words, but they can also be punctuation, numbers, or other meaningful units of text. Tokenization is the process of breaking down text into tokens.
In this post, we will discuss how to use Spark NLP’s Normalizer annotator to perform normalization efficiently.
Let us start with a short Spark NLP introduction and then discuss the details of the normalizing techniques with some solid results.
Introduction to Spark NLP
Spark NLP is an open-source library maintained by John Snow Labs. It is built on top of Apache Spark and Spark ML and provides simple, performant & accurate NLP annotations for machine learning pipelines that can scale easily in a distributed environment.
Since its first release in July 2017, Spark NLP has grown in a full NLP tool, providing:
- A single unified solution for all your NLP needs
- Transfer learning and implementing the latest and greatest SOTA algorithms and models in NLP research
- The most widely used NLP library in industry (5 years in a row)
- The most scalable, accurate and fastest library in NLP history
Spark NLP comes with 17,800+ pretrained pipelines and models in more than 250+ languages. It supports most of the NLP tasks and provides modules that can be used seamlessly in a cluster.
Spark NLP processes the data using Pipelines, structure that contains all the steps to be run on the input data:
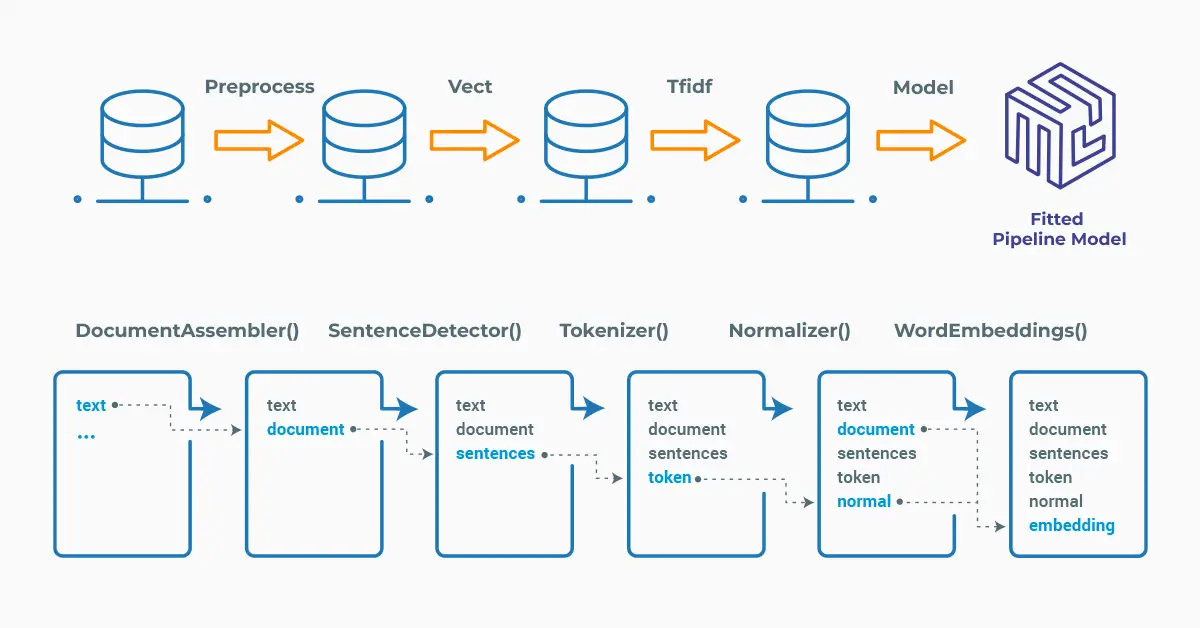
Each step contains an annotator that performs a specific task such as tokenization, normalization, and dependency parsing. Each annotator has input(s) annotation(s) and outputs new annotation.
An annotator in Spark NLP is a component that performs a specific NLP task on a text document and adds annotations to it. An annotator takes an input text document and produces an output document with additional metadata, which can be used for further processing or analysis. For example, a named entity recognizer annotator might identify and tag entities such as people, organizations, and locations in a text document, while a sentiment analysis annotator might classify the sentiment of the text as positive, negative, or neutral.
Setup
To install Spark NLP in Python, simply use your favorite package manager (conda, pip, etc.). For example:
pip install spark-nlp
pip install pyspark
For other installation options for different environments and machines, please check the official documentation.
Then, simply import the library and start a Spark session:
import sparknlp

# Start Spark Session
spark = sparknlp.start()
Normalizer
In NLP, a Normalizer is a component or module that is used to transform input text into a standard or normalized form. This is typically done to make text more consistent and easier to process.
Normalizer annotator in Spark NLP expects TOKEN as input, and then will provide TOKEN as output. This means that, input data will be in the form of individual tokens, and the output (the predictions) will be in the form of individual tokens (normalized) as well.
Thus, we need the previous steps to generate the tokens that will be used as an input to our annotator.
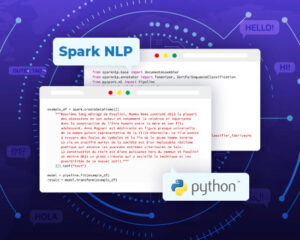
# Import the required modules and classes
from sparknlp.base import DocumentAssembler, Pipeline, LightPipeline
from sparknlp.annotator import (
    Tokenizer,
    Normalizer
)
import pyspark.sql.functions as F

# Step 1: Transforms raw texts to `document` annotation
document_assembler = (
    DocumentAssembler()
    .setInputCol("text")
    .setOutputCol("document")
)

# Step 2: Gets the tokens of the text
tokenizer = (
    Tokenizer()
    .setInputCols(["document"])
    .setOutputCol("token")
)

# Step 3:  Normalizes the tokens
normalizer = (
    Normalizer()
    .setInputCols(["token"])
    .setOutputCol("normalized")
)

pipeline = Pipeline(stages=[document_assembler, tokenizer, normalizer])
We use a sample text to see the performance of the Normalizer annotator, then fit and transform the dataframe to get the results:
# Create a dataframe from the sample_text
text = "John and Peter are brothers.
However they don't support each other that much.
John is 20 years old and Peter is 26"
data = spark.createDataFrame([[text]]) \
.toDF("text")
# Fit and transform to get a prediction
model = pipeline.fit(data)
result = model.transform(data)
# Display the results
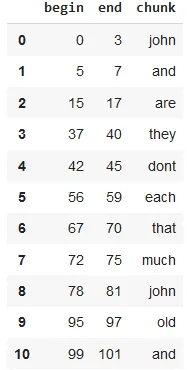
result.selectExpr("normalized.result").show(truncate = False)

Normalized tokens
The default settings of the Normalizer annotator will only keep alphabet letters ([^A-Za-z]), so the numbers in the sample text are removed.
Using LightPipeline
LightPipeline is a Spark NLP specific Pipeline class equivalent to Spark ML Pipeline. The difference is that its execution does not hold to Spark principles, instead it computes everything locally (but in parallel) in order to achieve fast results when dealing with small amounts of data. This means, we do not input a Spark Dataframe, but a string or an Array of strings instead, to be annotated.
We can show the results in a Pandas DataFrame by running the following code:
import pandas as pd

light_model = LightPipeline(model)

light_result = light_model.fullAnnotate(text)

results_tabular = []
for res in light_result[0]["normalized"]:
    results_tabular.append(
        (
            res.begin,
            res.end,# res.result.token,
            res.result,
                   )
    )
pd.DataFrame(results_tabular, columns=["begin", "end", "chunk"])

The dataframe shows the tokens after normalizing the text
Additional Parameters
We can include additional parameters to the Normalizer in order to improve the results. For example, CleanupPatterns is a feature that allows you to specify a set of regular expressions to clean and preprocess your text data. By default, the annotator keeps only the alphabet letters, but you can create your own set of CleanupPatterns to include specific characters or patterns that you want.
In the code snippet below, (["""[^\w\d\s]"""]) removes all non-word, non-digit and non-space characters.
Also, the code will make sure that the normalized tokens will be lower case, and only the words with 3 or 4 characters will be selected.
normalizer = (
    Normalizer()
    .setInputCols(["token"])
    .setOutputCol("normalized")
    .setCleanupPatterns(["""[^\w\d\s]"""])
    .setLowercase(True)
    .setMaxLength(4)
    .setMinLength(3) #Default = 0
)

pipeline = Pipeline(stages=[document_assembler, tokenizer, normalizer])

# Run the same dataframe as above and display the results
model = pipeline.fit(data)
result = model.transform(data)

result.selectExpr("normalized.result").show(truncate = False)

Normalized tokens after using additional parameters
And the Light Pipeline results will be produced by:
light_model = LightPipeline(model)

light_result = light_model.fullAnnotate(text)

results_tabular = []
for res in light_result[0]["normalized"]:
    results_tabular.append(
        (
            res.begin,
            res.end,
            res.result,
         ))

pd.DataFrame(results_tabular, columns=["begin", "end", "chunk"])
The dataframe shows the tokens after using additional parameters
Adding a Slang Dictionary
Another useful tool, especially when working with informal language or text from social media, is the option to use the setSlangDictionary parameter. It allows you to provide a list of words that are commonly used in a specific context or domain, but may not be recognized by standard language models. By providing this list, you can ensure that the model is able to accurately process and understand the text.
Here, we first create a csv file using the slangs list defined below, save the file:
slang_text = """Hey, what's good fam? I'm just chillin with my squad.
                We're about to get to this dope party."""

#Create a Demo Slang CSV File
import csv

field_names = ['Slang', 'Correct_Word']

slangs = [
{'Slang': "fam", 'Correct_Word': 'friends'},
{'Slang': "chillin", 'Correct_Word': 'relaxing'},
{'Slang': "squad", 'Correct_Word': 'group of friends'},
{'Slang': "dope", 'Correct_Word': 'excellent'}
]

with open('slangs.csv', 'w') as csvfile:
    writer = csv.DictWriter(csvfile, fieldnames = field_names)
    writer.writeheader()
    writer.writerows(slangs)
Now, use the setSlangDictionary parameter to define the file including the slang words:
normalizer = Normalizer() \
    .setInputCols(["token"]) \
    .setOutputCol("normalized") \
    .setSlangDictionary("/content/slangs.csv" ,",")


pipeline = Pipeline().setStages([
    documentAssembler,
    tokenizer,
    normalizer
])

data = spark.createDataFrame([[slang_text]]) \
    .toDF("text")

model = pipeline.fit(data)
result = model.transform(data)
result.selectExpr("normalized.result").show(truncate = False)

And the Light Pipeline results will be produced by:
light_model = LightPipeline(model)

light_result = light_model.fullAnnotate(text)

results_tabular = []
for res in light_result[0]["normalized"]:
    results_tabular.append(
        (
            res.begin,
            res.end,
            res.result,
         ))

pd.DataFrame(results_tabular, columns=["begin", "end", "chunk"])
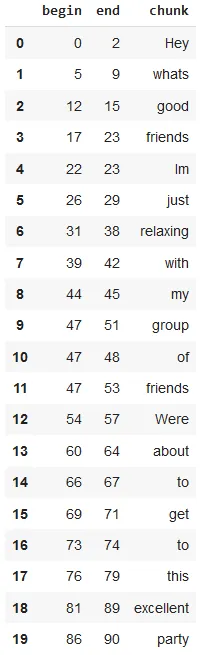
The dataframe shows the tokens after normalizing according to the slang dictionary
Recent advancements in healthcare applications of Spark NLP show how normalization continues to evolve beyond basic preprocessing. A key trend has been the shift toward context-aware normalization, where models not only clean text but also preserve domain-specific meaning. Integrating normalization with specialized medical ontologies helps reduce errors in downstream tasks such as diagnosis classification and automated reporting, supporting clinical decision-making and patient safety.
Another development is the adoption of multimodal normalization pipelines. Hospitals and research centers increasingly combine textual data with medical imaging and sensor streams to enhance precision-medicine workflows. Aligning normalized clinical notes with imaging or genomic data can improve comorbidity detection and treatment response prediction.
Finally, real-time normalization is becoming a standard component in production systems. With the rise of generative AI assistants for clinicians, standardized input is critical for accurate and safe outputs. Deploying large-scale NLP pipelines in healthcare settings also helps cut processing delays while maintaining compliance with regulatory frameworks, elevating normalization from a background utility to a core pillar of trustworthy clinical AI.
One-liner alternative
In October 2022, John Snow Labs released the open-source johnsnowlabs library that contains all the company products, open-source and licensed, under one common library. This simplified the workflow especially for users working with more than one of the libraries (e.g., Spark NLP + Healthcare NLP). This new library is a wrapper on all John Snow Lab’s libraries, and can be installed with pip:
pip install johnsnowlabs
Please check the official documentation for more examples and usage of this library.
To normalize a text with one line of code, we can simply run the following code
from johnsnowlabs import nlp

text = '@CKL_IT says that #normalizers are pretty useful to clean
#structured_strings in #NLU like tweets'

nlp.load('norm').predict(text)
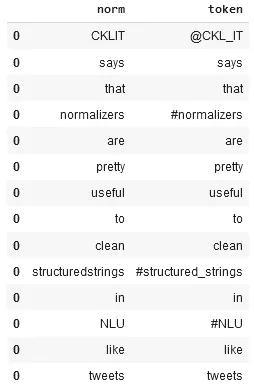
After using the one-liner model, the result shows the original and normalized tokens
The one-liner is based on default models for each NLP task. Depending on your requirements, you may want to use the one-liner for simplicity or customizing the pipeline to choose specific models that fit your needs.
NOTE: when using only the johnsnowlabs library, make sure you initialize the spark session with the configuration you have available. Since some of the libraries are licensed, you may need to set the path to your license file. If you are only using the open-source library, you can start the session with spark = nlp.start(nlp=False). The default parameters for the start function includes using the licensed Healthcare NLP library with nlp=True, but we can set that to False and use all the resources of the open-source libraries such as Spark NLP, Spark NLP Display, and NLU.
For additional information, please check the following references.
- Documentation : Normalizer
- Python Docs : Normalizer
- Scala Docs : Normalizer
- For extended examples of usage, see the Spark NLP Workshop repository.
Conclusion
Normalizer in Spark NLP is a useful annotator that performs text normalization on data. It is an important preprocessing step in NLP pipelines that can help improve the accuracy and quality of downstream analyses and models. By standardizing the text data, the Normalizer annotator can reduce the noise and variability in the text, making it easier to analyze and extract meaningful information.
The Normalizer annotator in Spark NLP is a configurable component that can be customized based on specific use cases and requirements. It offers a variety of options for text normalization, such as converting text to lowercase, removing special characters, punctuation, and stop words, and even defining a slang dictionary.
FAQ
1. What exactly does “normalization” do in Spark NLP, and when should I use it?
Normalization standardizes tokens (e.g., lowercasing, removing punctuation/special chars, applying regex cleanup, optional slang mapping) so downstream models see consistent inputs. Use it early in your pipeline when noisy text hurts tokenization, NER, classification, or search.
2. How can I customize the Normalizer without losing domain meaning (e.g., medical terms, IDs, units)?
Tune setCleanupPatterns to keep allowed characters (like hyphens in drug names or units), avoid indiscriminate number removal if you need dosages or vitals, and selectively lowercase. Combine with dictionaries (e.g., slang or domain synonyms) to preserve clinical semantics instead of stripping them.
3. What’s the difference between using Normalizer in a Spark pipeline vs. LightPipeline?
A standard Pipeline runs distributed across a cluster for large datasets. LightPipeline executes locally and in-parallel for low-latency scenarios (like quick previews, API calls, or unit tests). Functionally they support the same normalization logic; choose based on throughput vs. latency needs.
4. Can I handle multiple languages, emojis, or social text?
Yes. Provide language-appropriate cleanup patterns and, when needed, a setSlangDictionary CSV to map colloquialisms. Keep or strip emojis via regex depending on your task (e.g., sentiment). For multilingual corpora, use different pipelines or patterns per language to avoid over-cleaning.
5. How do I know normalization actually improves my model or retrieval results?
Run A/B evaluations: compare metrics (F1/accuracy for classifiers, exact-match for NER, MRR/nDCG for retrieval) with and without normalization. Inspect typical failure cases (e.g., dosage “5mg” removed, code “ICD-10” hyphen stripped) and iterate your patterns. In production, monitor drift and latency, well-tuned normalization should reduce noise without degrading critical signals.