


Training a NER model from scratch with Python
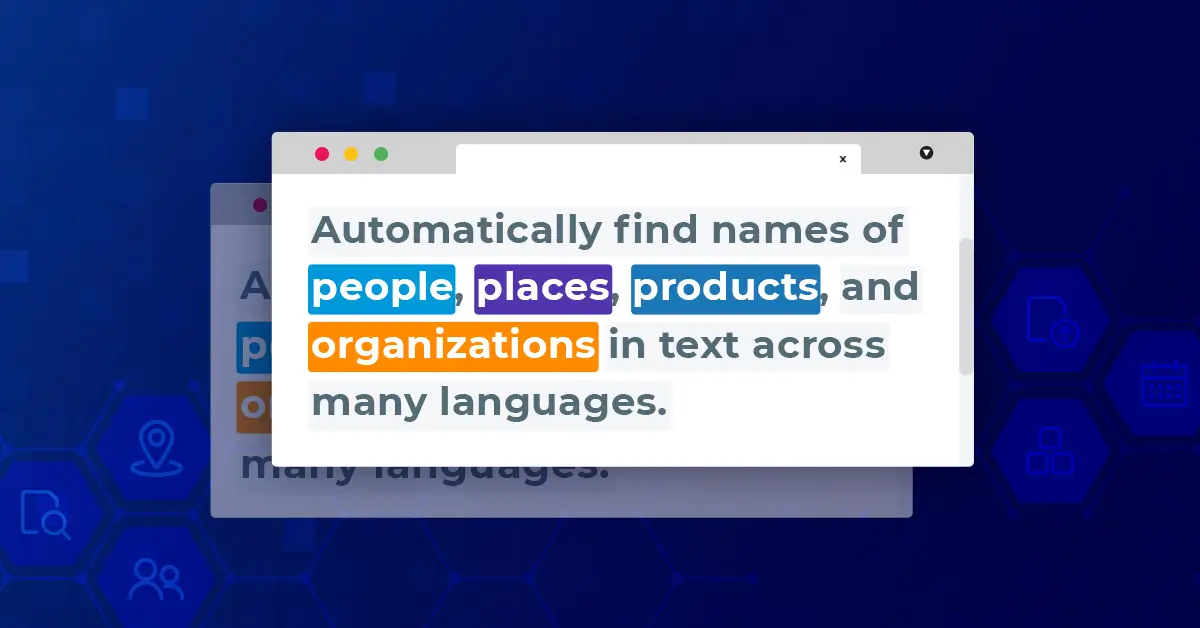
Named Entity Recognition is a Natural Language Processing technique that involves identifying and extracting entities from a text, such as people, organizations, locations, dates, and other types of named entities. NER is used in many fields of NLP, and using Spark NLP, it is possible to train deep learning models that extract entities from text with very high accuracy.
Named Entity Recognition (NER) is a Natural Language Processing (NLP) technique used to identify and extract named entities from text. Named entities are words or phrases that refer to specific entities such as people, organizations, locations, dates, times, and other types of entities that have a specific name or title.
NER has many practical applications in various fields, such as information extraction, sentiment analysis, chatbots, question answering systems, and more. NER models are crucial in NLP that enables machines to understand and process unstructured text data more efficiently and accurately. They have many practical applications in various fields and can help in automating tasks that would otherwise require human effort.
NER involves analyzing text to identify and classify these named entities into predefined categories. This can be done using various techniques, such as rule-based approaches, machine learning algorithms, or deep learning models. Although there are other alternatives, deep learning models are very successful in NER tasks.
There are more than 1,700 NER models in the John Snow Labs Models Hub, but it is possible to train your own deep learning model by using Spark NLP. The purpose of model training is to teach a model to make accurate predictions on new, unseen data by learning from labeled annotated data. The training process involves feeding the model with labeled examples and adjusting its parameters to minimize the difference between its predicted outputs and the true outputs in the training data. The trained model can then be used to make predictions on new, unseen data.
In other words, model training process involves providing the NerDLApproach (Spark NLP annotator for NER model based on Neural Networks) with a set of annotated data, called the training set, that includes text documents along with labels for the named entities present in the text. The training set is typically created by human annotators who label the named entities in the text with predefined categories.
In this post, we will discuss three concepts; namely, CoNLL File Preparation, TFNerDLGraphBuilder and NerDLApproach in order to understand the fundamentals of NER model training in Spark NLP.
CoNLL (Conference on Computational Natural Language Learning) is a standard format used for annotating and sharing annotated language data. CoNLL files are commonly used in named entity recognition.
TFNerDLGraphBuilderis a Spark NLP annotator that is used to build the TF graph for training and inference of a custom NER model based on the Deep Learning architecture.
NerDLApproach in Spark NLP is a powerful annotator for building and training NER models using deep learning techniques. It supports different embedding strategies and hyperparameters, and is highly customizable to meet the specific needs of different NER tasks.
In this post, you will learn how to use certain Spark NLP annotators to train deep learning models for the named entity recognition task.
Let us start with a short Spark NLP introduction and then discuss the details of NER model training with some solid results.
Introduction to Spark NLP
Spark NLP is an open-source library maintained by John Snow Labs. It is built on top of Apache Spark and Spark ML and provides simple, performant & accurate NLP annotations for machine learning pipelines that can scale easily in a distributed environment.
Since its first release in July 2017, Spark NLP has grown in a full NLP tool, providing:
- A single unified solution for all your NLP needs (for Medicine, Banking and Finance, Legal)
- Transfer learning and implementing the latest and greatest SOTA algorithms and models in NLP research
- The most widely used NLP library in industry (5 years in a row)
- The most scalable, accurate and fastest library in NLP history
Spark NLP comes with 17,800+ pretrained pipelines and models in more than 250+ languages. It supports most of the NLP tasks and provides modules that can be used seamlessly in a cluster.
Spark NLP processes the data using Pipelines, structure that contains all the steps to be run on the input data:
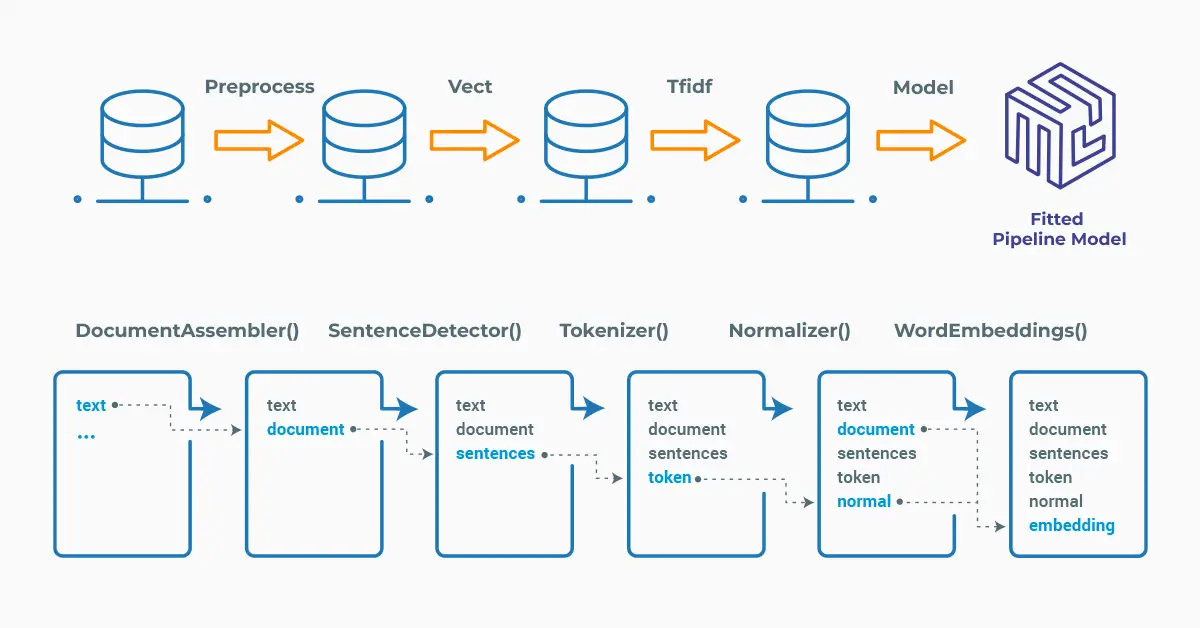
Spark NLP pipelines
Each step contains an annotator that performs a specific task such as tokenization, normalization, and dependency parsing. Each annotator has input(s) annotation(s) and outputs new annotation.
An annotator in Spark NLP is a component that performs a specific NLP task on a text document and adds annotations to it. An annotator takes an input text document and produces an output document with additional metadata, which can be used for further processing or analysis. For example, a named entity recognizer annotator might identify and tag entities such as people, organizations, and locations in a text document, while a sentiment analysis annotator might classify the sentiment of the text as positive, negative, or neutral.
Setup
To install Spark NLP in Python, simply use your favorite package manager (conda, pip, etc.). For example:
pip install spark-nlp
pip install pyspark
For other installation options for different environments and machines, please check the official documentation.
Then, simply import the library and start a Spark session:
import sparknlp

# Start Spark Session
spark = sparknlp.start()
CoNLL File Preparation
CoNLL (Conference on Natural Language Learning) is a format for representing annotated data in NLP.
The CoNLL format consists of columns, with each row representing a token and its associated features. To prepare data in the CoNLL format, the raw text is first annotated with the relevant labels (e.g., named entities or part-of-speech tags). This annotated data is then converted to the CoNLL format by representing each token and its associated features as a separate row in the CoNLL file. The resulting CoNLL file can then be used to train and evaluate machine learning models for the relevant NLP task.
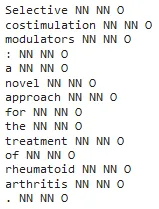
Here is a sample sentence:

CoNLL representation of the sentence:
We will use train and test datasets from the John Snow Labs Github, so first let us get their links:
!wget -q https://raw.githubusercontent.com/JohnSnowLabs/spark-nlp/master/src/test/resources/conll2003/eng.train
!wget -q https://raw.githubusercontent.com/JohnSnowLabs/spark-nlp/master/src/test/resources/conll2003/eng.testa
Now, import the first 5,000 texts of the training dataset as CoNLL file:
from sparknlp.training import CoNLL

training_data = CoNLL().readDataset(spark, './eng.train').limit(5000)

# Observe the first 3 rows of the Dataframe
training_data.show(3)

Let’s explode the training data to understand the number of all the entities in IOB format (short for inside, outside, beginning):
import pyspark.sql.functions as F

training_data.select(F.explode(F.arrays_zip(training_data.token.result,
                                            training_data.label.result)).alias("cols")) \
             .select(F.expr("cols['0']").alias("token"),
                     F.expr("cols['1']").alias("ground_truth")).groupBy('ground_truth').count().orderBy('count', ascending=False).show(100,truncate=False)
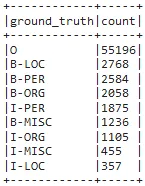
Now that we have the training dataframe, we can get to the next stage, namely graph generation.
There is a detailed notebook in the John Snow Labs Github repo about CoNLL preparation. Please check the notebook to understand the details of the process.
TFNerDLGraphBuilder
Graphs are data structures that contain a set of TensorFlow (TF) operation objects, which represent units of computation and TF tensor objects, which represent the units of data that flow between operations. They are defined in a TF Graph context. Since these graphs are data structures, they can be saved, run, and restored all without the original Python code. Graphs are extremely useful and let the TF run fast, run in parallel, and run efficiently on multiple devices.
TFNerDLGraphBuilder is a Spark NLP annotator that is used to build the TF graph for training and inference of a custom NER model based on the Deep Learning architecture. It constructs the graph using TF APIs to define the model’s layers, inputs, and outputs. It also defines the optimization algorithm, loss function, and evaluation metrics to use during training. The resulting graph can be used to train a custom NER model on a large corpus of text data and then use it to extract named entities from new text.
First, we need to install Tensor Flow and Tensor Flow addons:
pip install -q tensorflow==2.7.0
pip install -q tensorflow-addons
Then create directories for log and graph files:
!mkdir ner_logs
!mkdir ner_graphs

graph_folder = "./ner_graphs"
Finally, define the TFNerDLGraphBuilder annotator with the parameters.
from sparknlp.annotator import TFNerDLGraphBuilder

graph_builder = TFNerDLGraphBuilder()\
              .setInputCols(["sentence", "token", "embeddings"]) \
              .setLabelColumn("label")\
              .setGraphFile("auto")\
              .setGraphFolder(graph_folder)\
              .setHiddenUnitsNumber(20)
The graph will be stored in the defined folder and loaded by the NerDLApproach annotator.
NerDLApproach
NerDLApproach is an annotator within Spark NLP that implements a deep learning approach for NER model training. NerDLApproach allows users to train custom NER models on large text corpora, using pre-trained word embeddings, character embeddings, and contextual embeddings, such as BERT (Bidirectional Encoder Representations from Transformers) or ELMo (Embeddings from Language Models).
NerDLApproach annotator expects DOCUMENT, TOKEN and WORD_EMBEDDINGS as input, and then will provide NAMED_ENTITY as output. Thus, the pipeline will require the previous steps to generate those annotations that will be used as input to our annotator.
The next step is to get the word embeddings through BERT. We will use Spark NLP annotator called BertEmbeddings().
# Import the required modules and classes
from sparknlp.base import DocumentAssembler, Pipeline
from sparknlp.annotator import (
    Tokenizer,
    SentenceDetector,
    BertEmbeddings
)

# Step 1: Transforms raw texts to `document` annotation
documentAssembler = DocumentAssembler()\
    .setInputCol("text")\
    .setOutputCol("document")

# Step 2: Getting the sentences
sentence = SentenceDetector() \
    .setInputCols(["document"]) \
    .setOutputCol("sentence")

# Step 3: Tokenization
tokenizer = Tokenizer() \
    .setInputCols(["sentence"]) \
    .setOutputCol("token")

# Step 4: Bert Embeddings
embeddings = BertEmbeddings.pretrained().\
    setInputCols(["sentence", 'token']).\
    setOutputCol("embeddings")
We already created the graph by using TFNerDLGraphBuilder, and saved in the “graph_folder”, next step will be running the NerDLApproach annotator, the main module that is responsible for training the NER model.
from sparknlp.annotator import NerDLApproach

# Model training
nerTagger = NerDLApproach()\
              .setInputCols(["sentence", "token", "embeddings"])\
              .setLabelColumn("label")\
              .setOutputCol("ner")\
              .setMaxEpochs(7)\
              .setLr(0.003)\
              .setBatchSize(32)\
              .setRandomSeed(0)\
              .setVerbose(1)\
              .setValidationSplit(0.2)\
              .setEvaluationLogExtended(True) \
              .setEnableOutputLogs(True)\
              .setIncludeConfidence(True)\
              .setGraphFolder(graph_folder)\
              .setOutputLogsPath('ner_logs')

# Define the pipeline
ner_pipeline = Pipeline(stages=[embeddings,
                                graph_builder,
                                nerTagger])
Next step will be fitting the training dataset to train the model:
ner_model = ner_pipeline.fit(training_data)
Here are the metrics from the first epoch:
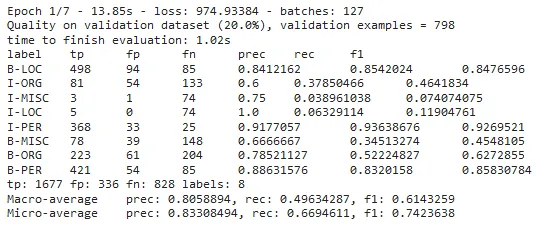
And the last epoch:
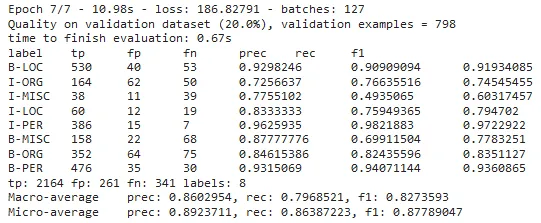
By checking the metrics, you can observe the improvement in the trained model’s accuracy. NerDLApproach has many parameters and by fine-tuning, it is possible to achieve very high accuracy values. Please check this notebook for different options in NER DL training.
Getting Predictions from the Trained Model
Now that we have trained the model, we can test its efficiency on the test dataset. First, convert the CoNLL file to Spark data frame:
test_data = CoNLL().readDataset(spark, './eng.testa').limit(1000)
Let’s get predictions by transforming the test dataframe:
predictions = ner_model.transform(test_data)
Now, we will explode the results to get a nice dataframe of the tokens, ground truths and the labels predicted by the model we just trained.
predictions.select(F.explode(F.arrays_zip(predictions.token.result,
                                          predictions.label.result,
                                          predictions.ner.result)).alias("cols")) \
            .select(F.expr("cols['0']").alias("token"),
                    F.expr("cols['1']").alias("ground_truth"),
                    F.expr("cols['2']").alias("prediction")).show(30, truncate=False)
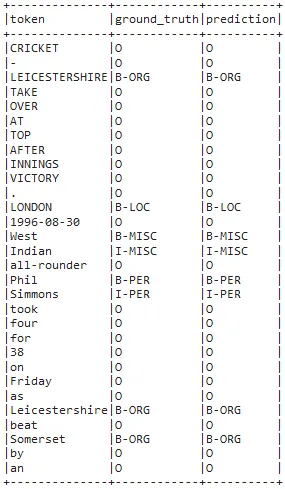
You can see that the model was very successful in predicting the named entities.
It is also possible to save the model and then load back by using the NerDLModel annotator in a pipeline.
Please check the post about Python Named Entity Recognition (NER), which gives details about the NerDLModel annotator.
Highlight Entities
The ability to quickly visualize the entities generated using Spark NLP is a very useful feature for speeding up the development process as well as for understanding the obtained results. Spark NLP Display is an open python NLP library for visualizing the annotations generated with Spark NLP.
The NerVisualizer annotator highlights the extracted named entities and also displays their labels as decorations on top of the analyzed text. The colors assigned to the predicted labels can be configured to fit the particular needs of the application.
The figure below shows the visualization of the named entities recognized from a sample text. The entities are extracted, labelled (as PERSON, DATE, ORG, LOC etc) and displayed on the original text. Please check the post named “Visualizing Named Entities with Spark NLP”, which gives details about NerVisualizer.
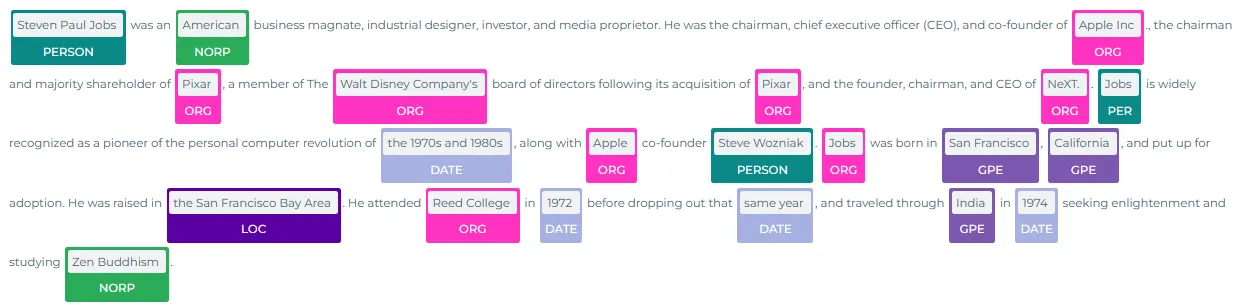
Extracted named entities, displayed by the Ner Visualizer
For additional information, please consult the following references.
- Documentation : CoNLL Datasets, TF Graphs, NerDLApproach.
- Python Doc : CoNLL Datasets, TFNerDLGraphBuilder, NerDLApproach.
- Scala Doc : CoNLL Datasets, NerDLApproach.
- For extended examples of usage, see the notebooks for CoNLL File Preparation, Graph Generation and NerDL Training.
Conclusion
In this article, we walked you through training an NER model by BERT embeddings.
Named entity recognition is a crucial task in NLP that involves identifying and extracting entities such as people, places, organizations, dates, and other types of named entities from unstructured text data. A well-trained NER model helps to extract useful information from unstructured text data with high accuracy.
NER deep learning model training in Spark NLP provides an efficient and scalable way to build accurate NER models for various natural language processing tasks.
Spark NLP also provides a variety of pre-trained models, including deep learning models like BERT, RoBERTa, and DistilBERT, which can be used to classify entities in the text. These models can be fine-tuned on specific datasets to improve the accuracy of the NER classification.
Read also related articles on the topic:
Named Entity Recognition in NLP